Transferring photos from Android to Chromebook is easy these days. Technology has made it simple to move images between devices automatically. Whether you want to share, edit, store, or view photos on a bigger screen, there are straightforward ways to do it.
Nowadays, most people buy Chromebooks because they can get a notebook with very good performance and a lightweight operating system at a low price.
In this article, I will guide you through transferring photos from Android to Chromebook using a USB cable and Nearby Share. Additionally, I’ll explore alternative methods, such as utilizing Google Drive and the Phone Hub feature in Chromebook Settings.
Table of Contents
Ways to Transfer Photos from Android to Chromebook
Method 1: Using Nearby Share
Step 1: Open your Gallery app on your Android. Select the Photos that you want to transfer and then tap on Send.

Step 2: You will be prompted to select the transferring medium application. Tap on Nearby Share, and it will start looking for nearby devices.

Step 3: Now, on your Chromebook, tap on time at the bottom right corner, then tap on the Nearby Share option.

If your Nearby Share option is not visible there, go to Settings. Tap on the Connected devices from the left pane and turn on the toggle next to Nearby Share. Now, it will be visible there; tap on it, and it will be visible to nearby devices.

Step 4: You will see the Chromebook ready to connect to your Android. Tap on it.

Step 5: Next, you will get a request to accept the files on your Chromebook. Tap on Accept, and the photos will transferred to the Chromebook. You can see the pictures from the download folder on your Chromebook.

Transferring photos from Chromebook to Android is also simple
- Step 1: Open your Files app and select the photos you want to transfer to your Android. Tap on the Share icon. You will see the Nearby Share option. Tap on it and choose your Android device to make the transfer. Make sure your Nearby Share sharing option on Android is visible to everyone.
- Step 2: You will receive a pop-up to Accept files on your Android. Tap on Accept, and the photos will be transferred to your Android.

Method 2: Using a USB Cable
Step 1: Connect the Android to your Chromebook using a USB cable.
Step 2: A pop-up will appear on your Android. Tap on File transfer.

Step 3: Open the Files app on your Chromebook. From the left pane, tap on your Android device.

Step 4: Now, locate the photos you want to transfer to your Chromebook. Select the photos and type Ctrl+C on your keyboard to copy the files.

Step 5: Go to the system folder on your Chromebook and type Ctrl+V to paste the files. That’s it; the photos are transferred from your Android device to your Chromebook.

The process of transferring photos from Chromebook to Android is also similar. Simply copy photos from the Chromebook system. Select your Android device from the left pane of the Files app on your Chromebook and paste them to your specific folder on your Android.
Method 3: Using Google Drive
Step 1: Install Google Drive on your Android and open the app. Next, log in to your Google Drive account.

Step 2: Tap on Files at the bottom right corner. Next, tap on the + New button.

Step 3: Select Upload from the options.
Step 4: Select the photos that you want to share. Next, tap on SELECT. All the photos will be uploaded to your Google Drive.

Step 5: Now, open the Chrome app on your Chromebook. Search for Google Drive and log in using the same Google account that you have used to upload your photos to Google Drive.
Step 6: Tap on My Drive from the left pane. Go to the folder where you uploaded the photos and Select the photos you want to transfer. Tap on three dots as shown in the image and then select Download. The photos will be downloaded to your Chromebook’s Downloads folder.

Method 4: From Chromebook Settings using Phone hub
Step 1: Click on time at the bottom right corner of your screen and then tap on the Settings icon.
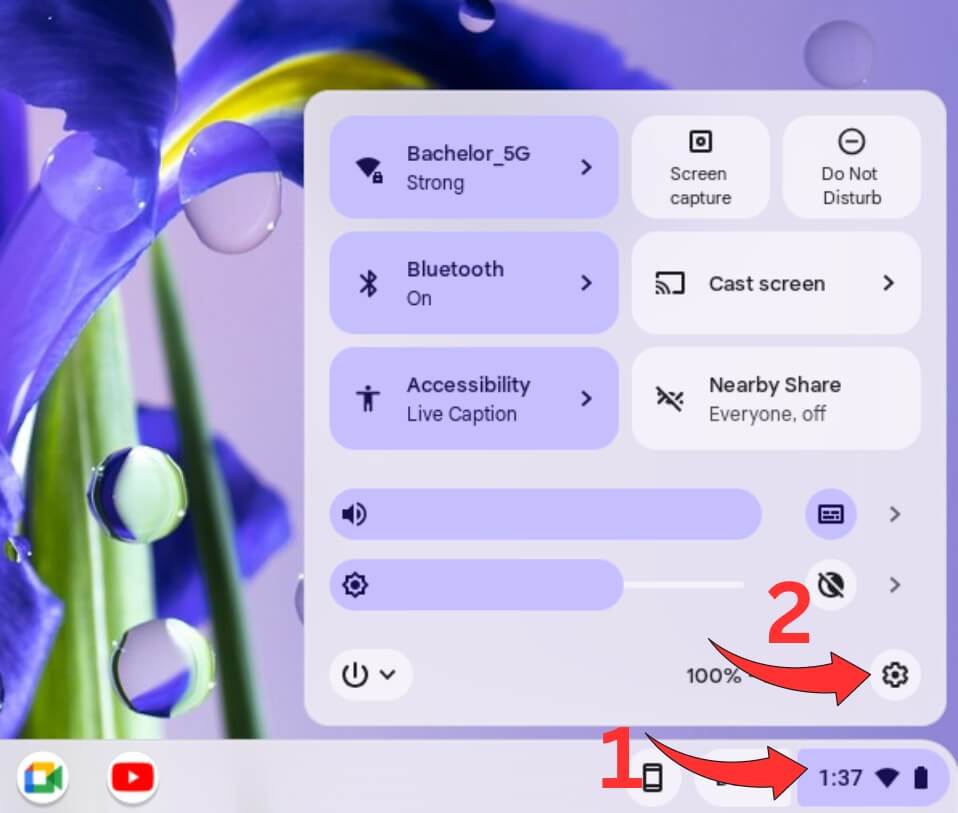
Step 2: From the left pane, click on Connected devices and tap Set up next to Android phone.

Step 3: Your Android device associated with your Google account will be automatically detected. Tap on Accept & continue to connect your Chromebook to your phone.

Step 4: Enter your Google account password and then tap on Done.
Step 5: Next tap on your device name and enable the toggle next to Recent photos.

Step 6: On your Android, open your Settings app. Scroll down and tap on Google.

Step 7: Select Devices and Sharing and then tap on Chromebook on your next screen.

Step 8: Turn on the toggle next to Photos and Media.

Step 9: Now, on your Chromebook, tap the mobile icon at the bottom of your screen. You can access the latest photos on your Android phone. Simply click on the photo to download it automatically to your Chromebook Download folder.

Important: This method is good but the only disadvantage is that it only shows you recent 4 photos of your Android to download.
Also Learn
FAQs
Can I transfer photos from Android to Chromebook without an internet connection?
Yes, you can transfer photos from Android to Chromebook without the internet. Transfer via USB and Nearby Sharing method, which works without the internet. However, if you want to use the Google Drive or Phone Hub method, you can only transfer with an internet connection.
If my Chromebook can’t recognize my Android, what to do?
Check if your Android and Chromebook use the same Google account and connect to the same Wi-Fi for photo transfer. If it’s not working, restart both devices and try connecting again.
Is it safe to transfer photos using any third-party apps?
Many third-party apps may need to prioritize security. When you transfer photos or any file through such apps, they may gain access to your media and potentially misuse it, causing inconvenience. For this reason, we do not recommend using any third-party apps.
If a premium app-making company introduces an app capable of transferring photos from an Android device to a Chromebook, it could work effectively.
Final Words
Nowadays, moving pictures from your Android phone to your Chromebook is easy. You can choose the method you like most, and you will find that transferring photos is simple and does not cause any hassle.
If the transfer doesn’t occur after applying this method, restart both devices and try again.
Enjoy how easy it is to use modern tools – they make every part of the process easy and quick. So, move your photos to any Chromebook without any worries!
