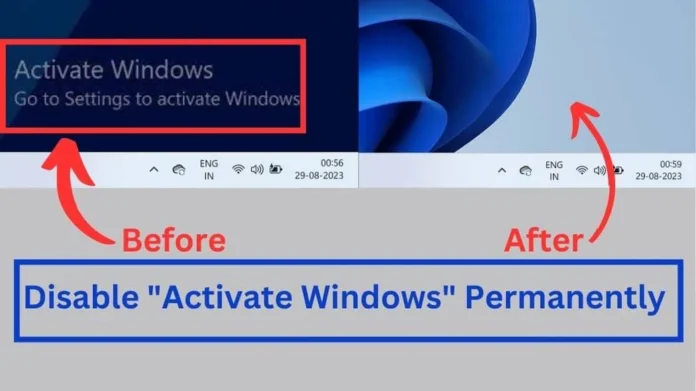
Are you annoyed by the “Activate Windows” watermark that stays on your Laptop/Computer screen?
Don’t worry
We are here to provide you with the best ways to turn it off.
In this guide, we’ll show you different ways to get rid of that annoying mark and get a clean computer screen.
Whether you prefer to use a product key, script, external tool, or a Windows alternative, we’ve provided every method to solve it.
Now, you can easily remove watermarks from Windows 11, 10, 8, and 7 and make your windows look clean.
Just follow our simple steps, say goodbye to the “Activate Windows, Go to Settings to activate Windows” notification, and enjoy your computer without any interruptions.
Why is the “Activate Windows” Watermark Appearing on a PC/Laptop?
If you see the “Activate Windows, Go to Settings to activate Windows” watermark on your PC, computer, or laptop screen, it means you haven’t activated the operating system with a proper license key.
When you put Windows on your device, it’s essential to activate it using a genuine license key.
Once you confirm the license, you can get to all the cool stuff from Microsoft, like updates and special features.
If you’ve removed or forgotten to activate the license after checking out the Windows trial, that’s when this notice pops up, asking you to activate it.
When you activate Windows, it’s like proving you’re allowed to use it. Then, that watermark thing won’t bother your screen anymore. You can enjoy all the good stuff and even the updates that are on the way.
Also Read:
How to Improve Laptop Battery Life?
How to Get Live Wallpaper on Windows 11?
How to Free up Space on Windows 11?
Best and Working Ways to Remove “Activate Windows” Watermark Permanently
Method 1: Using Product Key
Step 1: Click on the Start button and then go to Settings.
![How to Remove Activate Windows Watermark Permanently? [100%] 1 click-on-start-and-settings-windows-10](https://pcvenus.com/wp-content/uploads/2024/01/click-on-start-and-settings.jpg)
Step 2: Click on Update & Security from Windows Settings.
![How to Remove Activate Windows Watermark Permanently? [100%] 2 Update-and-Security-in-Windows-10](https://pcvenus.com/wp-content/uploads/2022/06/Update-and-Security-in-Windows-10.jpg)
Step 3: Click on Activation from the left pane and then click on Change product key from the right pane.
![How to Remove Activate Windows Watermark Permanently? [100%] 3 activation change product key](https://pcvenus.com/wp-content/uploads/2023/08/activation-change-product-key.jpg)
Step 4: A dialog box will appear where you have to enter the Product Key and then click on Next.
![How to Remove Activate Windows Watermark Permanently? [100%] 4 Enter product key windows activation](https://pcvenus.com/wp-content/uploads/2023/08/Enter-product-key-windows-activation.jpg)
Step 5: After verification of the product key, you will get an option to Activate. Just click on Activate.
![How to Remove Activate Windows Watermark Permanently? [100%] 5 activate-windows-activate-tap](https://pcvenus.com/wp-content/uploads/2023/08/activate-windows-activate-tap.jpg)
Then, you will get a message that your Windows is activated. Click on Close, and the Activate Windows watermark will also be removed.
![How to Remove Activate Windows Watermark Permanently? [100%] 6 windows-activated-close](https://pcvenus.com/wp-content/uploads/2023/08/windows-activated-close.jpg)
Method 2: Using Script
Step 1: Click on the Windows key. Type notepad into the search box and press Enter.
![How to Remove Activate Windows Watermark Permanently? [100%] 7 notepad search](https://pcvenus.com/wp-content/uploads/2023/08/notepad-search.jpg)
Step 2: Write the text on your notepad as written below or shown in the image.
@echo off

taskkill /F /IM explorer.exe

explorer.exe

exit![How to Remove Activate Windows Watermark Permanently? [100%] 8 notepad script to remove Activate windows watermark](https://pcvenus.com/wp-content/uploads/2023/08/notepad-script-to-remove-Activate-windows-watermark.jpg)
Step 3: Save the file as Active.bat in your desired location by pressing Ctrl + S keys.
![How to Remove Activate Windows Watermark Permanently? [100%] 9 activebat save file](https://pcvenus.com/wp-content/uploads/2023/08/activebat-save-file.jpg)
Step 4: Go to the location where you have saved the file. Right-click on the file and choose Run as administrator. Next, select Yes from the pop-up menu.
![How to Remove Activate Windows Watermark Permanently? [100%] 10 run as administrator Activebat file](https://pcvenus.com/wp-content/uploads/2023/08/run-as-administrator-Activebat-file.jpg)
Step 5: Now restart your laptop or PC, and your Windows Watermark will be removed.
Method 3: Using Third-Party Tools
Download the third-party application Universal Watermark Disabler.
Step 1: Download the zip file on your system. Locate the zip file and right-click on it. Next, click on Extract Here or Extract to your desired location.
![How to Remove Activate Windows Watermark Permanently? [100%] 11 Extract here](https://pcvenus.com/wp-content/uploads/2023/08/Extract-here.jpg)
Step 2: After extraction is complete, double-click on the exe file and click on Yes from the pop-up menu.
![How to Remove Activate Windows Watermark Permanently? [100%] 12 exe file double click install](https://pcvenus.com/wp-content/uploads/2023/08/exe-file-double-click-install.jpg)
Step 3: An installer window will open. Click on Install.
![How to Remove Activate Windows Watermark Permanently? [100%] 13 Install](https://pcvenus.com/wp-content/uploads/2023/08/Install-exe.jpg)
Step 4: Next, click on Yes from the warning pop-up message and then press OK. Finally, restart your system, and the Activate Windows watermark will be removed.
![How to Remove Activate Windows Watermark Permanently? [100%] 14 warning yes](https://pcvenus.com/wp-content/uploads/2023/08/warning-yes.jpg)
Method 4: Using Windows PowerShell
Step 1: Press the Windows key on your keyboard. This action will prompt the Search box to appear. Within this Search box, type Windows PowerShell.
Step 2: Now, right-click on the Windows PowerShell app icon and click on Run as administrator. A pop-up window will appear. Click on Yes from the menu.
![How to Remove Activate Windows Watermark Permanently? [100%] 15 Windows-powershell-run-as-admistrator](https://pcvenus.com/wp-content/uploads/2023/08/Windows-powershell-run-as-admistrator.jpg)
Step 3: Type the command slmgr /renew in your Windows PowerShell and press Enter. You will get some pop-ups; keep on pressing OK.
![How to Remove Activate Windows Watermark Permanently? [100%] 16 command to remove Activate windows watermark](https://pcvenus.com/wp-content/uploads/2023/08/command-to-remove-Activate-windows-watermark.jpg)
Now, restart your system, and the Activate Windows watermark will be gone.
Method 5: Using Regedit
Step 1: Press the Windows + R keys on your keyboard. Type regedit into the search box and click on OK. Next, click on Yes from the pop-up menu to open Registry Editor.
![How to Remove Activate Windows Watermark Permanently? [100%] 17 regedit run](https://pcvenus.com/wp-content/uploads/2023/08/regedit-run.jpg)
Step 2: Now, enter the address HKEY_CURRENT_USER\Control Panel\Desktop into the search bar as shown in the image and then press Enter.
![How to Remove Activate Windows Watermark Permanently? [100%] 18 address in regedit](https://pcvenus.com/wp-content/uploads/2023/08/address-in-regedit.jpg)
Step 3: On the right pane, scroll down, search for Paint Desktop Version, and double-click on it.
![How to Remove Activate Windows Watermark Permanently? [100%] 19 Paint destop version](https://pcvenus.com/wp-content/uploads/2023/08/Paint-destop-version.jpg)
Step 4: A dialog box will appear. Change the value under Value data to 1.
![How to Remove Activate Windows Watermark Permanently? [100%] 20 value data paint destop version](https://pcvenus.com/wp-content/uploads/2023/08/value-data-paint-destop-version.jpg)
Now, restart your system, and your Activate Windows watermark will be removed.
Method 6: Using Ease of Access
Step 1: Click on the Windows key. Type Control Panel into the search box and press Enter.
![How to Remove Activate Windows Watermark Permanently? [100%] 21 control panel search](https://pcvenus.com/wp-content/uploads/2023/08/control-panel-search.jpg)
Step 2: Under Ease of Access, click on Optimize visual display.
![How to Remove Activate Windows Watermark Permanently? [100%] 22 optimize visual display](https://pcvenus.com/wp-content/uploads/2023/08/optimize-visual-display-1024x571.jpg)
Step 3: Scroll down, and inside the “Make things on the screen easier to see” section, click the checkbox for Remove background images (where available).
Step 4: Next click on Apply and press OK.
Your Activate Windows watermark will be removed.
![How to Remove Activate Windows Watermark Permanently? [100%] 23 Remove background images from ease of access](https://pcvenus.com/wp-content/uploads/2023/08/Remove-background-images-from-ease-of-access.jpg)
FAQs
Is it safe to get rid of the “Activate Windows” watermark?
Yes, it’s usually safe to remove the “Activate Windows” watermark using proper methods. But be cautious with third-party tools as they might not be secure and could harm your computer. Always keep in mind that all your access and data may be leaked if you install an app from a harmful third party and try it on your PC.
Is It Legal to Remove the Watermark Without Activation?
Using methods to remove the watermark without proper activation may violate Microsoft’s terms of use. It’s recommended to activate Windows legally to ensure compliance.
What are the risks of removing the “Activate Windows” watermark?
Well, some things should be kept in mind. If you use a third-party tool to erase it, your system might get messed up.
Also, if your Windows is not legitimate and you remove the watermark, you may miss out on important updates that keep your system secure.
Before taking any action, weigh the risks and rewards. If you’re not sure how to do this safely, it’s wise to ask someone knowledgeable, such as a techie.
Final Words
Say goodbye to distractions and watermarks! Now you know different ways to remove the “Activate Windows” mark from your screen.
Whether you went for the traditional method with a product key, tried out scripts, used third-party tools, or relied on Windows features, you’re all set to enjoy a clean and activated Windows.
Pick the method that feels right for you and your tech skills, and enjoy a transparent screen.
Activate your Windows and get ready for a smoother and more professional computer experience.
Note: We recommend that you always remove the watermark by purchasing a product license with an activation key from the official site.


