It is important to stay safe online in today’s digital age, where one link click, like bloatware, can result in the loss of valuable data. Privacy and identity protection are essential to maintaining a secure online presence.
Creating a Gmail alias has many benefits for organizing your inbox and enhancing your email experience. This article guides you through the step-by-step process of creating a Gmail alias to help you maintain a secure and efficient email account.
What is an alternate email address (email alias)?
A Gmail alias, or alternate email address, is essentially a secondary email associated with your primary Gmail account. This is an additional or alternative address that forwards emails to your main inbox. This feature allows you to divide and manage your emails effectively, just like a mailbox has different sections. Each alias can serve a specific purpose, such as work, personal communications, or online shopping, while all emails are conveniently directed to a single primary inbox.
Things to consider when Creating a Gmail Alias
- All emails sent to your aliases will still arrive in your main inbox.
- Remember, using different names in Gmail has some rules. You can’t use a name that someone else is already using on another Google Account.
- Check if the name you want is available by trying to create an account with it.
- Choose a good, professional name, especially for work. Don’t use funny names.
- You can have up to 30 different names for each Gmail account. Don’t use the “+” symbol in your name.
- Make sure your new name works on the websites and apps you want.
- Don’t tell your new names to everyone, especially if it’s for important things.
Steps to Create a Gmail Alias
Step 1: Log in to Your Gmail Account:
If you don’t have a Google account, you won’t be able to create a Gmail alias. In that case, first, create a new Google account, and then proceed to create your alternative Gmail account using this new Google account.
- Open your internet browser.
- Go to the Gmail website.
- Log in with your main Gmail account details.
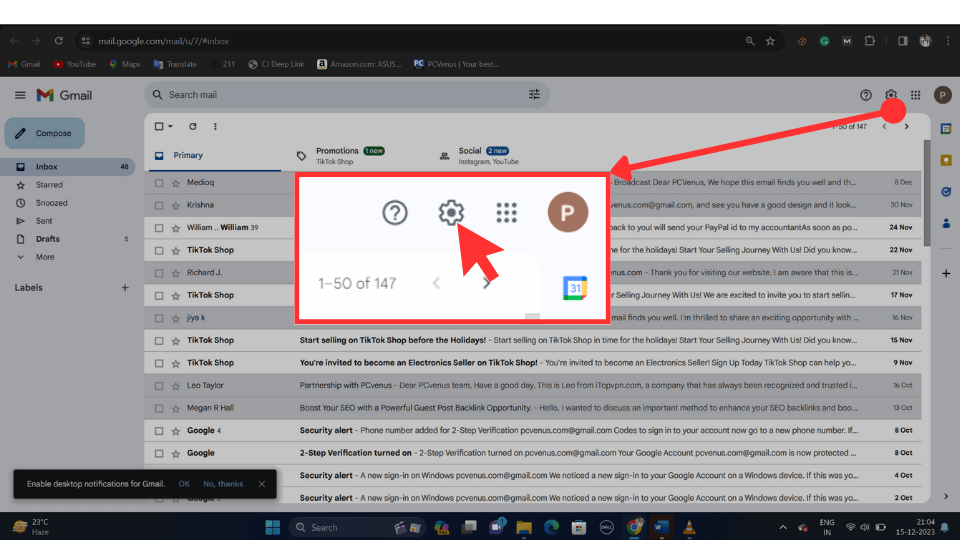
Step 2: Access Your Gmail Account Settings:
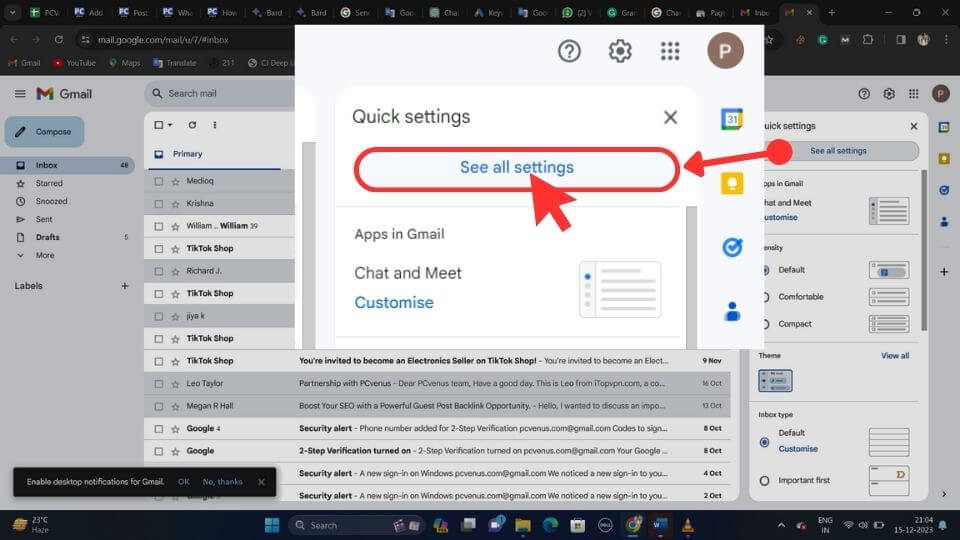
- Click the gear icon (Profile Pic) in the top-right corner of Gmail.
- Choose “See all settings” from the drop-down menu.
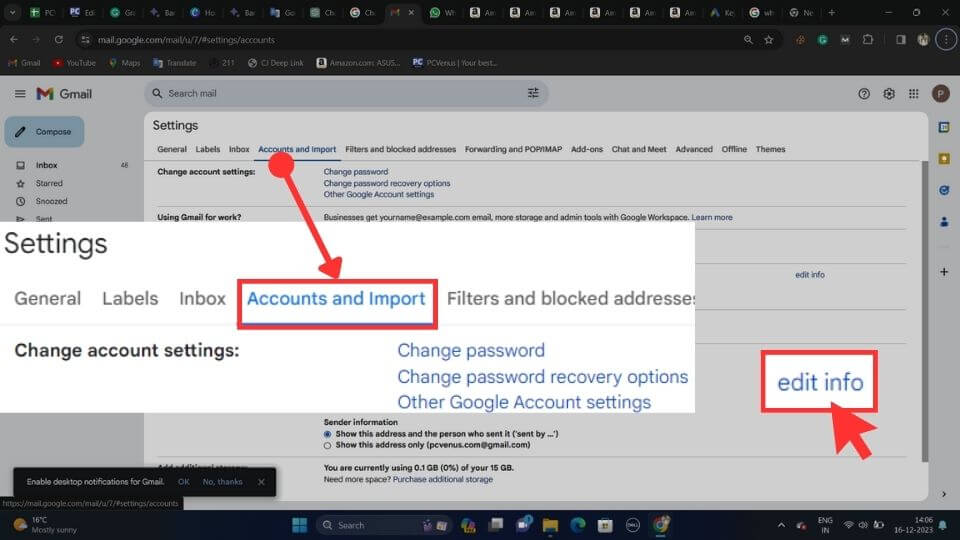
Step 3: Navigate to the “Accounts and Import” Tab:
After clicking on ‘Settings,’ go to the ‘Accounts and Import’ tab, as shown in the screenshot.
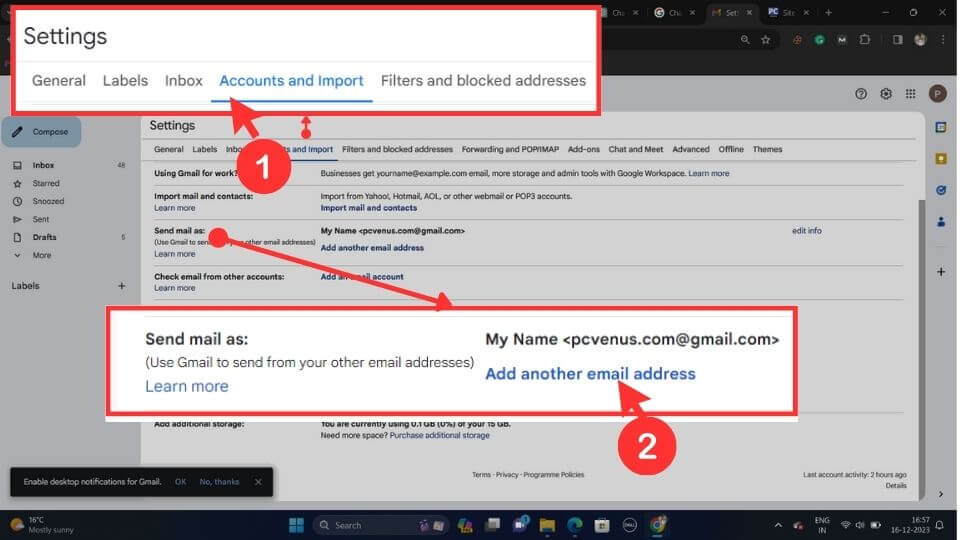
Step 4: Find the “Send Mail As” Section, and Click on “Add Another Email Address.
After clicking on ‘Accounts and Import,’ you’ll find various options below. Choose the ‘Send Email As’ option, and then you’ll see the ‘Add Another Email Address’ option. Click on it.
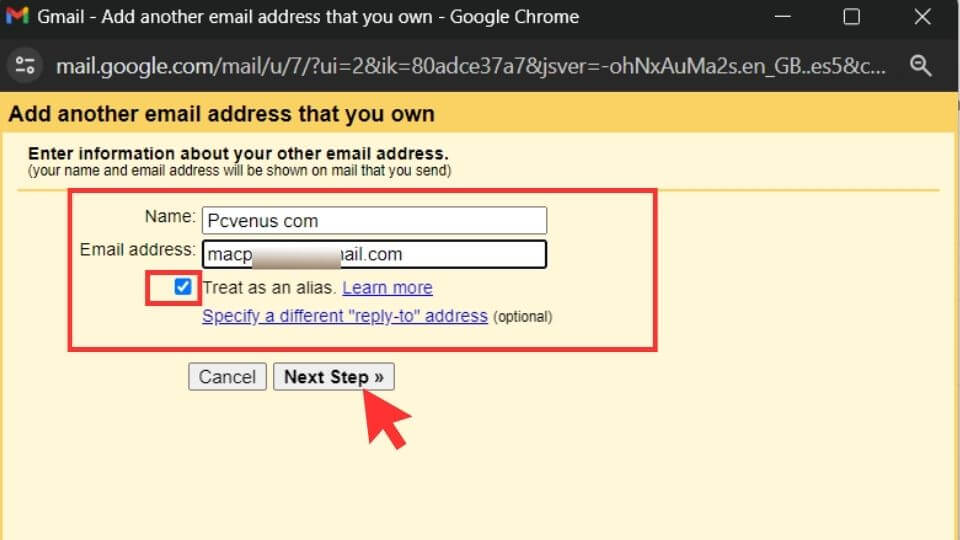
Step 5: Enter Your Alias:
A pop-up window will appear. Enter the display name and the alias email address. Make sure to check the box labeled ‘Treat as an alias, and click on “Next Step“.
Important: To create a Gmail Alias, you need your own Gmail account for verification. You cannot create a Gmail alias using someone else’s Google account name, as it may already be taken or created as a Gmail account.
Step 6: Verify Your Gmail Alias:
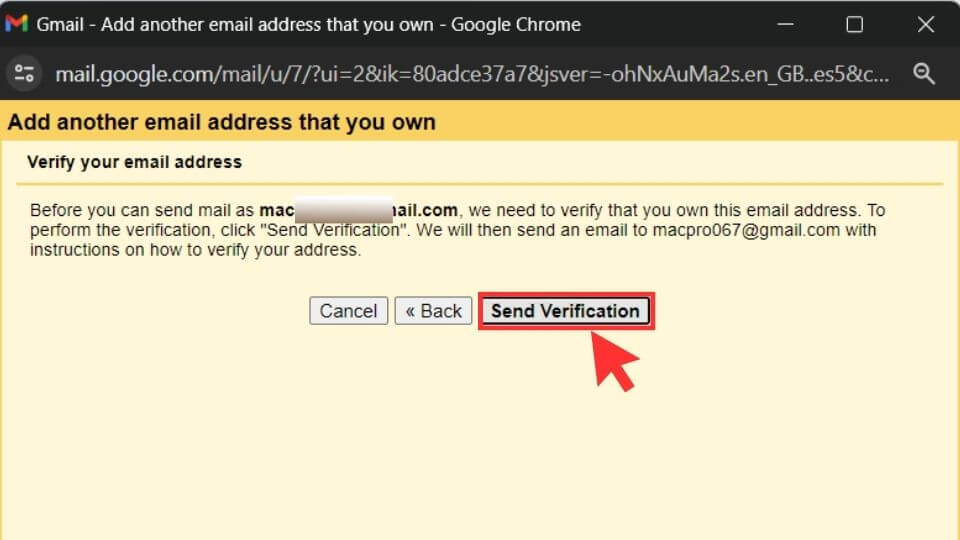
The Gmail alias you’ve just set up for Alias needs to be verified. To activate it, click on ‘Send Verification.’ A confirmation email will be sent to the Gmail address for verification.
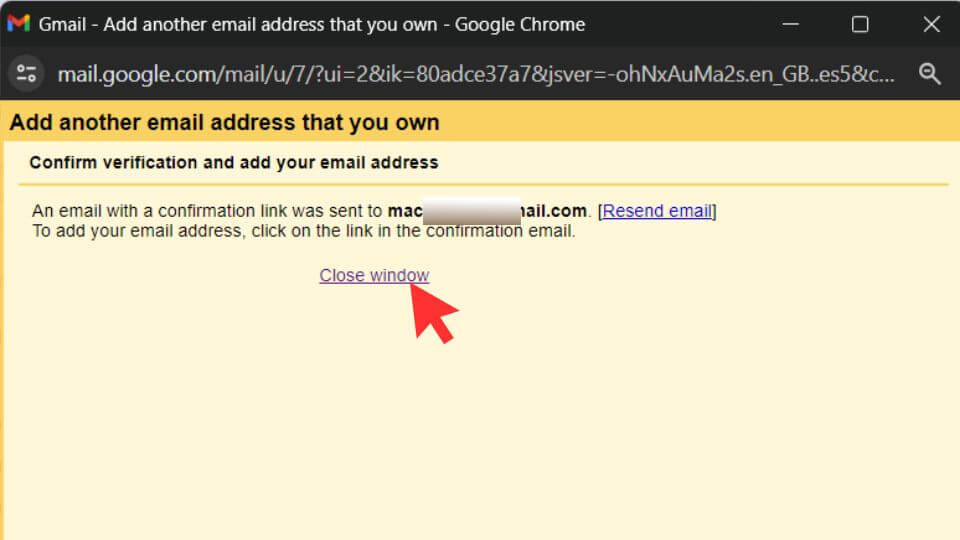
You can now close this pop-up window by clicking on ‘Close Window’; it’s no longer needed. Check your Gmail for the verification email.
Step 7: Confirmed Verification:
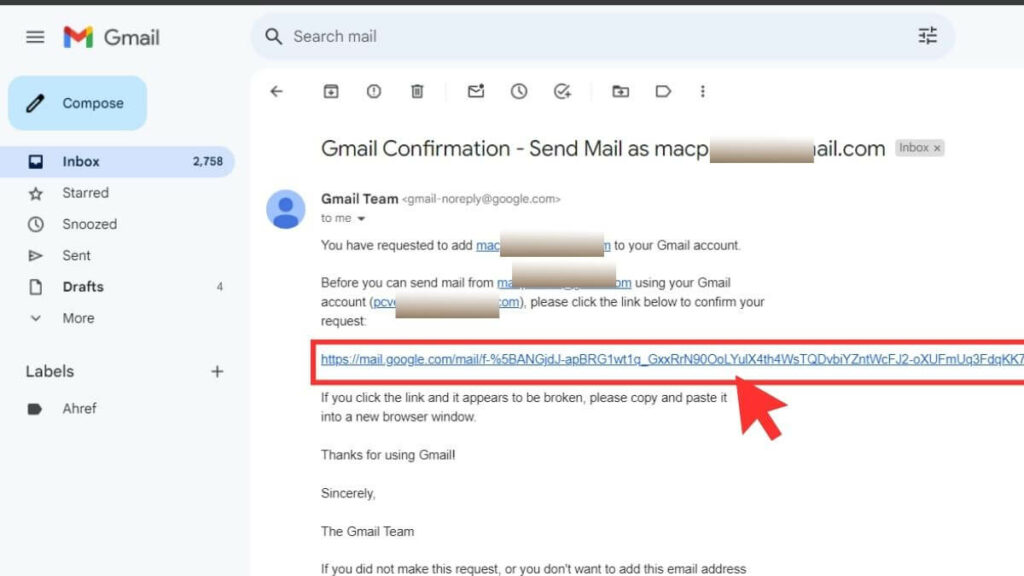
Gmail will send a verification email to the alias address. Open the email and follow the instructions to confirm.
Now, as shown in the screenshot, you’ll find a confirmation email in the Gmail account you provided earlier. Click on the link provided in the email to confirm.
After clicking the link, you’ll receive a confirmation message stating that your Gmail alias has been successfully confirmed for use.
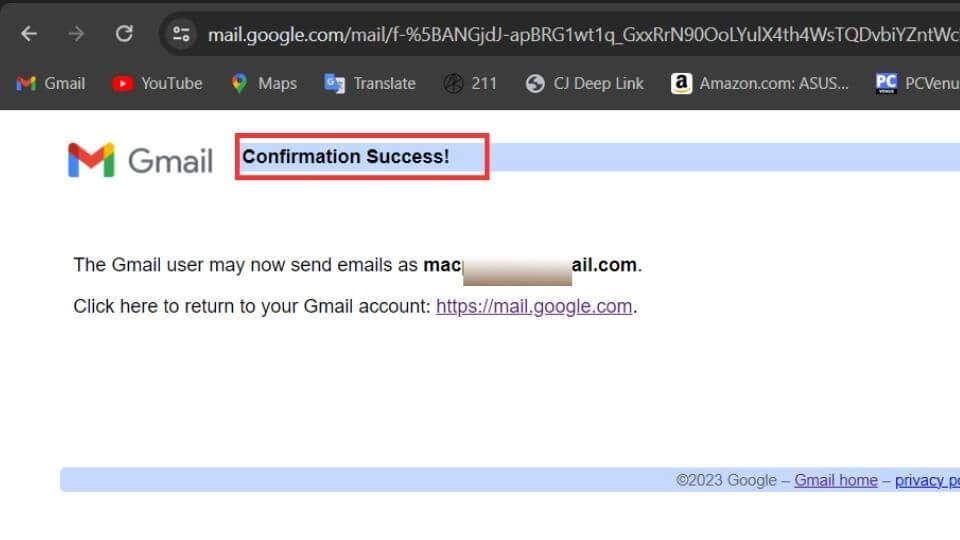
Congratulations! Your Gmail Alias has been successfully created. Enjoy using it for your intended purposes.
FAQs
Why should I use a Gmail alias?
Using different names (aliases) in Gmail is a great tool for improving your emails. An alternate email address helps keep your emails private, keeps things organized and protects you from unwanted messages. If you receive a phishing email from a specific alias, you can be sure that it is targeted and not a legitimate email sent to your main address.
Can I send emails from my alias?
Yes, you can send emails with your Gmail alias. Set a default alias for sending emails by going to Settings, selecting “Accounts and Import” and choosing the “Send mail as” tab. Reply to emails using your nickname by clicking the “Reply” button when viewing emails sent to that address.
How many Gmail aliases can I Create?
Gmail allows 30 aliases per account for flexibility, but remember, you can’t pick a name that someone else is already using for their Gmail.
You Might Also Like
Final Words
Creating an alternative email offers several benefits over a regular email account. By following the step-by-step instructions above, you can easily create a customized Gmail address.
Once your Gmail alias is set up, you gain the ability to filter out irrelevant and unwanted emails. This is especially useful for maintaining a professional image if your current Gmail account lacks it.
With Gmail aliases, you can choose certain emails to send to contacts without showing your main Gmail address. This helps keep your privacy in different situations.
If you have any questions about this post, feel free to ask.
