Are you looking to add some fun and personality to your desktop experience? With Windows 11, you can now easily enable the Desktop Stickers feature, allowing you to customize your workspace with stylish and playful stickers.
Among the various customization options introduced in the Windows 11 update, desktop stickers have emerged as a favorite among users. Exclusive to Windows 11 version 22H2, this feature offers a unique way to personalize your desktop, similar to popular messaging apps like Messenger or Telegram.
Once enabled, you can easily decorate your desktop background with stickers and resize them to suit your preferences. Are you ready to give your desktop a new look? Read our guide to learn how to activate desktop stickers on your Windows 11 system.
Table of Contents
Can I Use Stickers in Windows 11?
You can add stickers on your Windows 11 OS, just like wallpaper. Recently, the developers added a Desktop Sticker feature from the Windows 11 22H2 update. If you are looking for different methods to add these stickers to your desktop, then download the beta version of the Windows Insider program.
Microsoft released an article mentioning that they released the Windows 11 22H2 version.
You Might Also Like
Enable the Desktop Stickers by Using the Registry
Although this method may have some risks, don’t be afraid! I will provide a comprehensive guide to activate the desktop stickers feature without facing any issues. As an extra precaution, I highly recommend creating a backup for all images stored on your computer.
Follow the steps below to enable the Desktop Sticker feature through the Registry Method.
- Step 1: Press your keyboard’s ” Windows” and “R ” buttons simultaneously. This will open a “Run” box. In the box, you’ll find a text input area. Click on it, type “regedit,” and then press the “Enter” button.
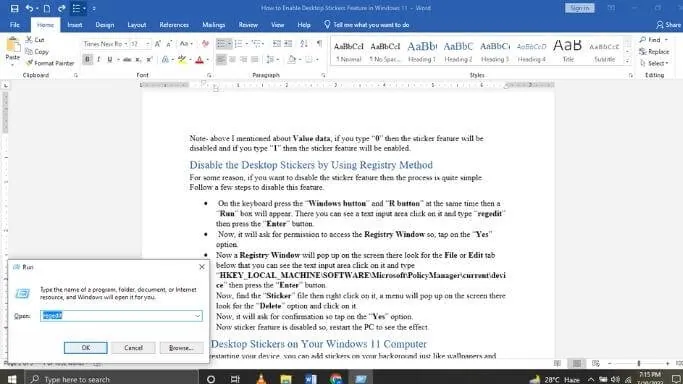
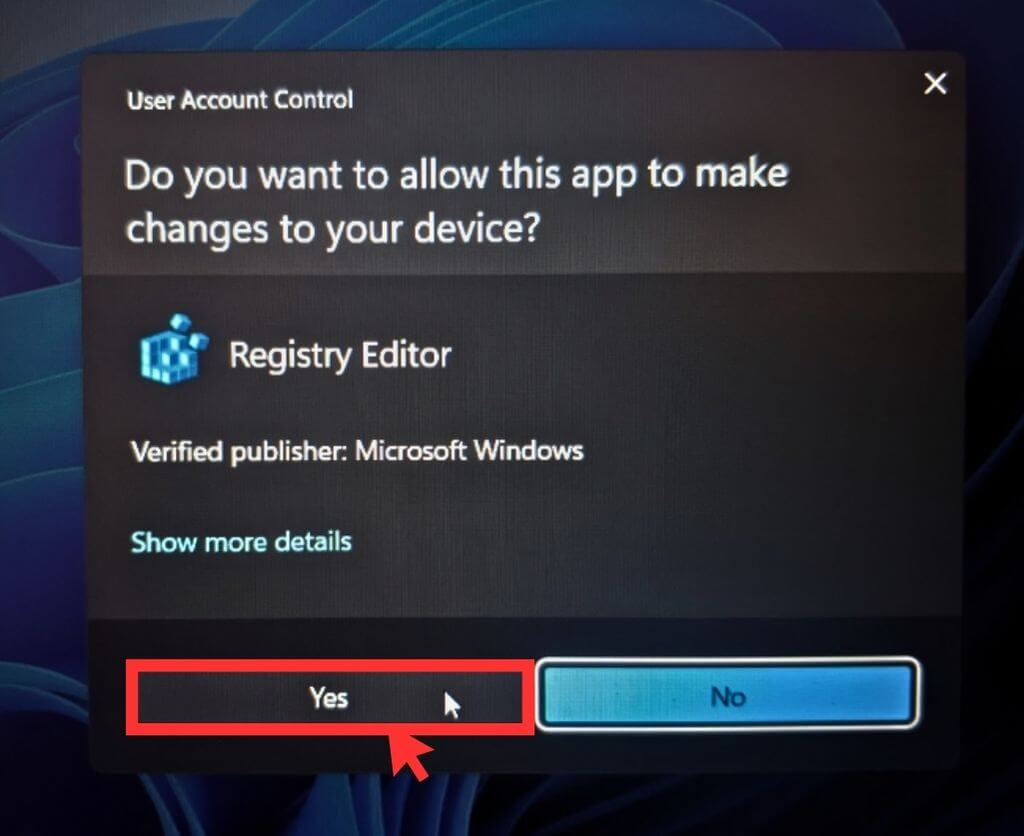
- Step 2: Now, it will ask for permission to access the Registry Window, so tap on the “Yes” option.
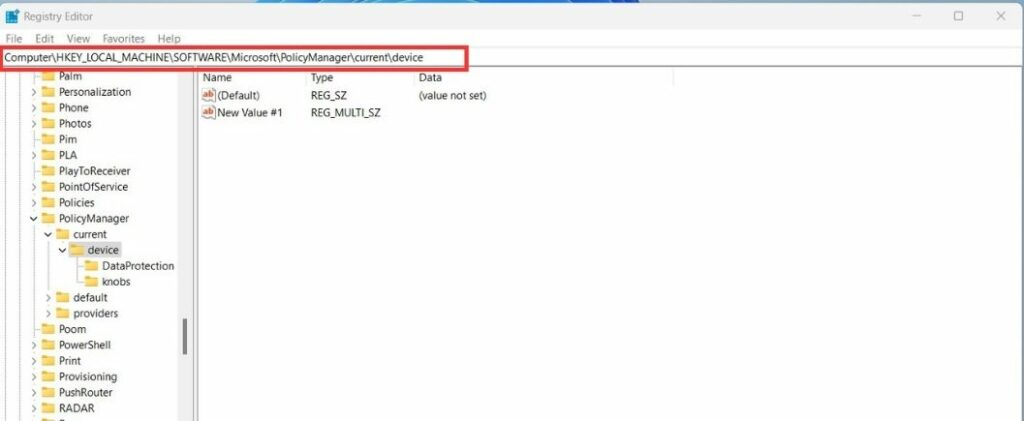
- Step 3: Now, a Registry Window will pop up on the screen; look for the File or Edit tab below that you can see the text input area; click on it and type “HKEY_LOCAL_MACHINE\SOFTWARE\Microsoft\PolicyManager\current\device” then press the “Enter” button.
- Step 4: On the left side, find the “device” file, then right-click on it; a menu will pop up on the screen; there, tap on the New > Key option to create a Registry key.
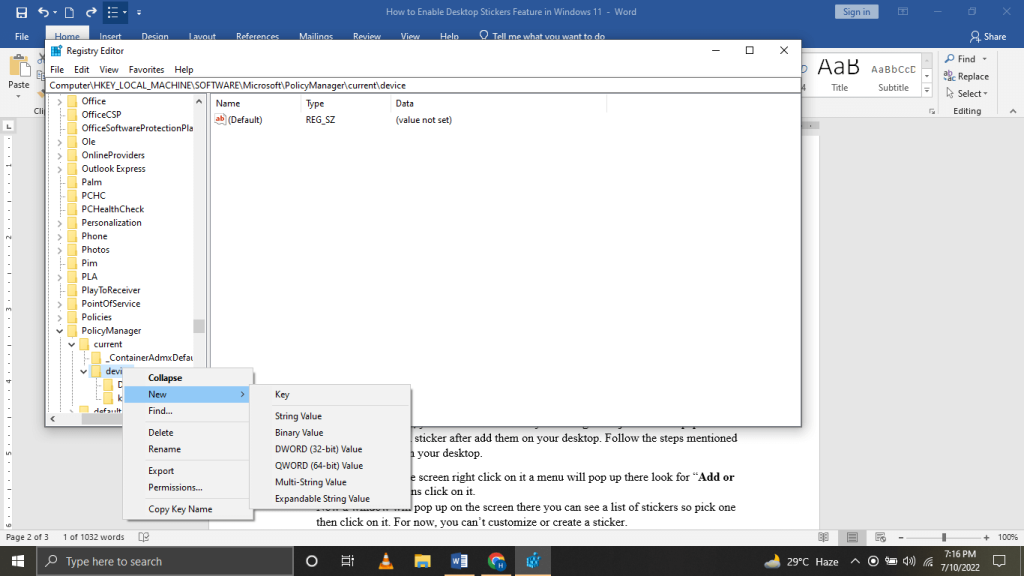
- Step 5: After that, name it “Stickers” and press the “Enter” button.
- Step 6: Now, right-click on the Sticker key you just created in the previous step, then a menu will pop up on the screen; tap on the New > DWORD (32-bit) Value option.
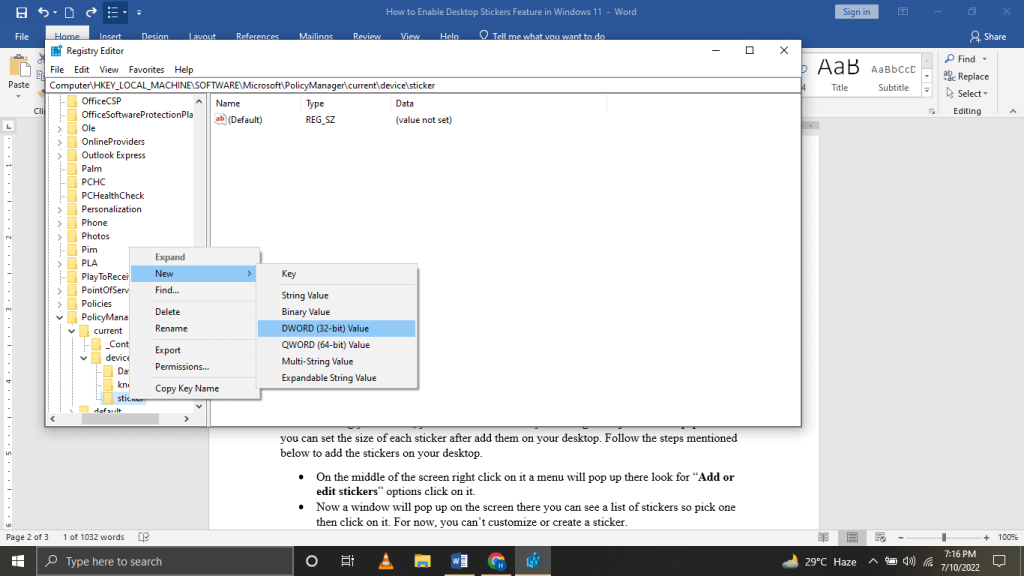
- Step 7: Now, an Edit DWORD 32-bit window will appear; there, you can see a Value data below that type “1”, then tap on the “OK” option.
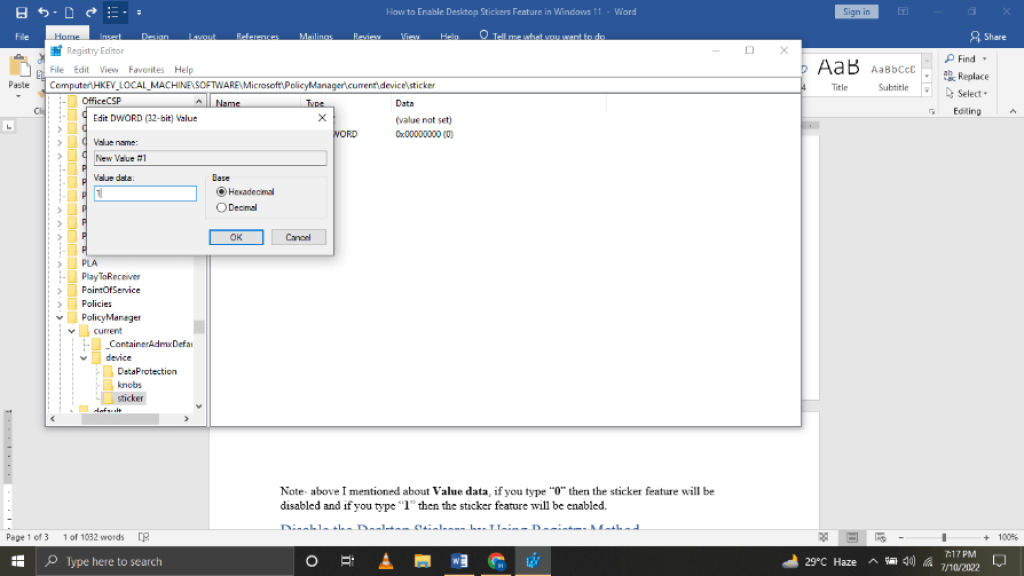
- Step 8: Now close all the windows, then restart your Windows 11 computer.
Note- above, and I mentioned Value data; if you type “0,” the sticker feature will be disabled, and if you type “1,” the sticker feature will be enabled.
Add Desktop Stickers on Your Windows 11 Computer
After restarting your device, you can add stickers to your background just like wallpapers, and you can set the size of each sticker after adding them to your desktop. Follow the steps mentioned below to add the stickers to your desktop.
- Step 1: On the middle of the screen right, click on it; a menu will pop up there; look for “Add or edit stickers” options; click on it.
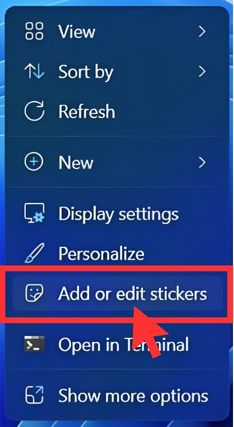
- Step 2: Now a window will pop up on the screen; you can see a list of stickers, so pick one, then click on it. For now, you can’t customize or create a sticker.
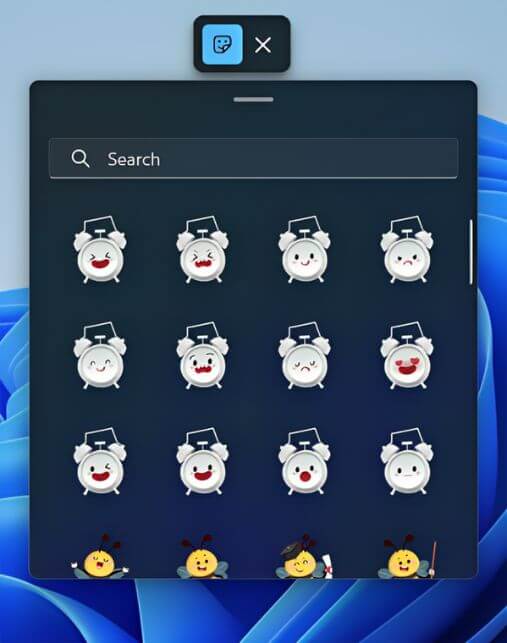
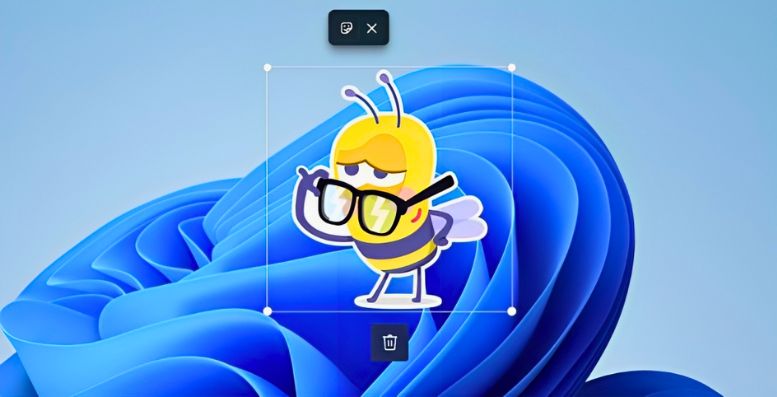
- Step 3: On the top-right corner of your screen, you will find the sticker tap on it then you can move it or resize it as per your need.

- Step 4: If you want to remove the sticker, then tap on the sticker and press the “Delete” button on the keyboard to remove the sticker.
Disable the Desktop Stickers by Using the Registry
For some reason, if you want to disable the sticker feature, then the process is quite simple. Follow a few steps to disable this feature.
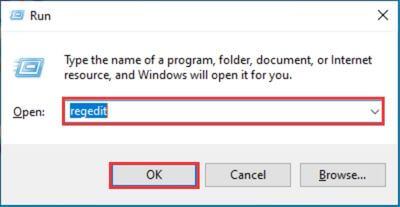
- Step 1: On the keyboard, press the “Windows button” and “R button” at the same time then a “Run” box will appear. You can see a text input area; click on it and type “regedit,” then press the “Enter” button.
- Step 2: Now, it will ask permission to access the Registry Window, so tap on the “Yes” option.

- Step 3: Now a Registry Window will pop up on the screen; look for the File or Edit tab below to see the text input area; click on it and type “HKEY_LOCAL_MACHINE\SOFTWARE\Microsoft\PolicyManager\current\device,” then press the “Enter” button.

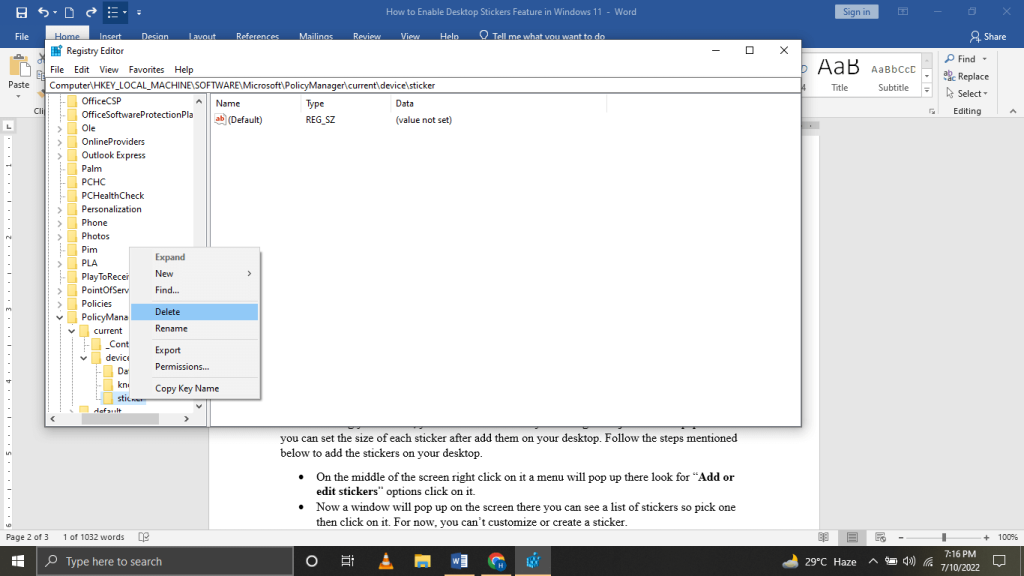
- Step 4: Now, find the “Sticker” file, then right-click on it; a menu will pop up on the screen; look for the “Delete” option and click on it.
- Step 5: It will ask for confirmation, so tap the “Yes” option.
- Now, the sticker feature is disabled, so restart the PC to see the effect.
Frequently Asked Questions
Is the Desktop Sticker Feature Available for Windows 10?
The Desktop Sticker feature is exclusively available for Windows 11 with the 22H2 update. As of now, Windows 10 users do not have access to this feature. There’s a possibility that this feature might be introduced to Windows 10 in future updates.
When Was the Desktop Sticker Feature Released?
The Desktop Sticker feature was released on October 5, 2021. To use this feature, ensure that your system has been upgraded to Windows 11 with the 22H2 update.
Does Adding Stickers Affect System Performance?
No, applying stickers on Windows 11 is designed to be lightweight and should not significantly impact system performance. Stickers are visual customizations that add a personal touch without slowing down your desktop.
Can I Create My Own Stickers?
Currently, the built-in Desktop Sticker feature supports a selection of pre-loaded stickers.
Are Desktop Stickers Secure?
Yes, the desktop stickers feature is part of the Windows 11 operating system and is safe to use. However, always be cautious when downloading third-party apps for additional sticker options.
You Might Also Like
Final Words
In this article, we’ve covered the steps to enable the sticker feature. After following this guide, you should be able to activate the sticker feature on your own.
Opinions about the sticker feature may vary, but many find it adds a cute and personal touch to their Windows 11 desktop. Share your thoughts in the comments below – we’d love to hear about this sticker feature.

