Are you looking to partition your hard drive in Windows? Well, our guide will help you get started! In this article, we’ll outline the steps you need to take to create a partition and give tips on choosing the right size for your needs.
Are you looking for different methods to split your hard disk space so that you can organize your files more efficiently? Then, you are at the right place. Let’s assume you want to keep your sensitive documents and other files like music or video files on a separate disk. Later, it will be easy to find when you are looking for a particular document.
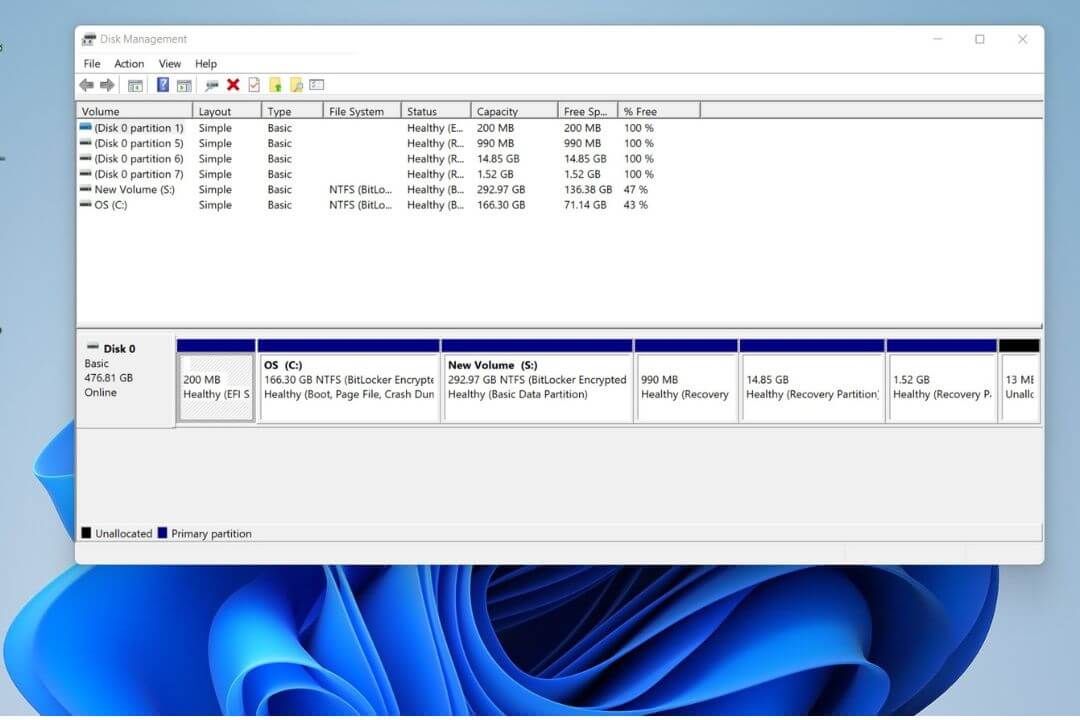
This process is called Partition, where you can split your hard disk space into different parts. You might know it as Local Disk C or Local Disk D.
Windows 11 has a built-in task management tool that helps extend, resize, or create new partitions.
Check out this article to learn how to make a partition in Windows 11. The process is quite simple, so anyone can do it.
Table of Contents
What is Partitioning?
Splitting the disk drive into one or more regions is called disk partitioning. After the partition, it will appear on the system as Local Disk E or D. As I mentioned before, it will be more efficient, and you can manage each partition separately without any issues.
Many partitions you want to create depend on the size of an HDD or SSD.
Why Should You Partition Your Hard Disk?
There are a lot of reasons for you to partition your hard disk. Below I mentioned a few benefits of partitioning your disk drive.
- It will be easier for you to categorize all your data. For example, you can store all your documents in one partition and music or video files in another.
- If you want to reset one partition, then there is no need to worry that the other partitions’ data will be safe. That means you can manage each partition separately.
- If you have already created new partitions and they got deleted for some reason, it will be easier for you to recover one partition.
- It will be more efficient to manage all the partitions.
Things to Know Before Partitioning:
Improper partitioning or manipulation can result in data loss. Always back up your data before making any changes.
Incorrect configuration may cause boot problems or render your system unbootable.
Creating too many partitions can decrease performance due to increased disk head movement.
Windows supports up to 128 primary partitions on a single disk.
Shrink a Partition in Windows 11/10
When you purchase a new PC or laptop, you will notice that it has a single drive. All the data is stored in one place, so if you want to free up the storage space before partitioning the disk drive. Follow a few steps to shrink a Windows partition.
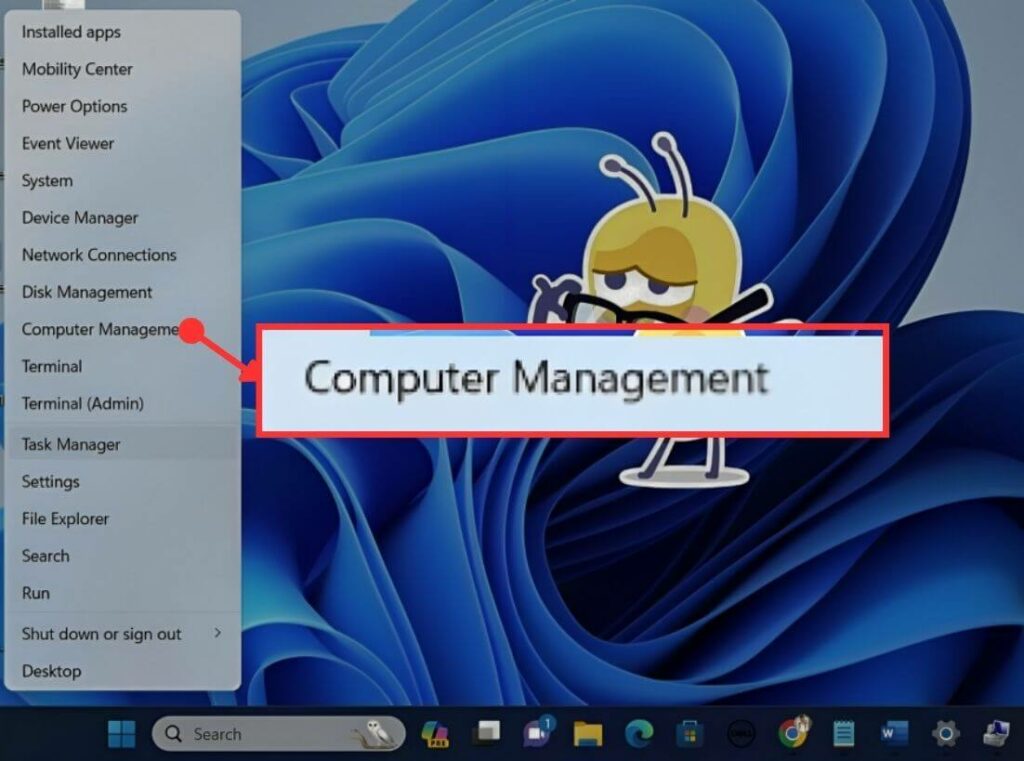
Step 1: Turn on your PC, then right-click on the “Windows icon” A menu will pop on the screen; there, search for the “Computer Management” tab and click on it.
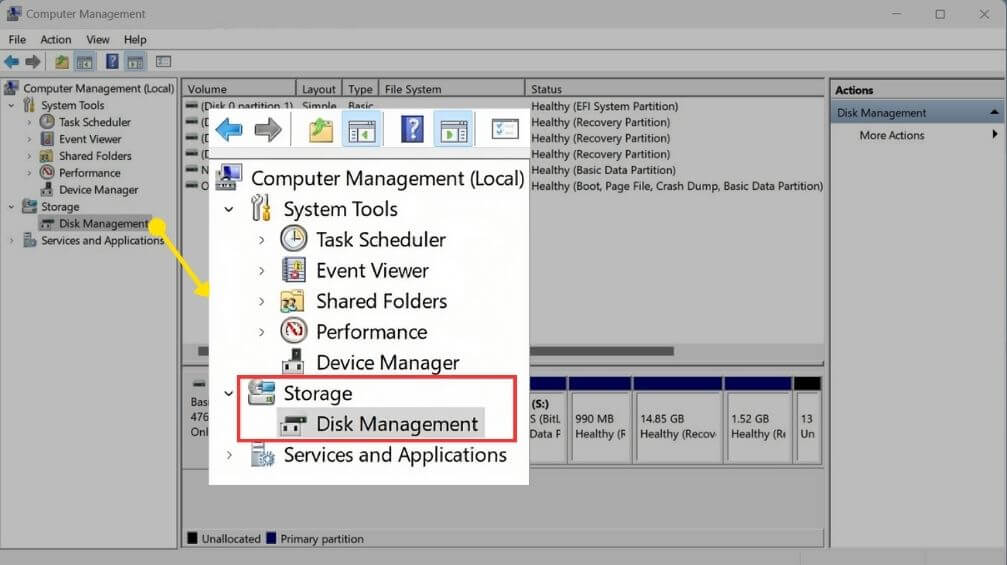
Step 2: A Window will pop up on the screen; there, look for a “Storage” option, then tap on it.
Step 3: Now find the “Disk Management” option, then double tap on it.
Step 4: Now find the partition you want to shrink and right-click on it; then a menu will appear on the screen; there, look for a “Shrink Volume option, “and tap on it.

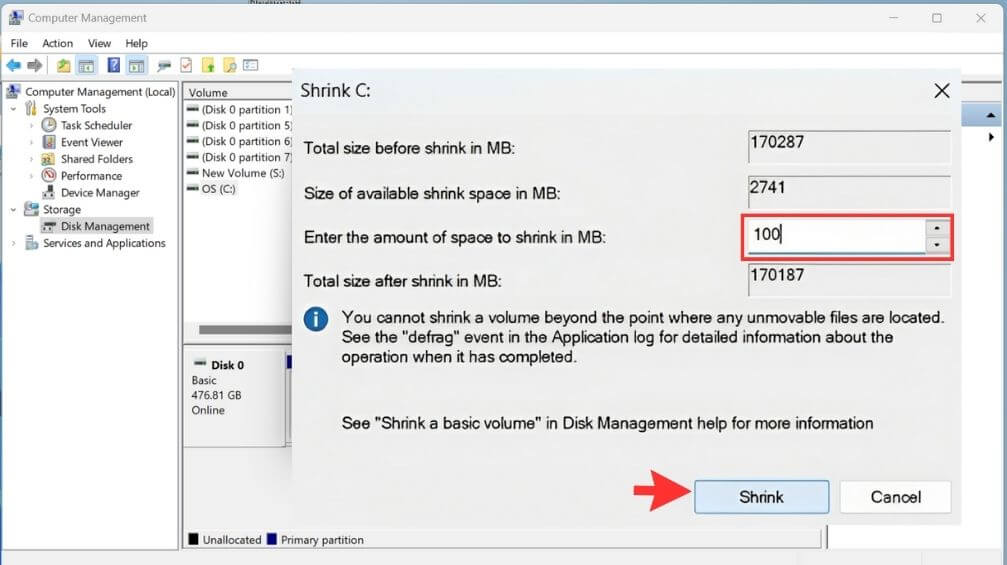
Step 5: Another window will appear on the screen. There type the number of data you want to remove, then look for a “shrink” tab and tap on it to shrink the storage space. Here you set the data in MB.
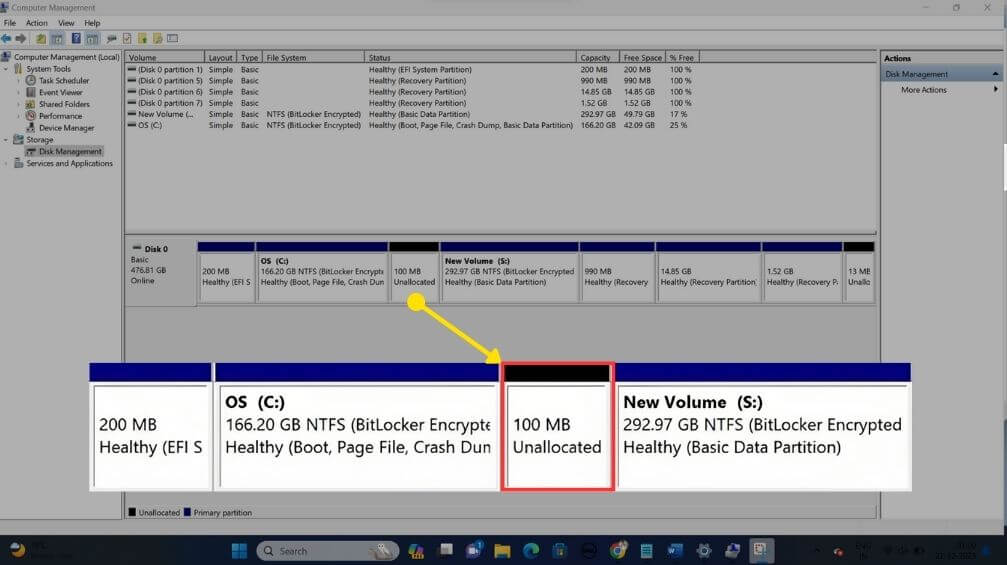
Step 6: After that, which partition you selected, the volume will be decreased, and besides the new volume section, you can see the unlocated section.
How to Create a New Partition without Losing Data?
Previously, I mentioned unallocated space. You can use that unallocated space to create a new partition. The process is quite simple. Follow a few simple steps below to create a new local disk.
Step 1: On the taskbar, you can see a Windows icon; right-click on it, and a menu will pop up on the screen.
Step 2: Now find the “Computer Management” option, then tap on it.
Step 3: After that, a Computer Management window will pop on the screen. There look for the “Storage” option, then tap on it.
Step 4: On the right side of the window, you will find a “Disk Management” option, then double-click on it.
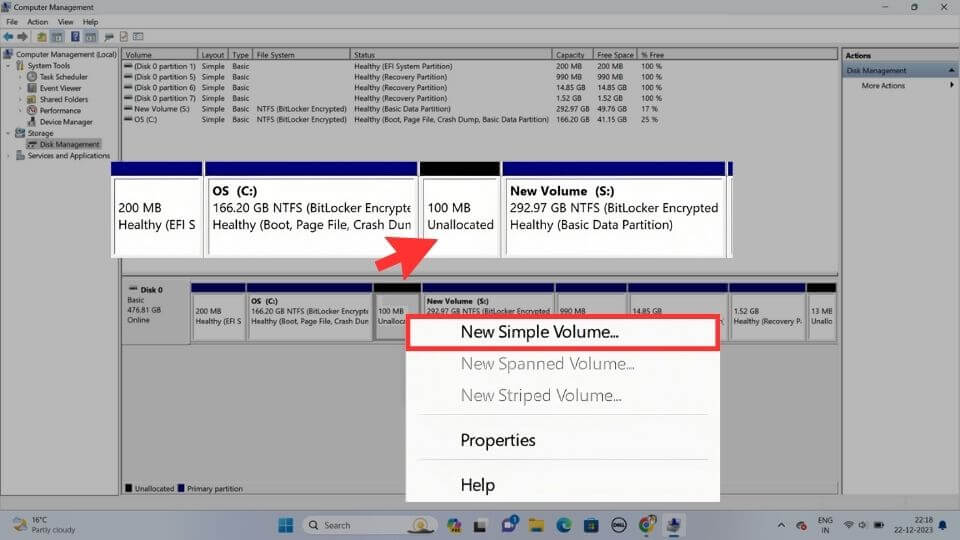
Step 5: At the bottom of the window, you will find the “Unlocated” section, then right-click on it.
Step 6: A menu will pop up on the screen; look for the “New Simple Volume” option, then tap on it.
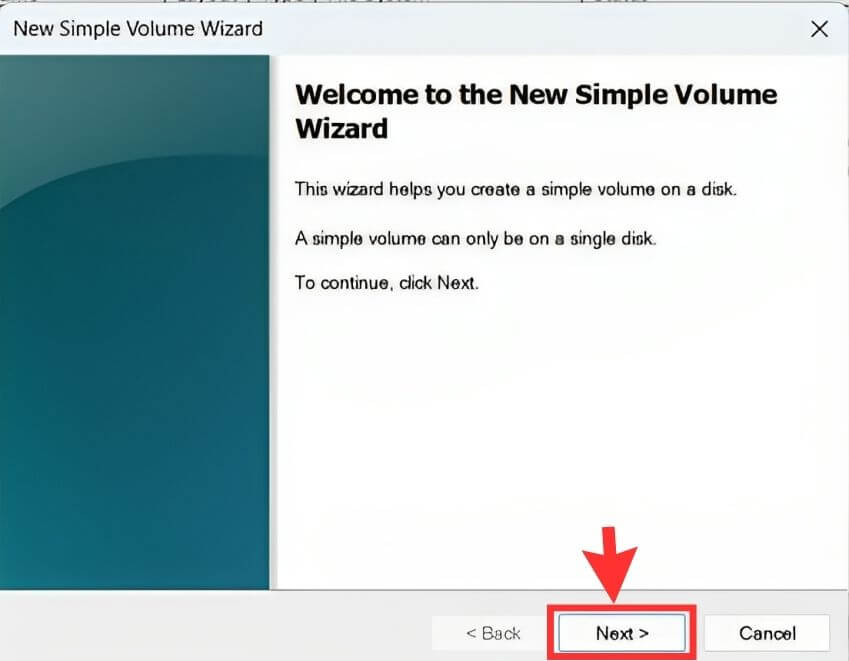
Step 7: A New Simple Volume wizard window will appear on the screen; tap on the “Next” tab, then tap on it.
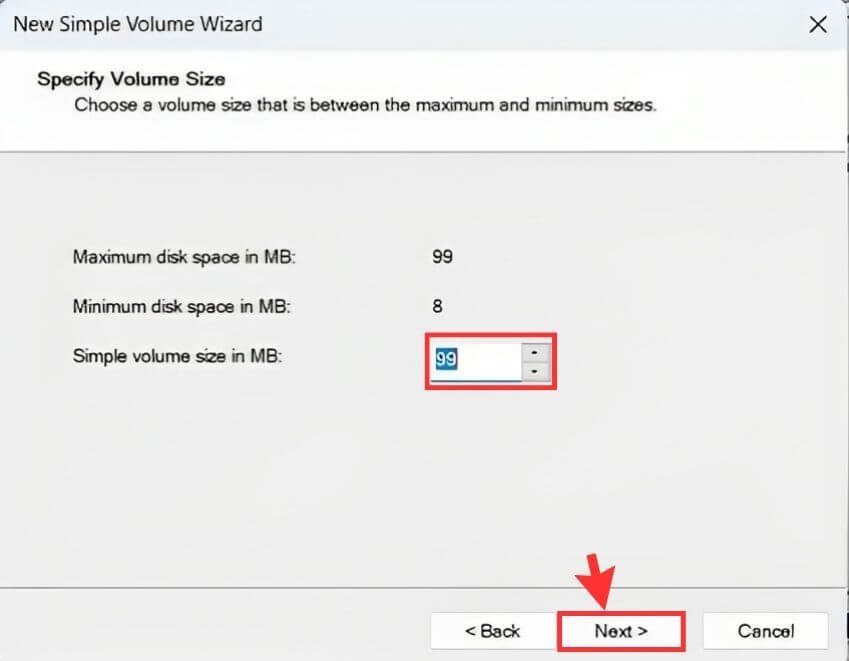
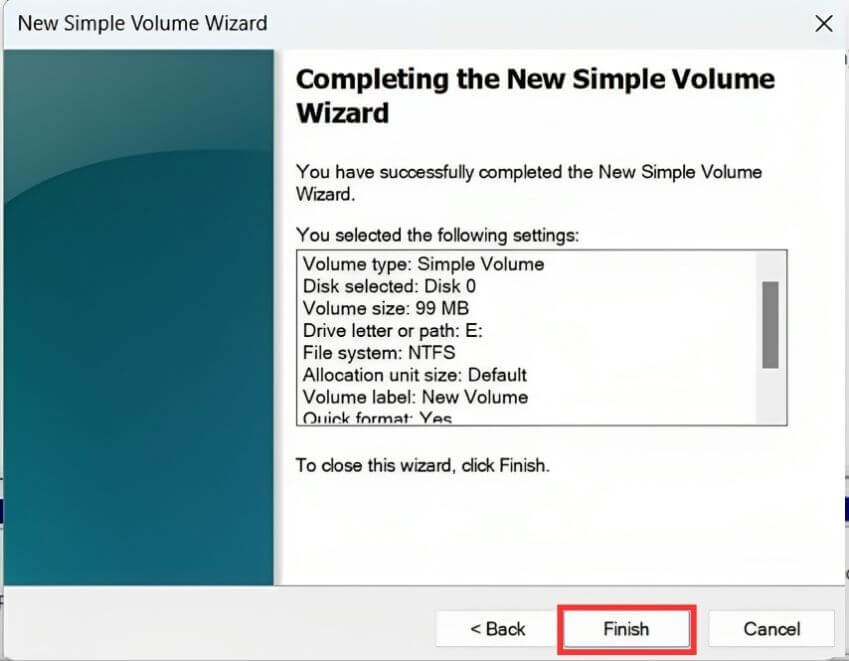
After that, it will ask you to choose the volume size, and by default, it has some random numbers like 99MB, so you can increase or decrease it as per your requirement. (Here, you will find the volume size in MB).
Step 8: At the bottom of the window, you will find a “Next” tab; tap on it.
Step 9: Now you have to select a letter as a new partition name, and by default, the system will automatically set a name D or E, but no need to worry; you also have options to change the name. After that, click on the “Next” tab.

Step 10: After that, a New Simple Volume Wizard window will pop up on the screen; look for the “Next” tab, then tap on it.
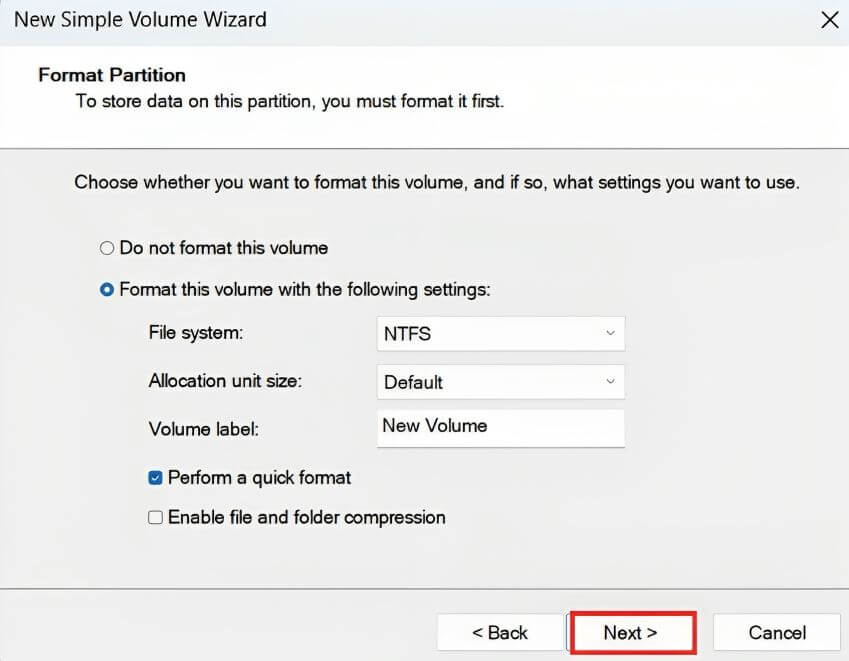
Step 11: After completing all the steps, click on the “Finish” tab, then tap on it to create a new disk.
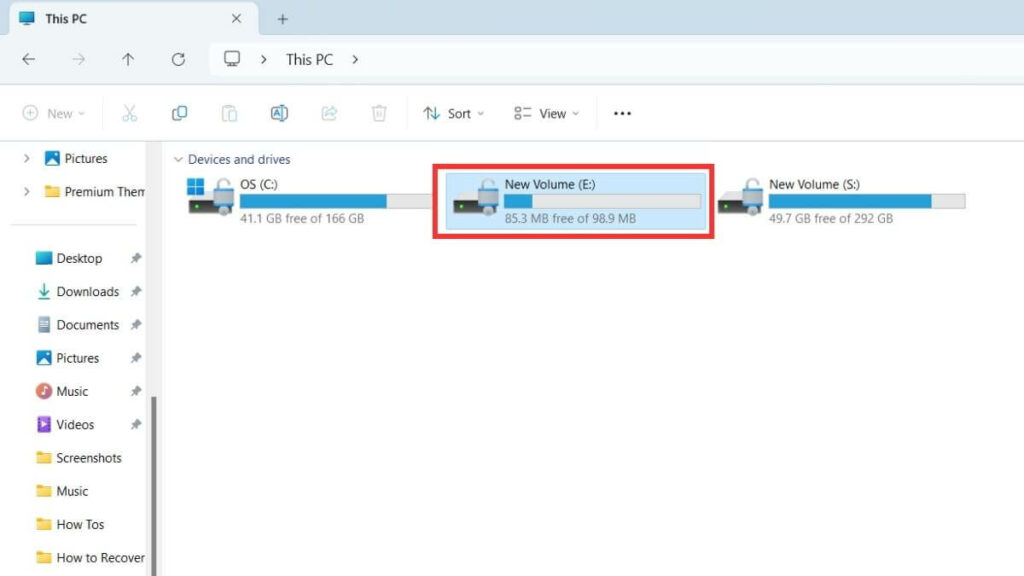
Now a new partition is created.
Extend a Partition in Windows 11/10
If you don’t have enough storage space on the partition you just created, then there is no need to worry. You can just expand it. Below I mentioned a few simple steps to expand the storage space.
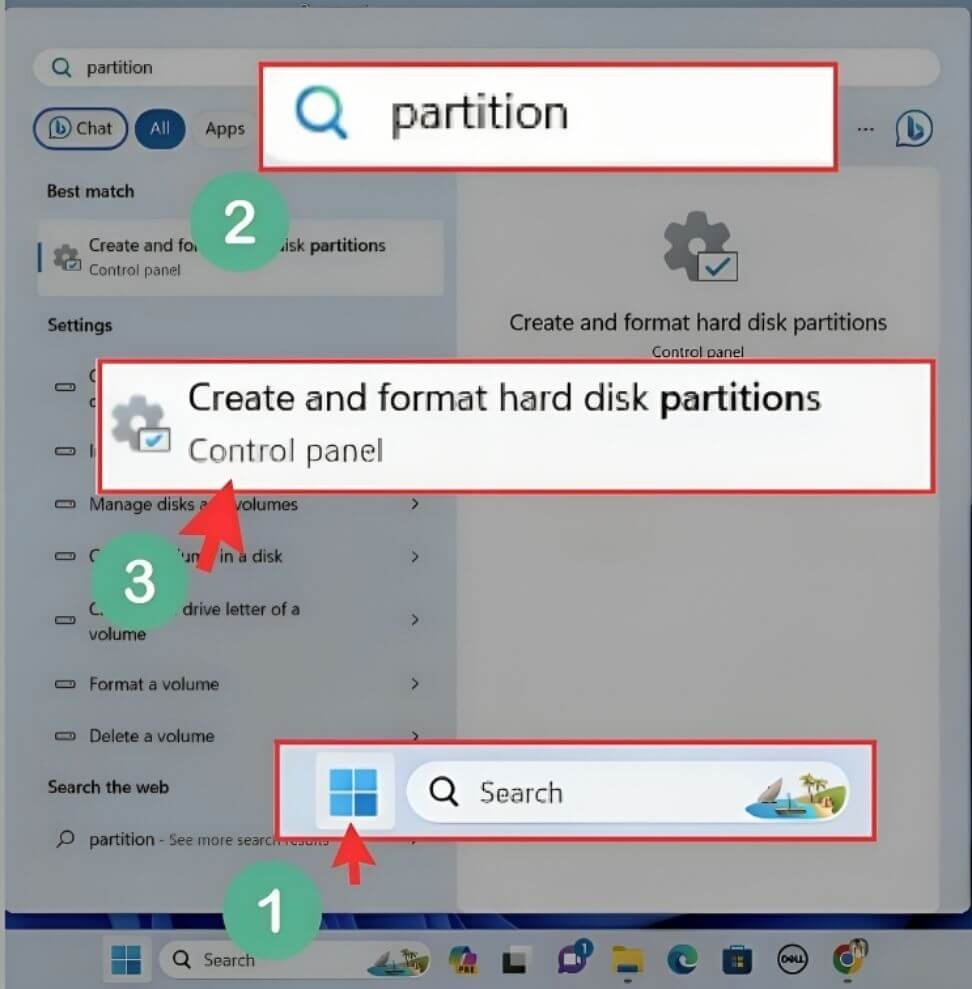
Step 1: Look for the search box on the taskbar, tap on it, and type “partition.”
Step 2: A menu will pop up on the screen. Look for the “Create and format hard disk partitions” option, then tap on it.
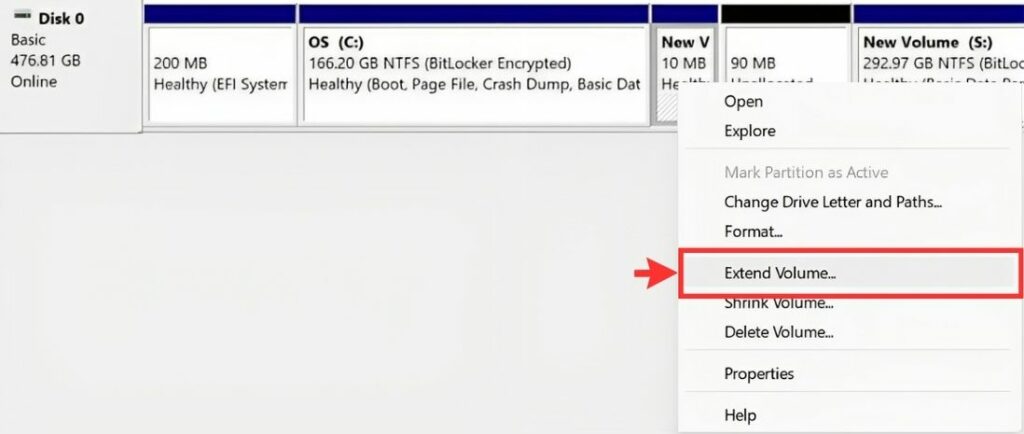
A “Disk Management” window will pop up on the screen; look for the partition you want to extend, then right-click on it.
Step 3: A menu will appear on the screen. Tap on the “Extend Volume” option.
Step 4: An Extend Volume Wizard window will pop up on the screen. There look for the “Next” tab, then click on it.

Step 5: Select the amount of storage you want to extend in MB, then click on the “Next” tab.
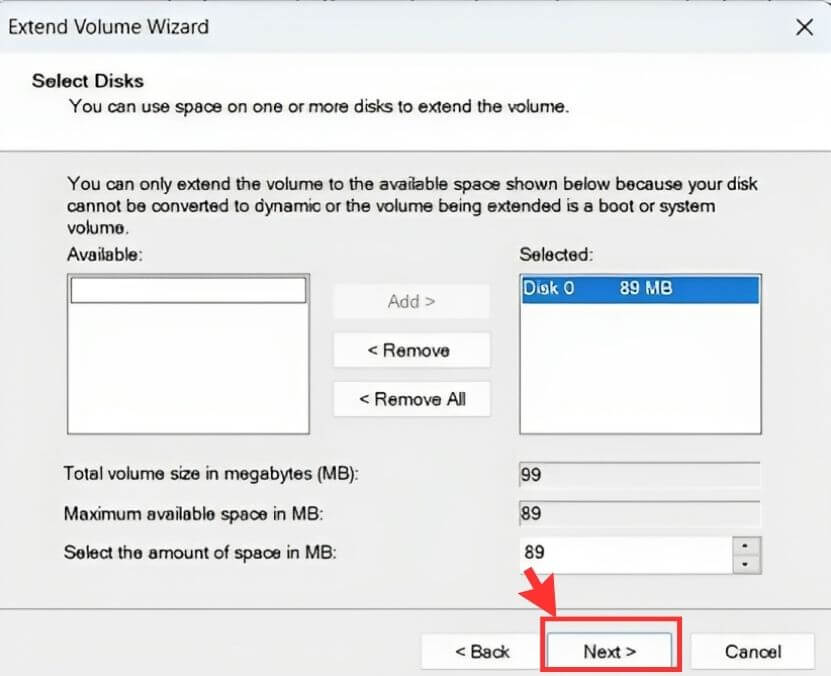
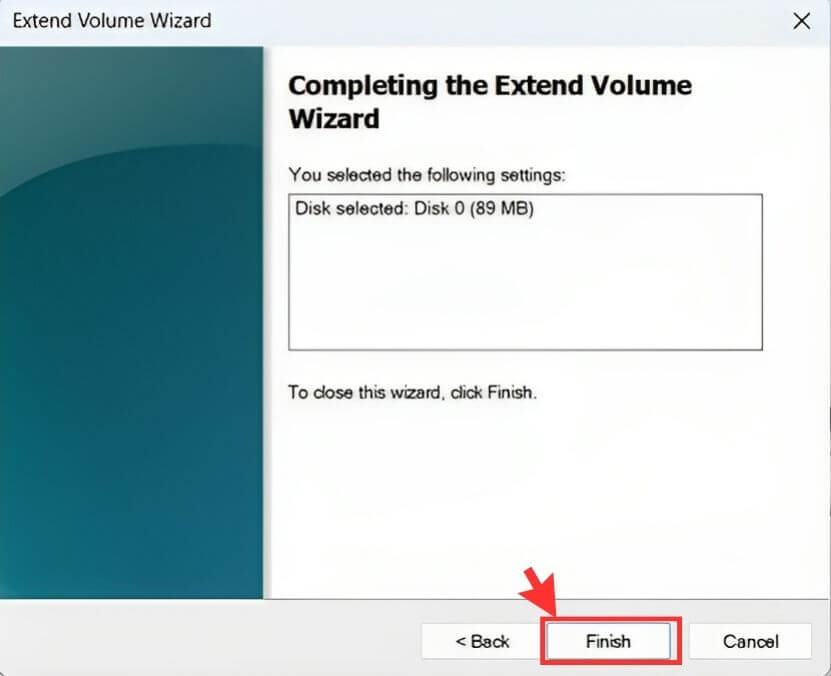
Step 6: Now click on the “Finish” tab to complete the process.
Partitioning with CMD (Command Prompt)
While Disk Management is the easiest way for most people, some advanced users prefer using CMD. This method gives you more control and is useful if Disk Management doesn’t work properly.
Steps to Create a Partition Using CMD
- Press Windows + R, type
cmd, and press Enter. - Type
diskpartand hit Enter. (This opens the Disk Partition tool inside CMD.) - Now type:
list disk→ shows all available drives.select disk 0→ selects your primary drive (replace 0 with the right disk number).list partition→ shows existing partitions.create partition primary size=100000→ creates a new partition with 100GB space (size is in MB).
- Type
assign letter=Eto give the partition a drive letter. - Type
format fs=ntfs quickto format the new partition in NTFS format. - Type
exitto close DiskPart.
That’s it — you now have a brand-new partition created via CMD.
How to Delete Partition in Windows 10/11
Important: Before starting the process, I suggest you keep a backup file because all your data will permanently get deleted after removing the disk.
If you want to delete a partition, you can easily do it by following a few simple steps below.
Step 1: On the taskbar, you can see a search box tap on it and type “partition.”
Step 2: A menu will pop on the screen; look for a “Create and format hard disk partitions” option, then tap on it.
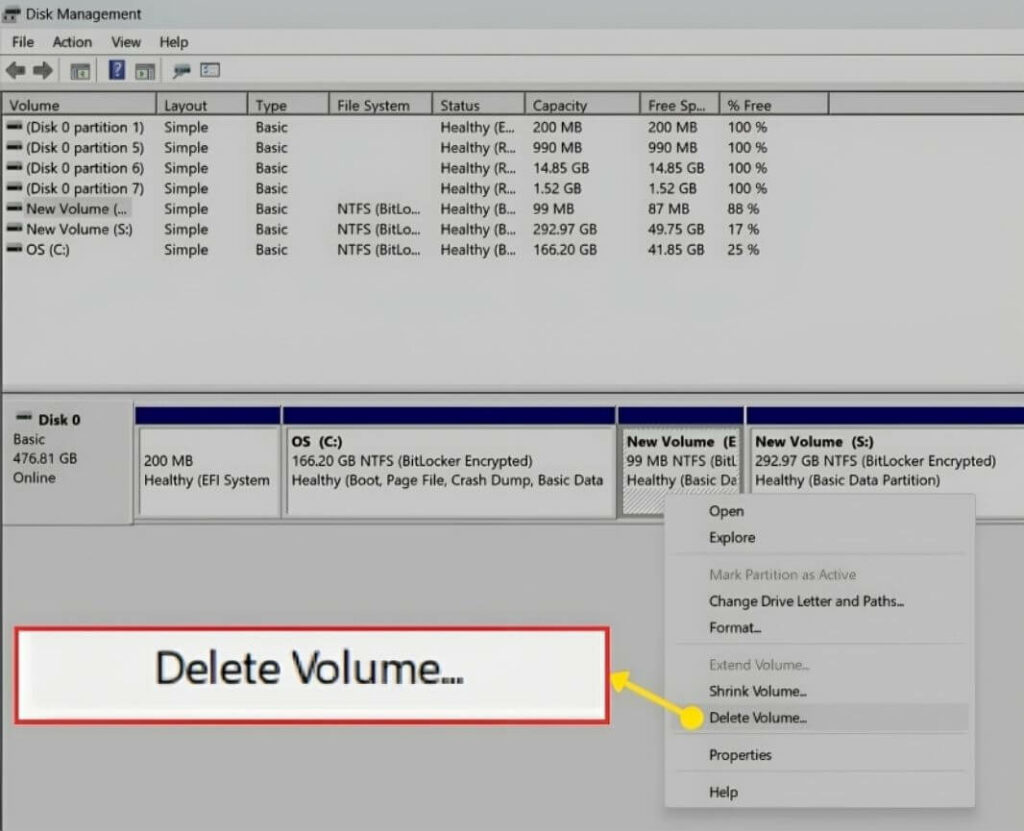
Step 3: A “Disk Management” window will pop up on the screen. Now look for the partition you want to remove, then right-click on it.
Step 4: A menu will appear on the screen. Look for the “Delete Volume” option, then tap on it.
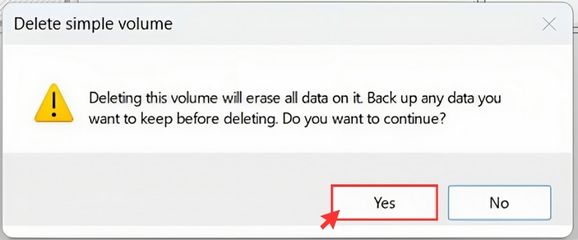
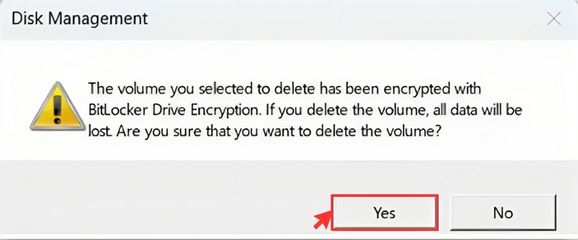
Step 5: Now it will ask your permission to remove the partition or local disk drive, so tap on the “Yes” option.
Disk Management vs CMD vs Third-Party Tools
| Method | Ease of Use | Features | Who Should Use It | Limitations |
|---|---|---|---|---|
| Disk Management (Built-in) | Very easy – graphical interface with right-click menus. | Create, shrink, extend, delete partitions. | Beginners or anyone who wants a simple method. | Can’t merge partitions; “Extend Volume” option is often greyed out if space isn’t adjacent. |
| CMD / DiskPart | Moderate difficulty – requires typing commands. | Full control: create, delete, format, assign letters, etc. | Intermediate to advanced users who are comfortable with commands. | Mistyping commands can delete data; less user-friendly. |
| Third-Party Tools (EaseUS, MiniTool, AOMEI) | Very easy – user-friendly interface, often with wizards. | Advanced features: merge partitions, move space, recover lost partitions. | Anyone who wants extra flexibility beyond Windows tools. | Most advanced features are paid; installing extra software required. |
Which Method Should You Choose?
- Go with Disk Management if you just want to create, shrink, or delete a partition in Windows 10/11. It’s simple and safe for beginners.
- Use CMD (DiskPart) if Disk Management gives errors (like “Extend Volume greyed out”) or if you want more control with commands. Just be careful – one wrong command can wipe data.
- Pick Third-Party Tools if you need advanced options like merging partitions, moving space between drives, or recovering deleted partitions. Tools like EaseUS Partition Master, MiniTool Partition Wizard, or AOMEI Partition Assistant make the process easier, though some features may require a paid version.
Partitioning HDD vs SSD: What’s the Difference?
When it comes to partitioning, both HDDs (traditional hard drives) and SSDs (solid-state drives) can be split into multiple sections, but there are a few key differences you should know.
HDD vs SSD Partitioning: Quick Comparison
| Feature | HDD (Hard Disk Drive) | SSD (Solid-State Drive) |
|---|---|---|
| Speed | Partitioning doesn’t improve speed. | Already fast; partitioning won’t change speed. |
| Lifespan | No major impact from partitions. | Too many partitions and frequent changes may slightly affect durability. |
| Best Use | Great for organizing system files, personal data, and backups. | Best to keep it simple—usually one system partition and one for files. |
| Boot & Recovery | A separate recovery partition helps restore Windows easily. | A recovery partition is also useful for quick system repair. |
| Flexibility | Works well with multiple partitions (C, D, E, etc.). | Works best with fewer partitions to avoid extra wear. |
Troubleshooting Common Partition Issues
Sometimes things don’t go smoothly when creating or managing partitions in Windows. Here are the most common problems people face — and how to fix them.
1. “Extend Volume” Option is Greyed Out
Why it happens: Windows can only extend a partition if there is unallocated space directly next to it.
How to fix:
Step 1: Delete the partition that’s blocking the unallocated space.
Step 2: Or, use a third-party tool like EaseUS or MiniTool to move/merge partitions without losing data.
2. Can’t Shrink Volume Enough Space
Why it happens: Certain unmovable files (like system files, page file, or shadow copies) prevent shrinking.
How to fix:
Step 1: Turn off system restore and hibernation temporarily.
Step 2: Defragment your drive (for HDDs).
Step 3: Then try shrinking again.
3. Accidentally Deleted a Partition
Why it happens: A wrong click in Disk Management or CMD can wipe a partition.
How to fix:
Step 1: Stop using the drive immediately.
Step 2: Use recovery software (EaseUS, Recuva, or MiniTool Partition Recovery) to restore the lost partition.
4. Windows Won’t Boot After Partition Changes
Why it happens: Boot files may have been moved or deleted.
How to fix:
Step 1: Boot into Windows Recovery Environment (WinRE).
Step 2: Run Startup Repair.
Step 3: If that fails, use a Windows installation USB to rebuild the bootloader.
5. Drive Letter Missing After Creating a Partition
Why it happens: Windows sometimes doesn’t assign a drive letter automatically.
How to fix:
Step: Open Disk Management, right-click the partition, and select “Change Drive Letter and Paths” to assign one.
You Might Also Like:
FAQs
1. Do I need to partition a new hard drive before using it?
Not always. A new hard drive usually needs to be initialized first. After that, you can either keep it as one big drive or create multiple partitions to organize your data better.
2. Can I merge two partitions in Windows without losing data?
Windows’ built-in tools don’t support merging partitions directly. To do this without losing files, you’ll need software like EaseUS Partition Master or MiniTool Partition Wizard.
3. Can I change the drive letter of a partition?
Of course, you can change the letter of a partition using Disk Management. Click the right mouse button on the partition, select “Change Drive Letter and Paths” and then follow the instructions to choose a new letter for the drive.
4. Can I partition an SSD without damaging it?
Yes, you can safely partition an SSD. Just avoid creating too many small partitions because SSDs have limited write cycles. Keeping it simple (one for Windows, one for files) is the best approach.
5. Is it safe to delete a partition?
Yes, but be careful. Deleting a partition will erase all the data inside it. Always back up important files before deleting any partition.
6. Can I change the drive letter of a partition?
Absolutely. Just open Disk Management, right-click on the partition, choose “Change Drive Letter and Paths,” and assign a new letter.
Final Words
Partitioning your hard drive may seem complicated at first, but as you may have noticed, Windows makes the process pretty easy. Whether you’re using Disk Management, CMD (Diskpart), or a third-party tool, you have several safe ways to create, shrink, extend, or delete partitions.
The real question is why you want to partition. If it’s just for better file organization, Windows’ built-in tools are enough. If you need advanced features like merging partitions, moving space, or recovering a lost drive, software like EaseUS or MiniTool can make things easier.
No matter which method you choose, always back up your important files first. Partitioning changes the structure of your storage, and although the process is safe, accidents can still happen.
Done correctly, partitioning helps you:
Keep your system files and personal data separate.
Make backups and recoveries faster.
Prepare your PC for a dual-boot setup or special storage needs.
Now you know everything you need to confidently manage partitions on your Windows PC.
If you found this guide helpful, be sure to share it with others, and if you run into any issues, comment below. I’ll be happy to help you out!
