If you are a Windows user looking for different methods to run Android apps or games on your Windows 7, 8, 10, and 11 PC or laptop, you might hear the name BlueStacks. It’s quite a popular app on the internet.
Two to three years back, I was looking for different methods to run PUBG mobile games on my laptop; at that time, I learned about BlueStacks; you can use this app to run Android apps on your Windows laptop. While using this app, sometimes I face minor errors like the entire screen getting black, so I researched and found that it’s a common error among all the BlueStacks users.
There are thousands of people facing black screen errors; if you are also one of them, follow a few simple methods mentioned in this article to fix BlueStacks’ black screen error.
Also Read: How to Watch YouTube Videos While Browsing Other Tabs?
Why BlueStacks Black Screen Appear?
BlueStacks is a third-party app that helps you to run Android apps on your Windows laptop. It’s quite a popular app among Windows users, and millions of people use it to play Android games or run their favorite apps. Previously I also used this for playing PUBG mobile, and I loved it.
Recently BlueStacks users have been facing some errors; whenever they open the app, the screen will get blank. Below, I mentioned a few common reasons for black screen errors occurring while using this app.
- Sometimes we forget to update the app or the graphics driver, which might be one of the reasons for the black screen error that occurs while using this app to keep up to date with all the apps or graphics drivers.
- If you run multiple apps at once, then a black screen error might occur while using this app, so close all the running apps.
- You might notice that it automatically goes into sleep mode whenever we are not using the system, which might be a reason for the black screen error.
- If you download the corrupt BlueStacks app, then a black screen error might occur whenever you open the app.
These are the common reasons for black screen errors while using this app.
Also Read: SSD vs HDD: What’s the Difference?
How to Fix BlueStacks Black Screen Error?
There are a lot of ways to fix the BlueStacks black screen error. Here below, I mentioned a few simple methods to resolve this error.
1. Update the Graphics Card Driver
Sometimes outdated graphics card driver might be the reason you are facing a black screen error while opening the BlueStacks app. Try to update your graphics driver, and it might resolve the issue. If you don’t know how to update your driver, follow the below steps.
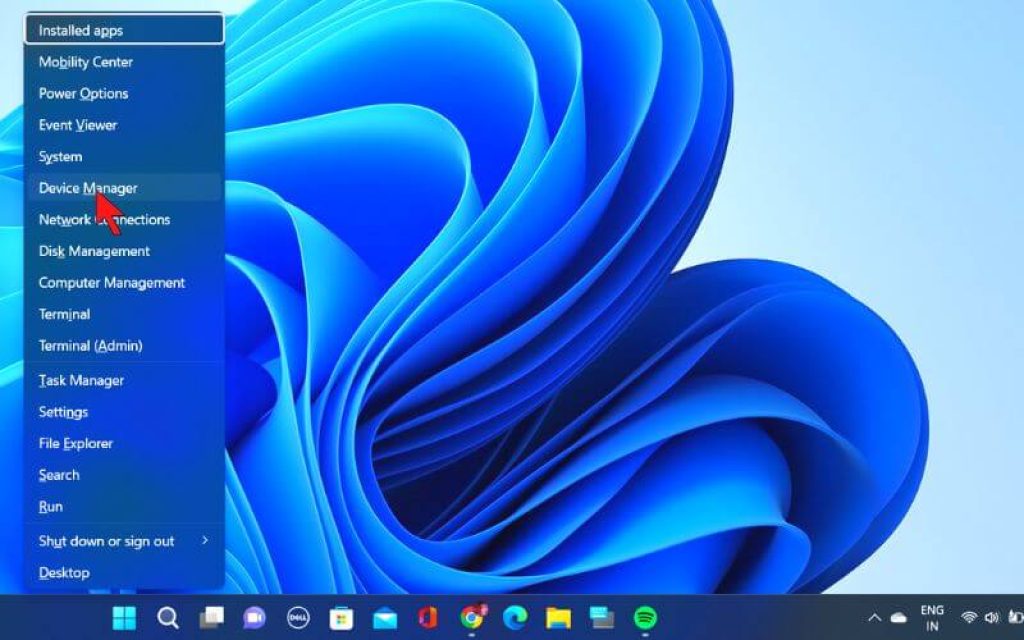
- First, Press the “Windows” button and “X” button at the same time; then, on the left side corner, a menu will appear; there, look for the “Device Manager” option and tap on it.
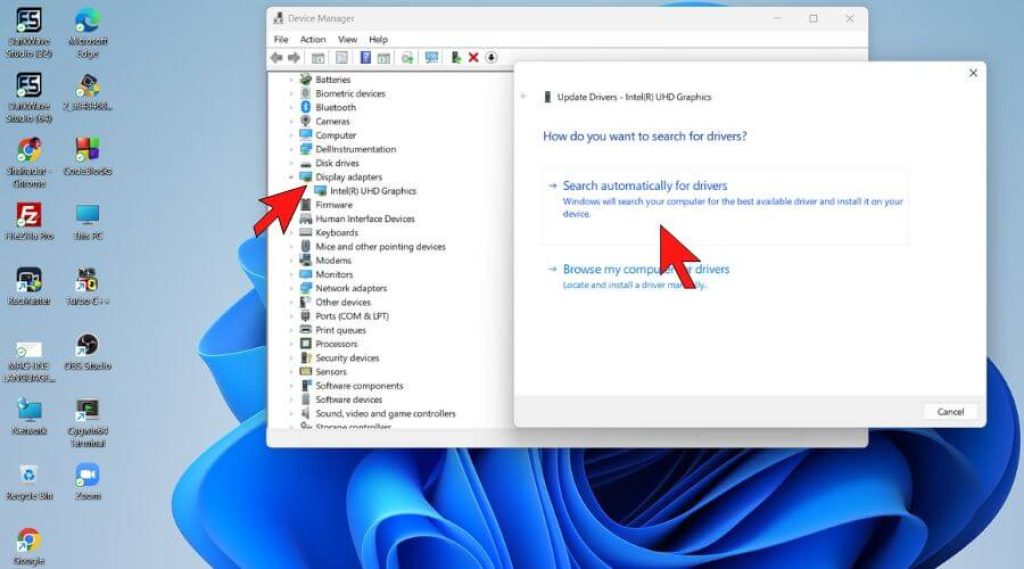
- After that, a window will pop up on your display; look for the “Display adapters” option and click on it.
- Below the “Display adapter” option, you can see the “Intel UHD Graphics” option; right-click on it, and a menu will appear there; look for the “Update Driver” option and tap on it.
- Now Update Drivers window will pop up on display there; you can see two options; between them, select the “Search Automatically for updated driver software” option and tap on it to update the driver.
If you think this method is complicated, you should use third-party apps. It will scan your entire system and automatically update the graphics driver. Isn’t it what you are looking for? Don’t worry; these tools are easy to set up, and it will take just a few steps to complete the process.
2. Reinstall the Graphics Card Driver
When you open the BlueStacks app, the entire screen will get black. The graphics card driver might be a reason you face this type of error. To resolve this error, reinstall the graphics driver. This method works in most cases and if you don’t know how to reinstall the driver, follow the below steps.
- First, press the “Windows” and “X” buttons at the same time, then a menu will appear on the left side corner; there, look for the “Device manager” option and tap on it to open.
- On the left side, find the “Graphics card driver” option, then right-click on it; after that, a menu will appear; there, find the “Uninstall device” option and tap on it.
- After that, an “Uninstall Device” window will appear on the screen; there, you can see an “Uninstall” option tap on it to remove the driver.
- After completing all the steps mentioned earlier, look for the “Scan for hardware changes” option and tap on it to install the default graphics driver.
If you want to play high-end games, then don’t try this method because you might face some issues while playing games.
Also Read: What to Look for in a Computer?
3. Turn Off the Sleeper Time
If you tried the above-mentioned methods, you still face the black screen error whenever you open the BlueStacks app. As per tech geeks, it happens because of sleeper time. To resolve this type of error, turn off the sleep mode. If you don’t know how to turn off the sleeper mode, follow the below steps.
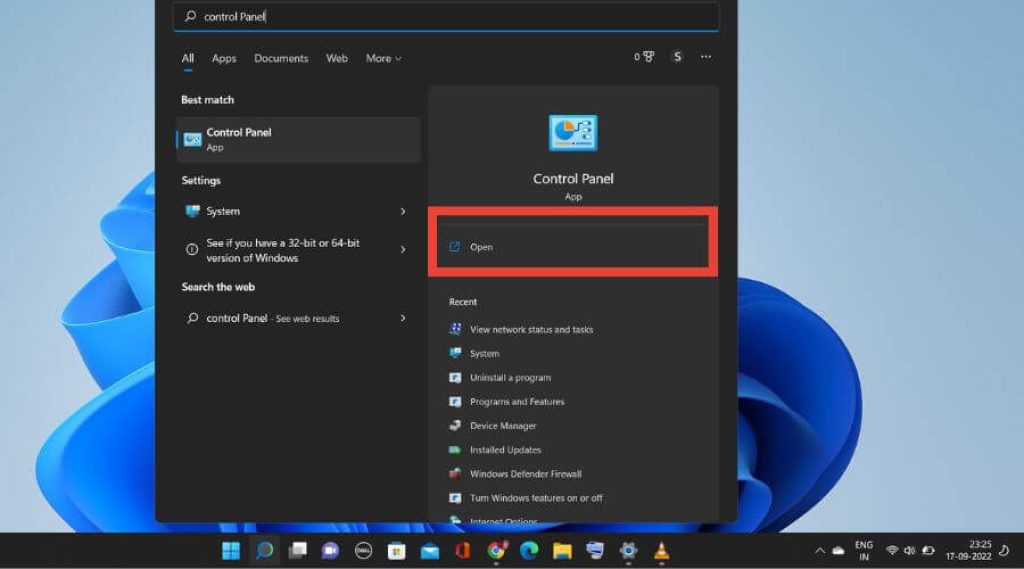
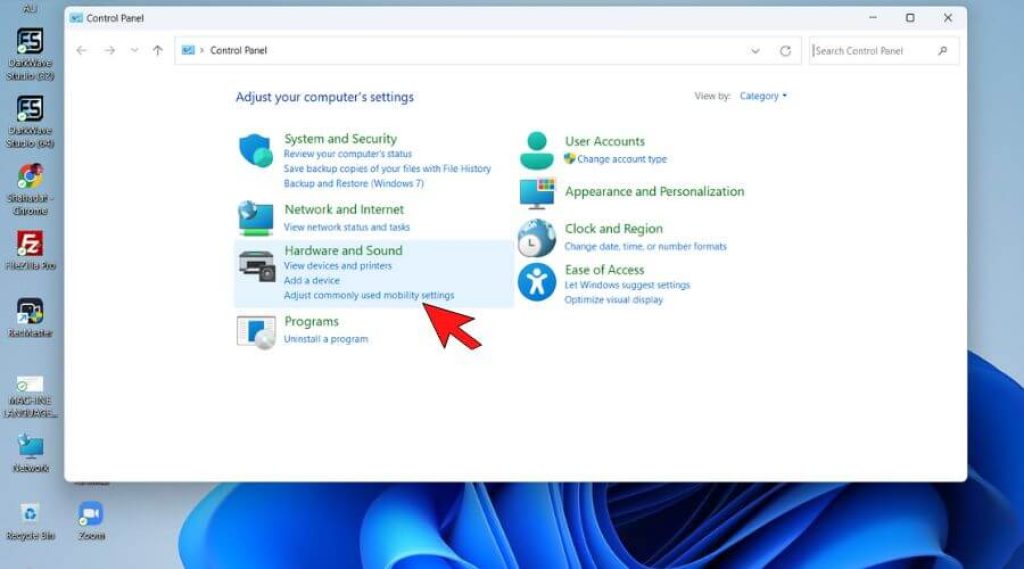
- On the search box, type “Control Panel” and tap on it.
- On the left side, you can see a “Hardware and Sound” option tap on it.
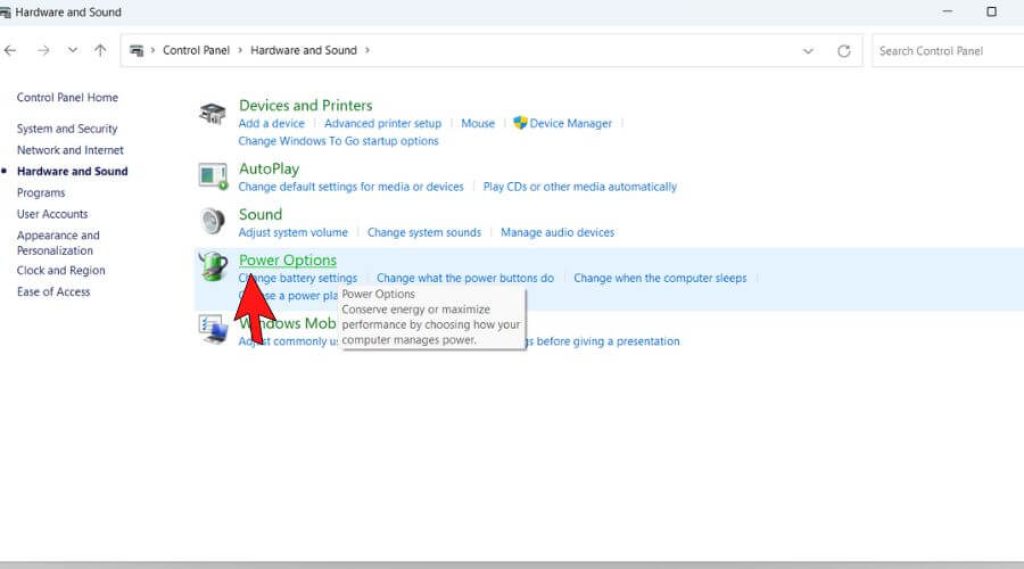
- After that, look for “Power Options” and tap on it.
- On the left side, the corner looks for a “Create a power plan” option, and tap on it.
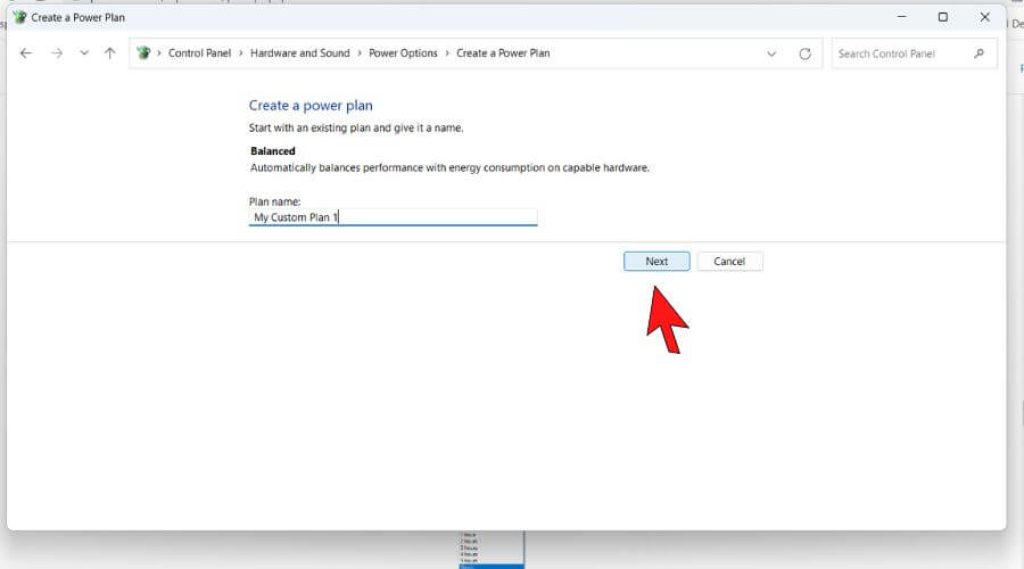
- Now, the “Create a plan” window will pop up on your display; look for the “Next” option and tap on it.
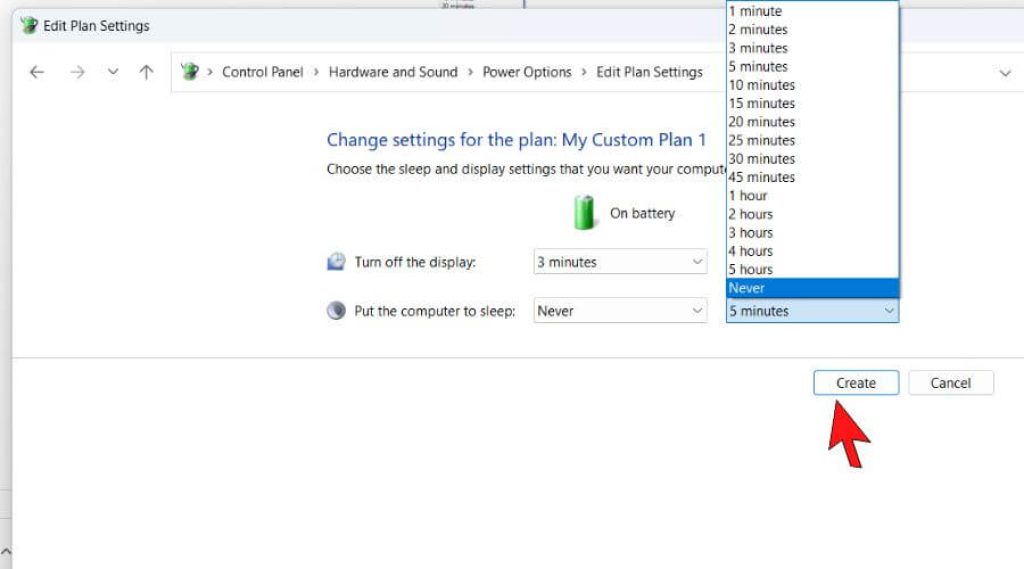
- Now, the “Edit Plan Settings” window will pop up on your display; there, you can see the “Turn off the display” and “Put the computer to sleep” options and set it to “Never.”
4. Turn Off Threaded Optimization
If you still face the black screen error while running the BlueStacks app, try to turn off the threaded optimization. If you don’t know how to turn off the Threaded Optimization, follow the below steps.
- Right-click on the desktop then a menu box will appear; there, look for the “NVIDIA Control Panel” option and tap on it to open.
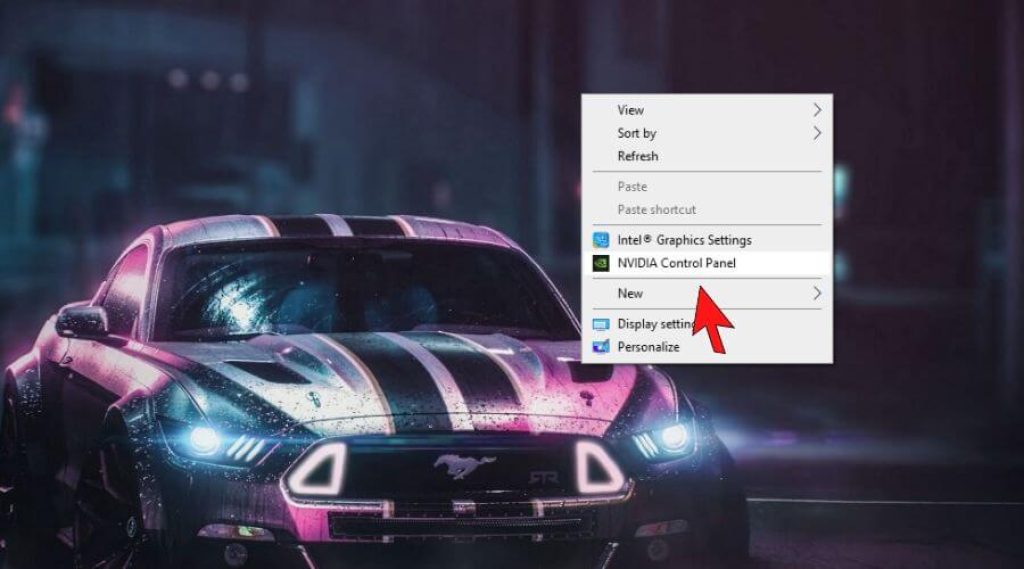
- After that, another window will pop up on your screen; look for the “Managed 3D Settings” option and tap on it.
- Now look for the “Program Settings” tab and click on it.
- Below the “Program Settings” tab, you can see a lot of options; then, find the “Threaded Optimization” option by default, and it will be “ON,” so set it to “Off.”
- After that, tap on the “Apply” option. After completing all the steps, check if the issue is resolved or not.
5. Run BlueStacks with Integrated Graphics
If you are a BlueStacks user facing the black screen error whenever you try to open the app, it happens because you have both a dedicated and integrated graphics card. To prevent this issue, go to the settings and set it to the integrated graphics card. If you don’t know how to do that, follow the below steps.
- Look for the BlueStacks shortcut on your desktop, then right-click on it.
- After that, a menu will appear on the screen; there, look for the “Run it with integrated graphics” option and tap on it. But remember, you have to choose the same option every time before opening the app.
Also Read: Windows 10 vs Windows 11
6. Reinstall the BlueStacks App
A missing or corrupt file can cause black screen errors while running the BlueStacks app. To prevent this type of error, reinstall the app. If you don’t know how to do it, follow the below steps.
- On the left side corner, you will see the “Start Menu” Tap on it; you will find the “Settings icon” Tap on it to open.
- Now look for the “Apps” option on the left side and tap on it.
- Below the “Apps & Features,” you can see all the installed apps on your device; between them, find the “BlueStacks” app and tap on it.
- After that, you can see the “Uninstall” option, tap on it to remove the app, then again download it from the Microsoft Store or use any third-party website to download the app.
The black screen issue with Bluestacks Hotstar can have several causes.
One reason could be that the app is not optimized for your device.
Another reason could be a problem with the connection between your device and the Hotstar servers. In this case, you may need to fix the problem and try some of the solutions mentioned below.
There can be several reasons for this, the most likely being that the game you are trying to play is not compatible with Bluestacks.
– Try downloading different games from the same developer or publisher.
– Make sure your device and Bluestacks are up to date.
– Try running the game on a different window or on a different device.
Yes, however, there is no guarantee that running Bluestacks on a low-end PC will work, but if you’re willing to try it, you can. However, make sure you have a low-end PC ready, as Bluestacks is not very tolerant of low-end hardware.
Final Words
In this article, we discussed how to fix BlueStack’s black screen error. Here I also mentioned a few methods to resolve this issue. I suggest you try each method discussed above because until you try, you never know which method will work for you. If you have any tech or gaming niche queries, feel free to tell us in the comment section.
