Do you want to know what you did on your computer and check your computer history?
Your computer can tell you what you did and help you make better choices.
When you use your computer, it remembers what you do. It saves data about the websites you visit, the files you download, the media you watch, and more. But how can you see your computer’s history and learn from it?
In this post, we will show you how to see your browser’s history, your downloads, and your Windows activities on your PC.
What is computer history?
Computer history is a record of the actions and events on your computer, such as the websites you’ve visited, the files you’ve downloaded or opened, and the activities you’ve performed with your account.
Why should You check the Computer history?
Checking computer history can help you with various purposes, such as:
- Keeping track of your online behavior and habits.
- Monitoring the usage of your computer by other users, such as your children, spouse, or employees.
- Troubleshooting issues or errors that may have occurred on your computer.
- Recovering lost or deleted files or websites that you may need again.
Ways to Checking the Computer Browser History and Delete it
1. Chrome Browser
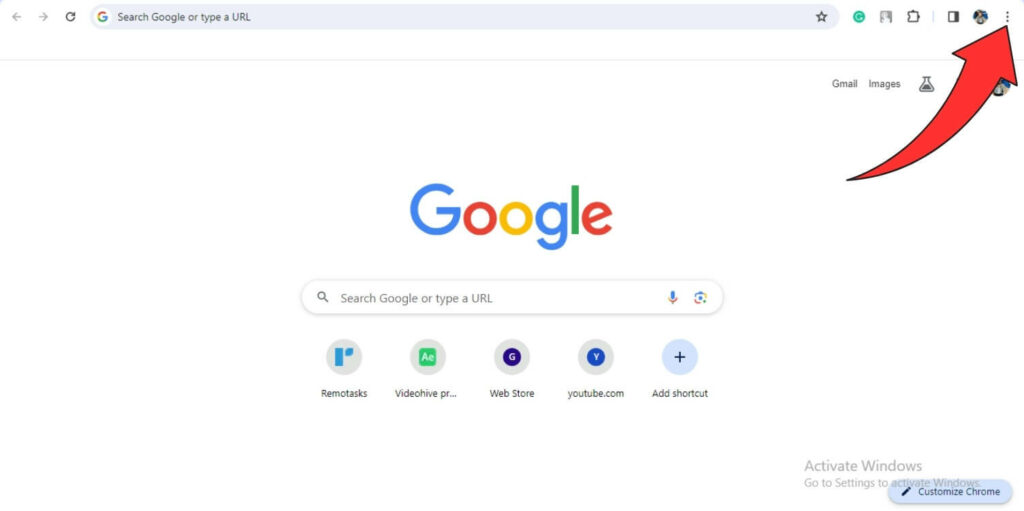
Step 1: Open your Chrome browser. Click on the three dots at the top right corner of your browser.
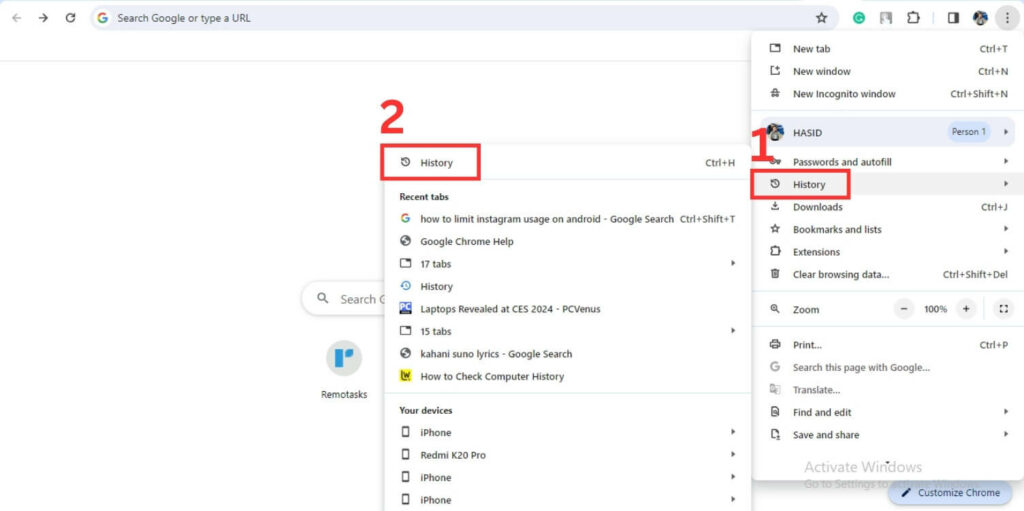
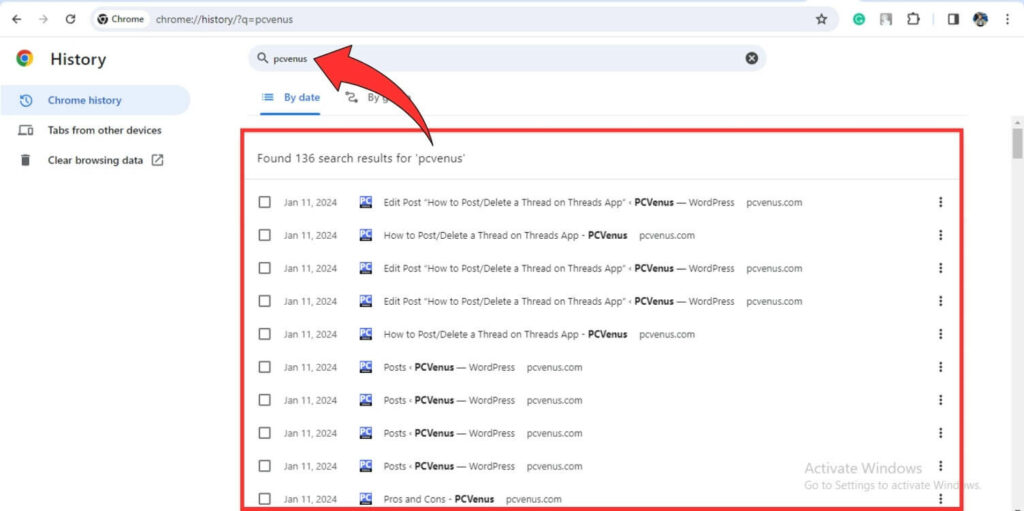
Step 2: Click on History and then again click History or type Ctrl + H to go to the Chrome history page.
You can see all the visited sites’ history sorted by date. If you are looking for a specific site, then click on the search bar at the top and search for it.
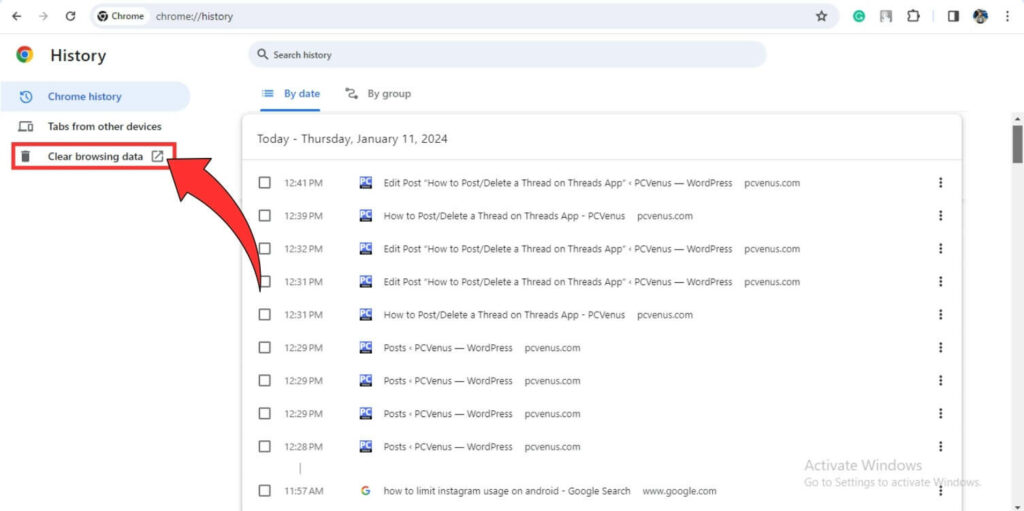
Step 3: To delete all your browsing history, click on Clear browsing data from the left sidebar.
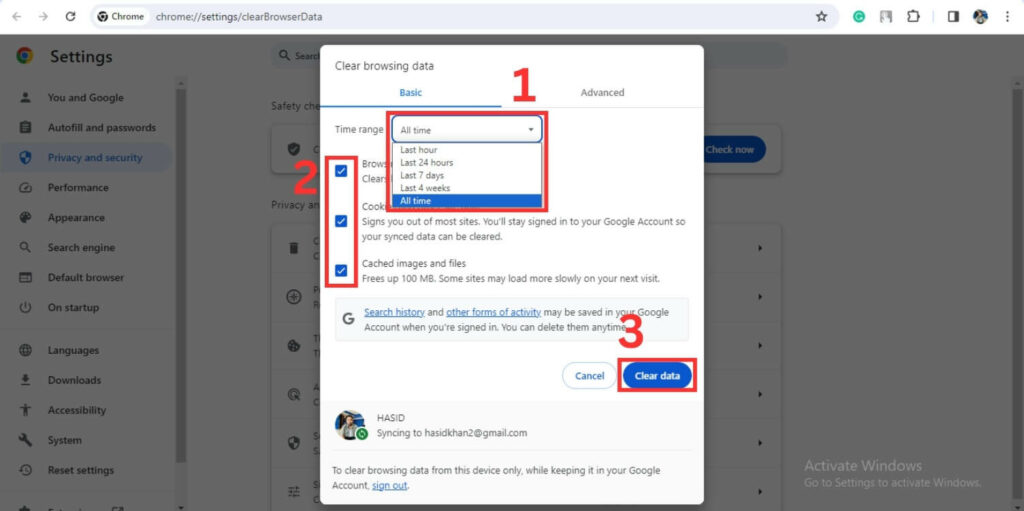
Step 4: Choose the timeframe for which you want to delete data from the Time range drop-down. Next, click the checkbox for the data type you want to delete and then click Clear data. It will clear your browsing data for that particular time frame you have selected.
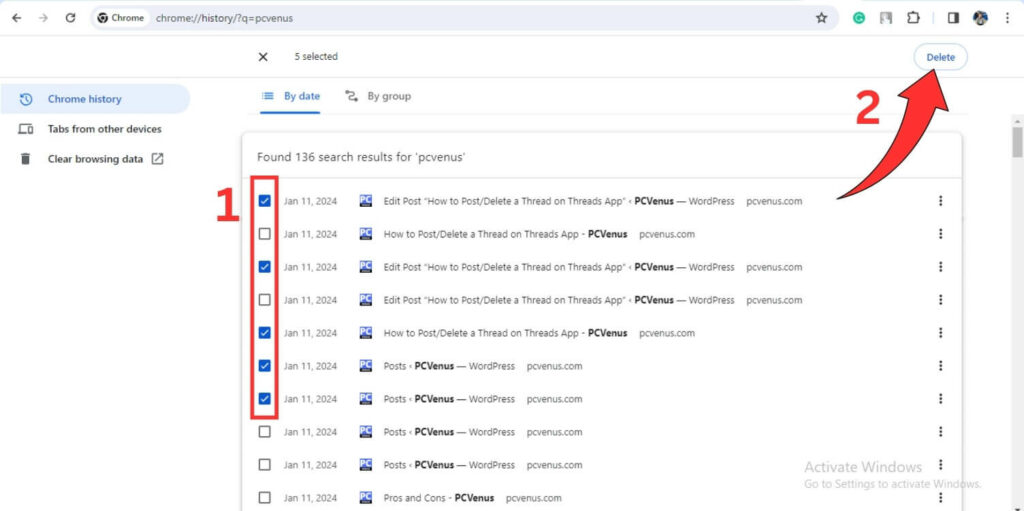
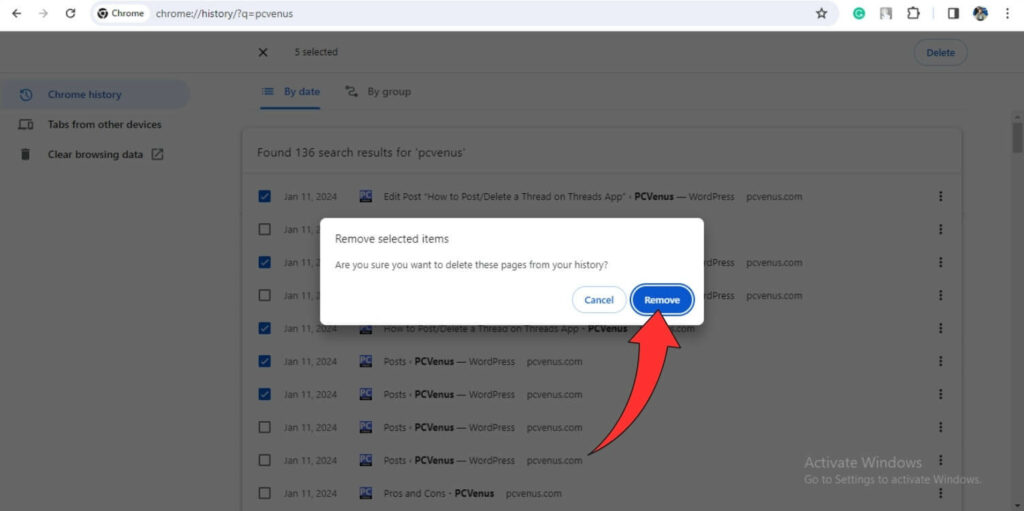
Step 5: To delete a specific visited site, search for it and click the checkbox you want to delete. Next, click on Delete at the top right corner.
Step 6: A pop-up will appear; click on Remove to delete the pages from your history.
2. Microsoft Edge Browser
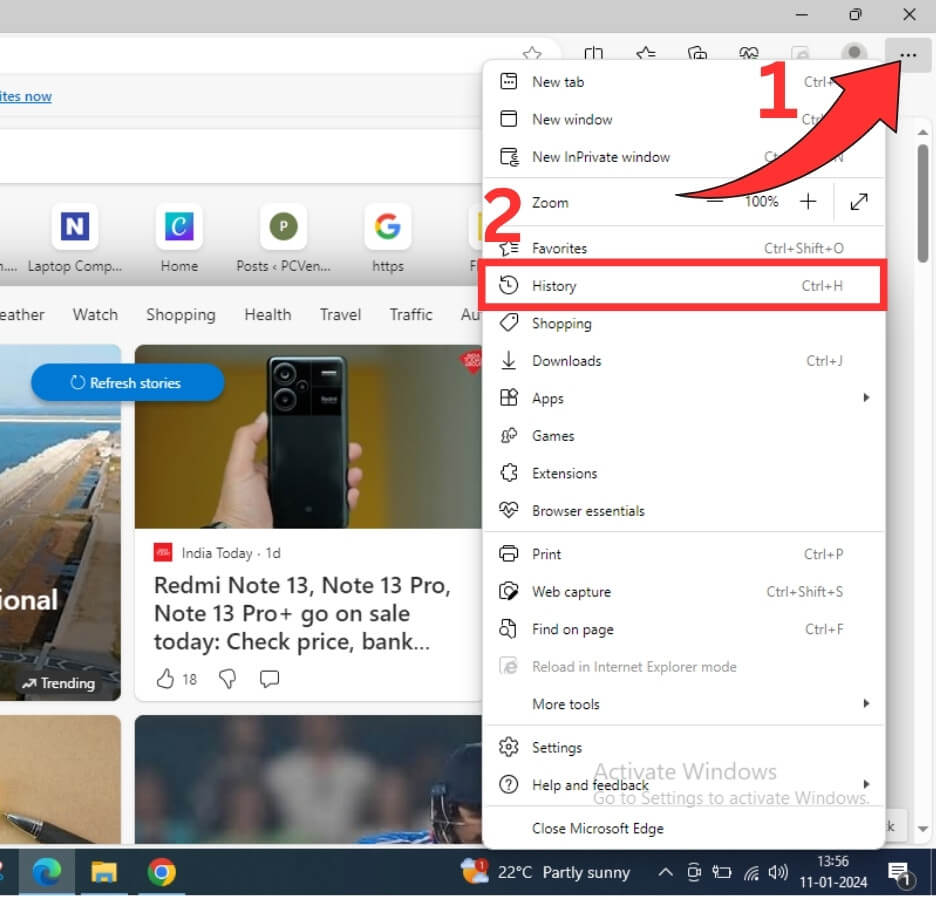
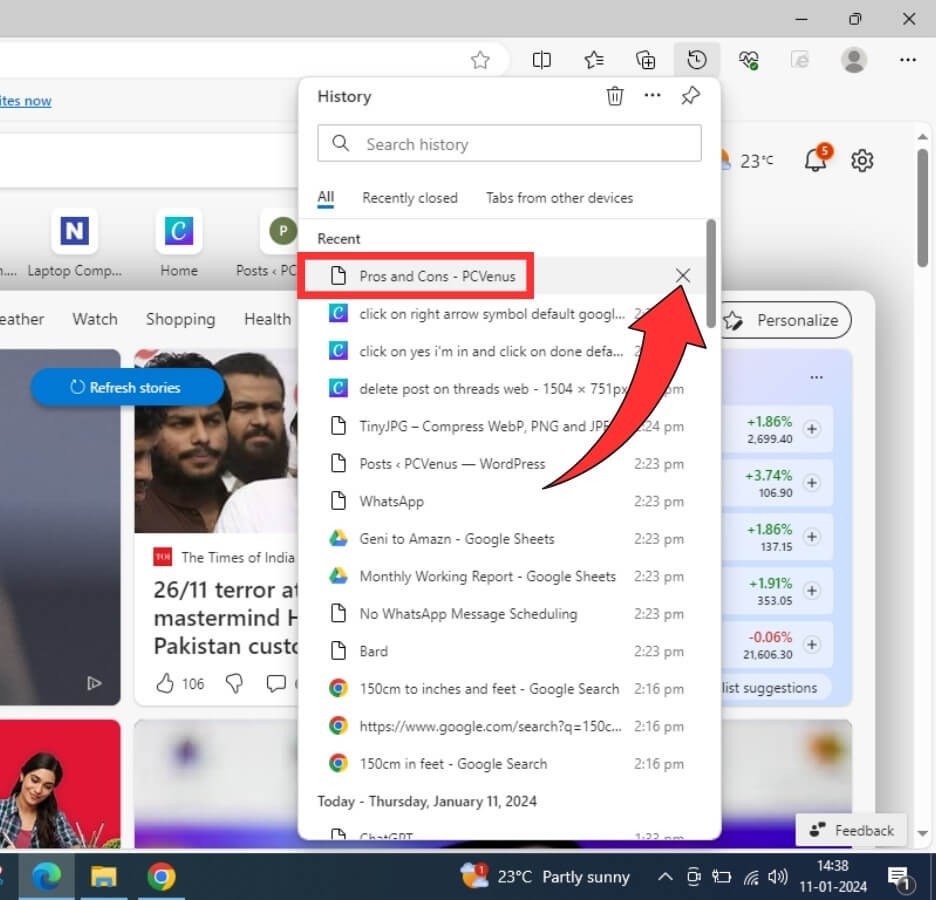
Step 1: Open the Microsoft Edge browser. Click on three dots (Settings and more) at the top right corner. Select History from the list or type Ctrl + H to see all the sites you have recently visited across your Google account.
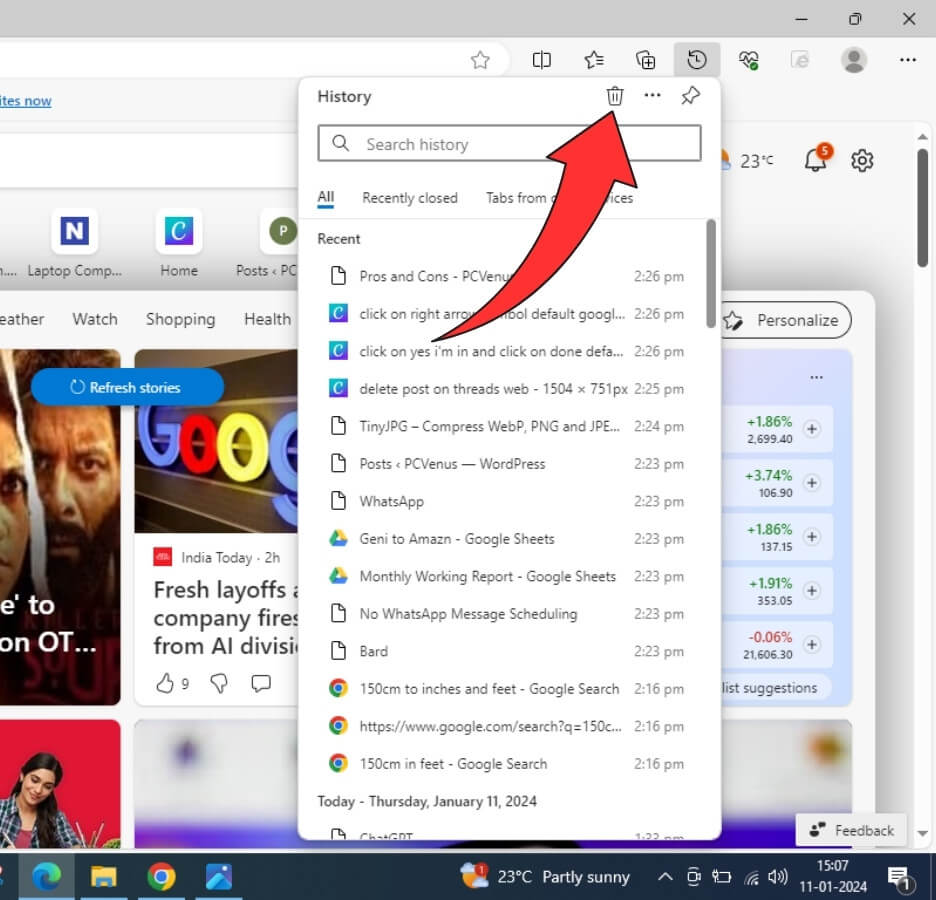
Step 2: To clear your browsing data, click the trash can icon at the top.
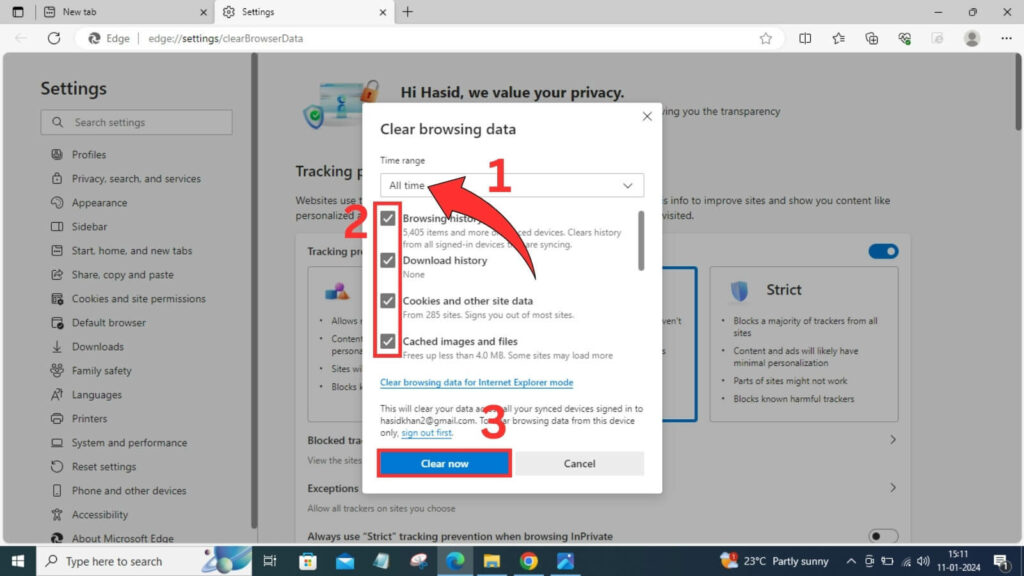
Step 3: A new page will open. Choose the time frame from the Time range drop-down menu. Next, click the checkbox for the data type you want to delete and then click on the ‘Clear now‘ button. It will delete all your browsing data for that particular time range you have selected.
Step 4: To delete specific sites, hover over the site in your recent history list and click the x icon that appears next to it. You can even search the site from the search bar and delete it from the search results.
Checking Windows Activity History
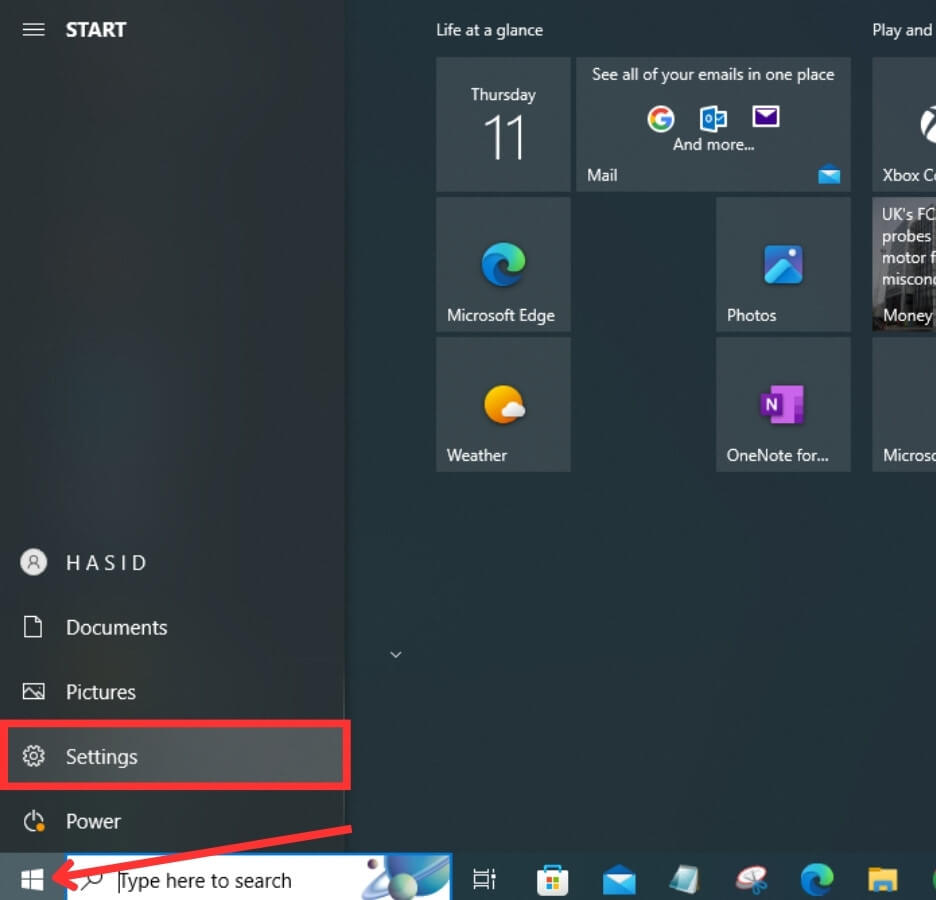
Step 1: Click on Start at the bottom left corner and then click on Settings.
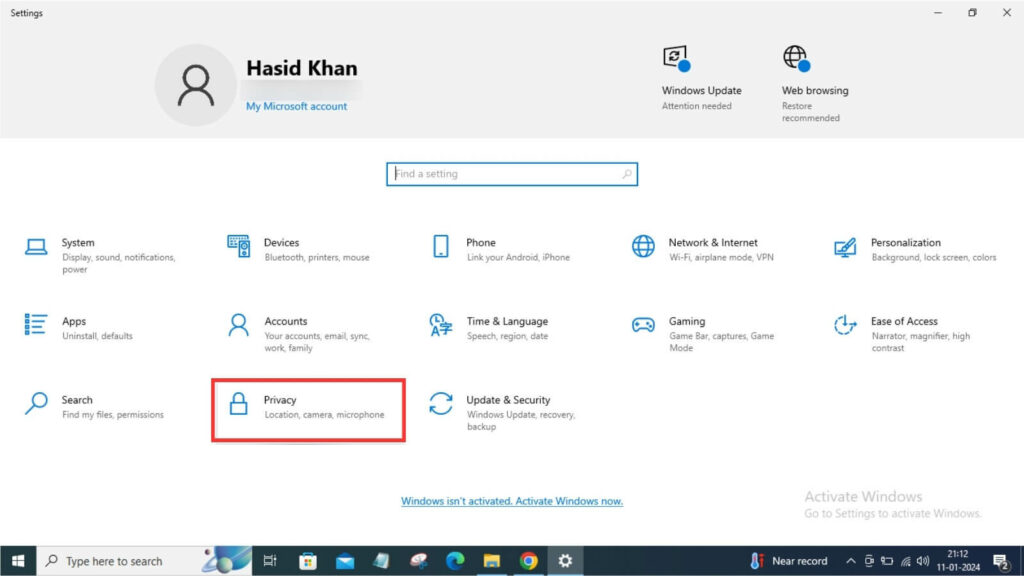
Step 2: The system settings page will open. Next, click on the Privacy option.
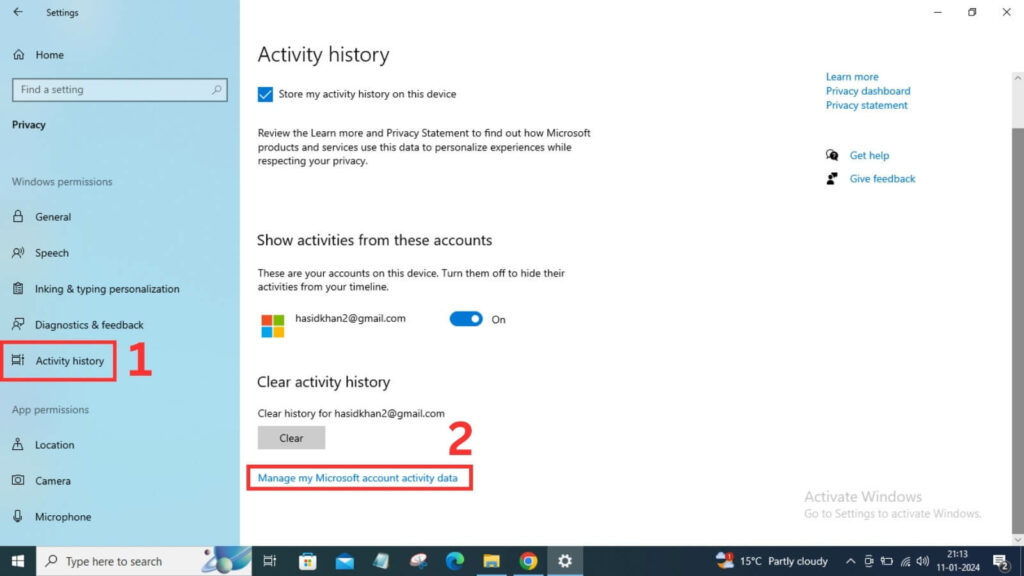
Step 3: Click on the Activity history from the left sidebar. Next, scroll down and click on the Manage my Microsoft account activity data.
Step 4: A new Microsoft account Privacy tab will open on your default browser. You need to sign in to proceed further. After signing in, scroll down and under Manage your activity data. You can see the activity data of your Microsoft account, such as location activity, browsing and search, app and service activity, and app and service performance data. You can expand any category to check its data and even delete it.
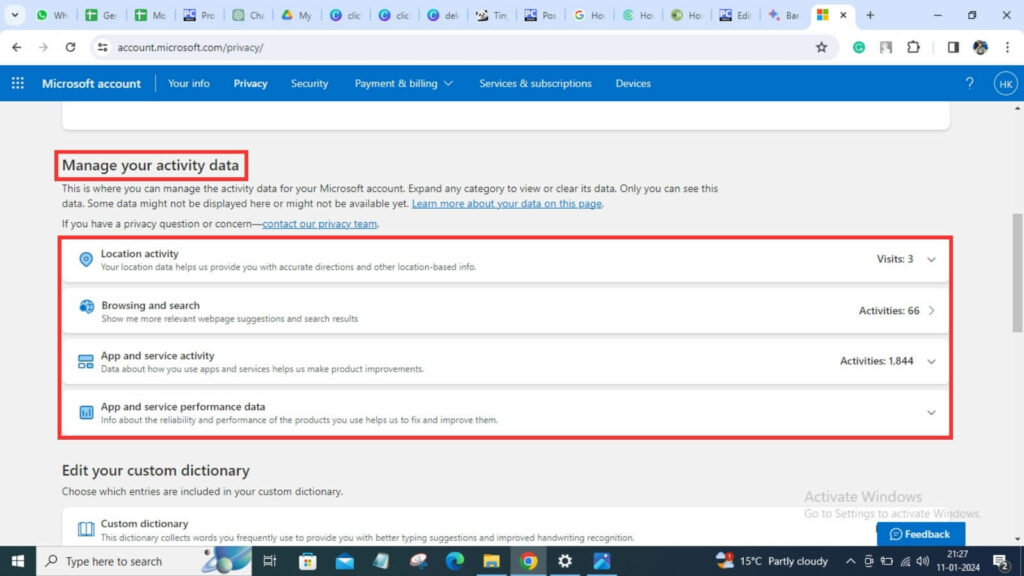
To check each category, firstly –
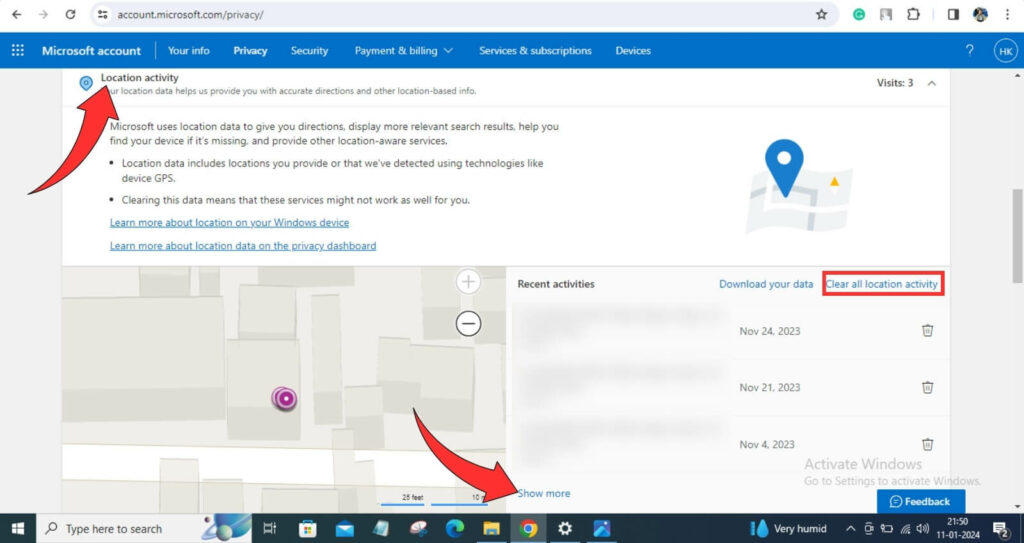
- Click on the Location activity to expand. At the bottom right side, you can check your location activity data. Click on ‘Show more‘ to check your entire location history. To delete location data, click on Clear all location activity.
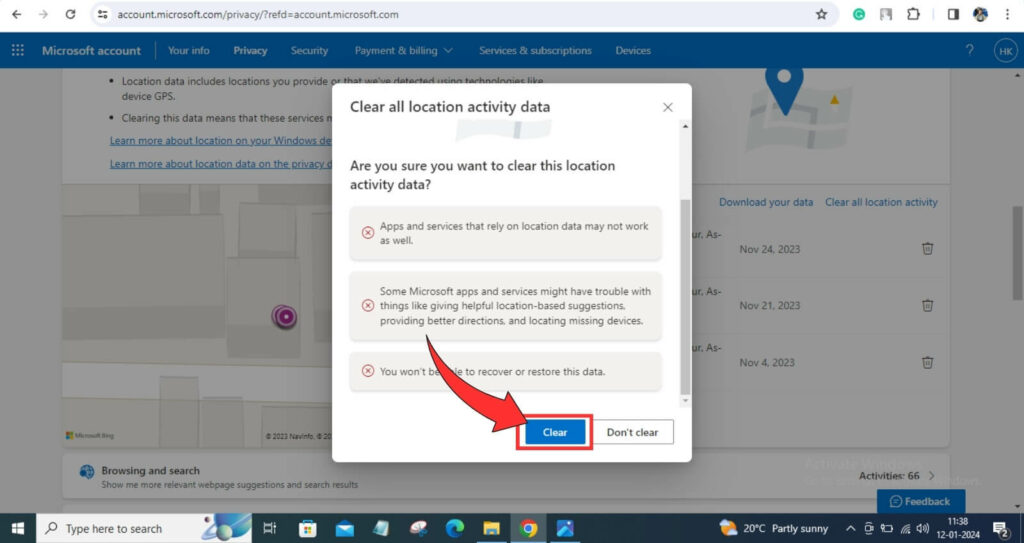
A pop-up will appear; click on Clear to delete all your location activity data.
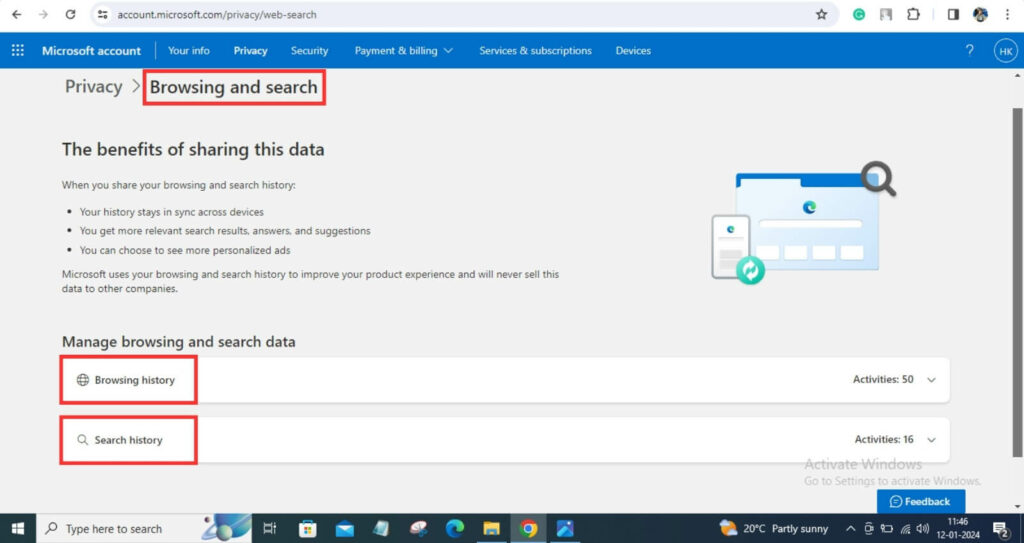
2. Next, click on the ‘Browsing and Search‘ category to expand. It has two sub-categories – ‘Browsing history‘ and ‘Search history.’
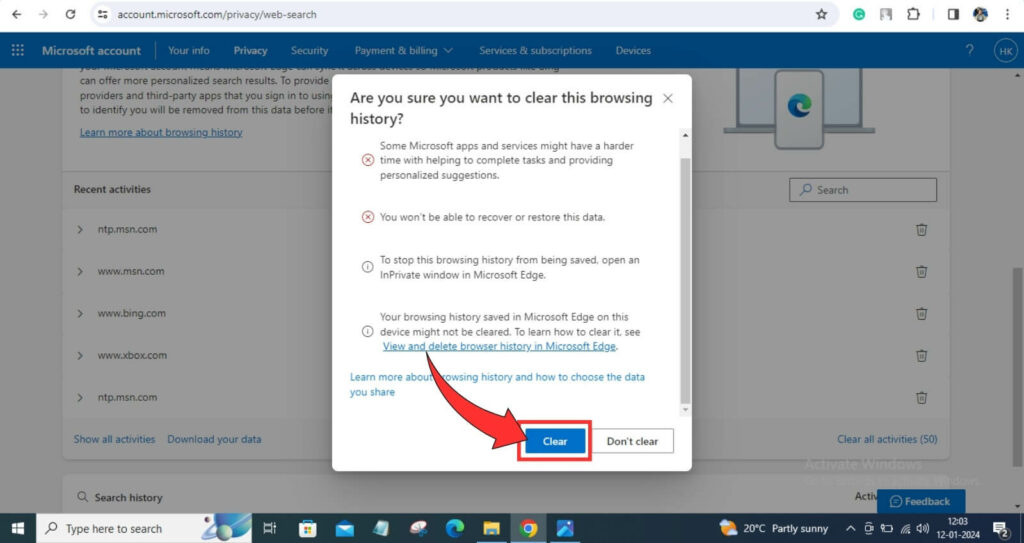
- Click on ‘Browsing history‘ to expand. Scroll down, and you can see your browsing data under Recent Activities. You can click on ‘Show all activities‘ to check all the browsing history data. To delete browsing history data, click on Clear all activities.
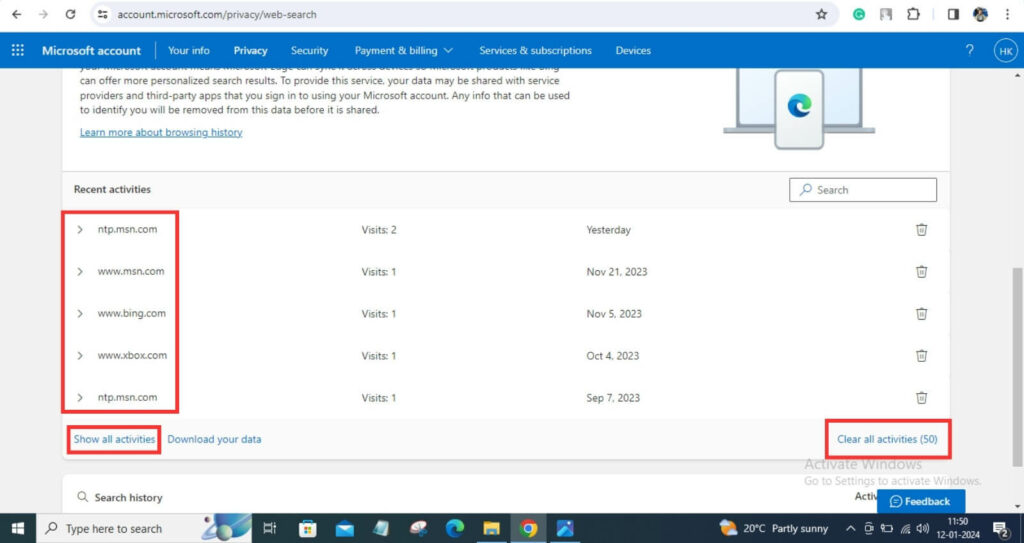
A pop-up will appear; click on Clear to delete all your browsing history.
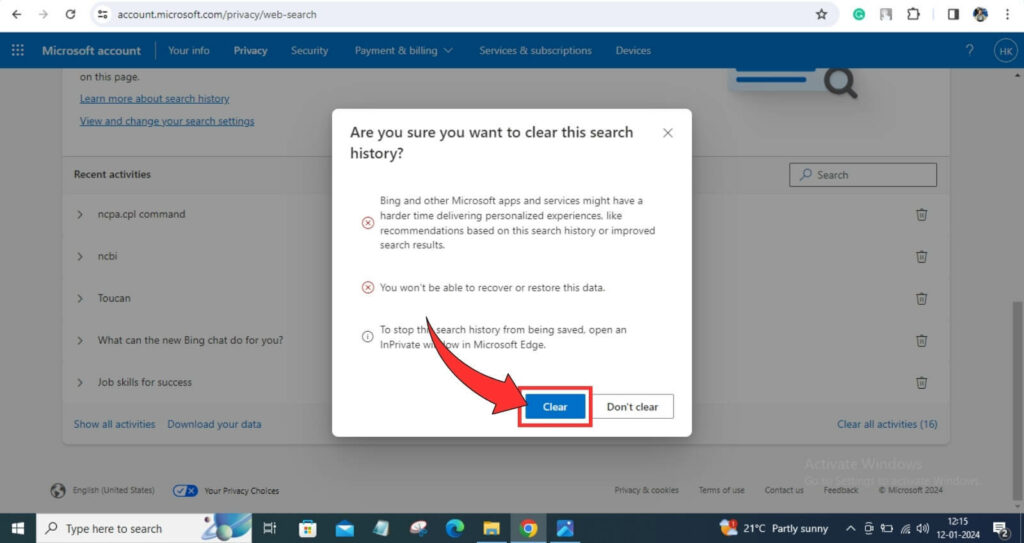
- Click on ‘Search history‘ to expand. Scroll down, and under Recent Activities, you can see your entire search history. Next, click on ‘Show all activities‘ to check all your past search history. To delete all your search history data, click on Clear all activities.
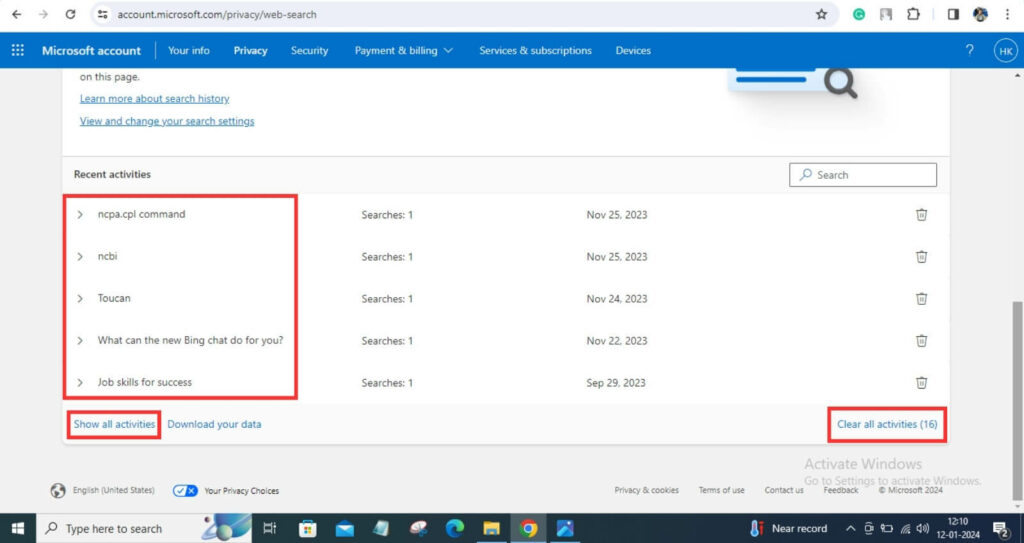
A pop-up will appear; click the Clear button to delete all your search history.
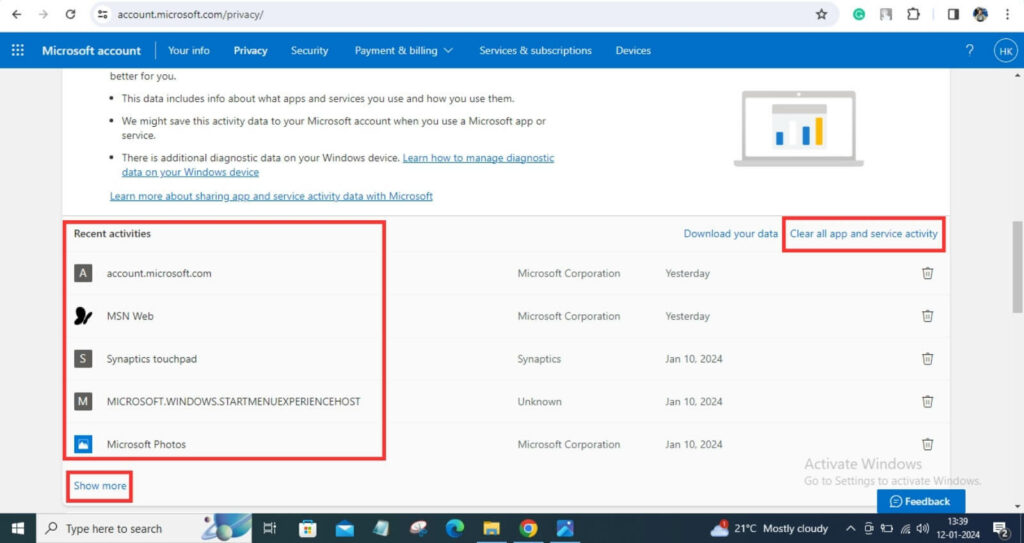
3. Now, click on App and service activity to expand. Scroll down to check your app and service activity under ‘Recent activities.’ Click on ‘Show more‘ to see all your past activities. To delete all your recent activities, click on Clear all app and service activity.
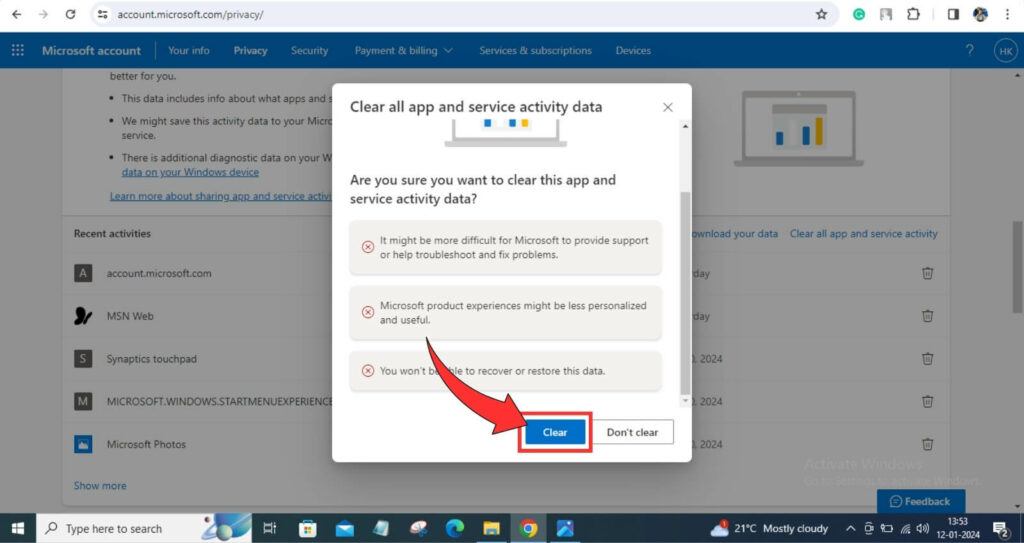
A pop-up will appear; click the Clear button to delete all app and service activity data.
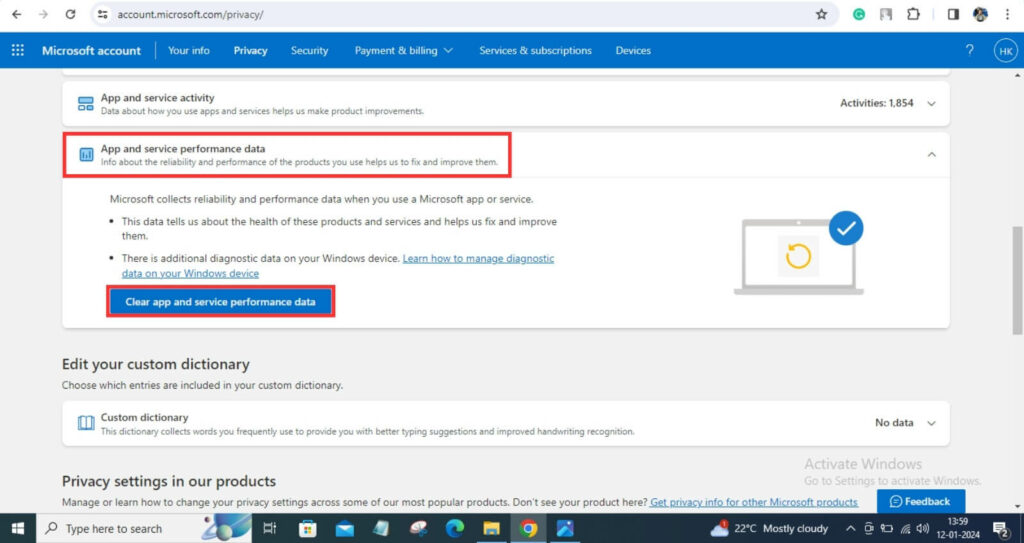
4. Lastly, click on App and service performance data to expand. Information about the reliability and performance of the products you use helps Microsoft to fix and improve them. This type of data is stored here. To delete App and service performance data, click on the Clear app and service performance data button.
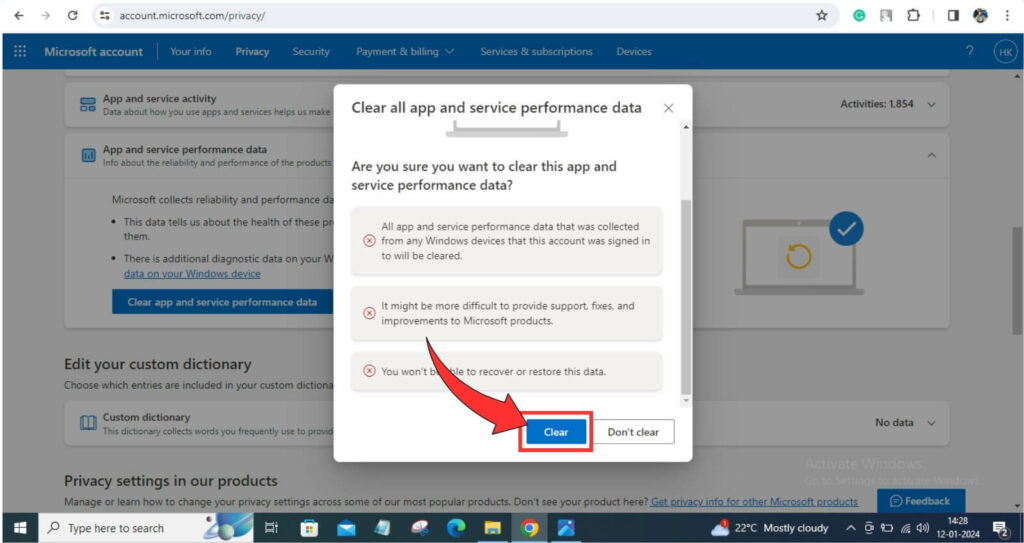
A pop-up will appear; click the Clear button to delete all app and service performance data.
Checking Recent Files of Computer
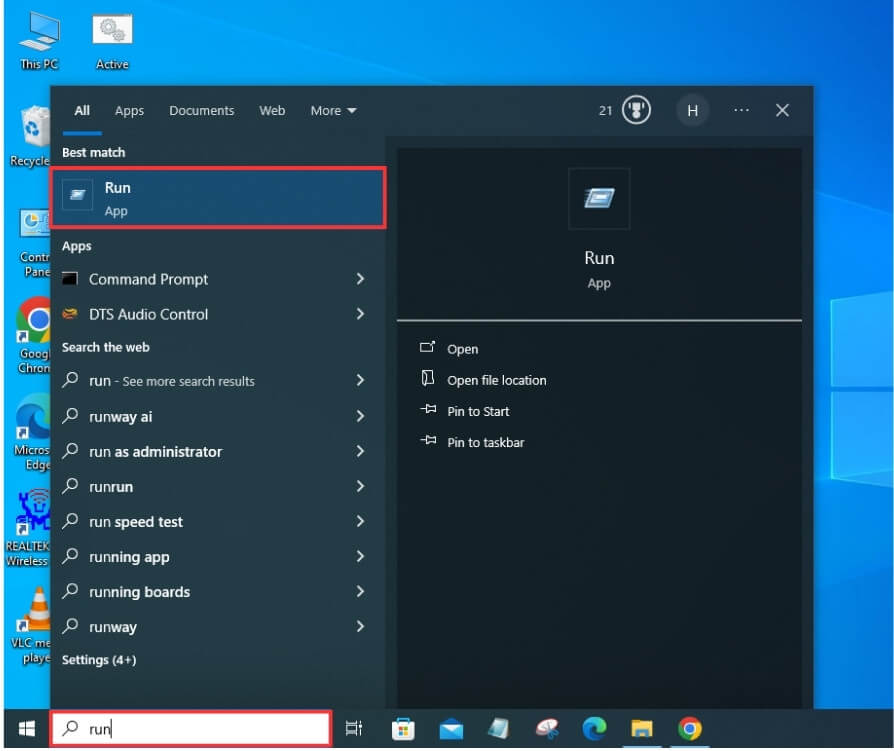
Step 1: Press the Windows key. Next, type Run into the search box and then press Enter.
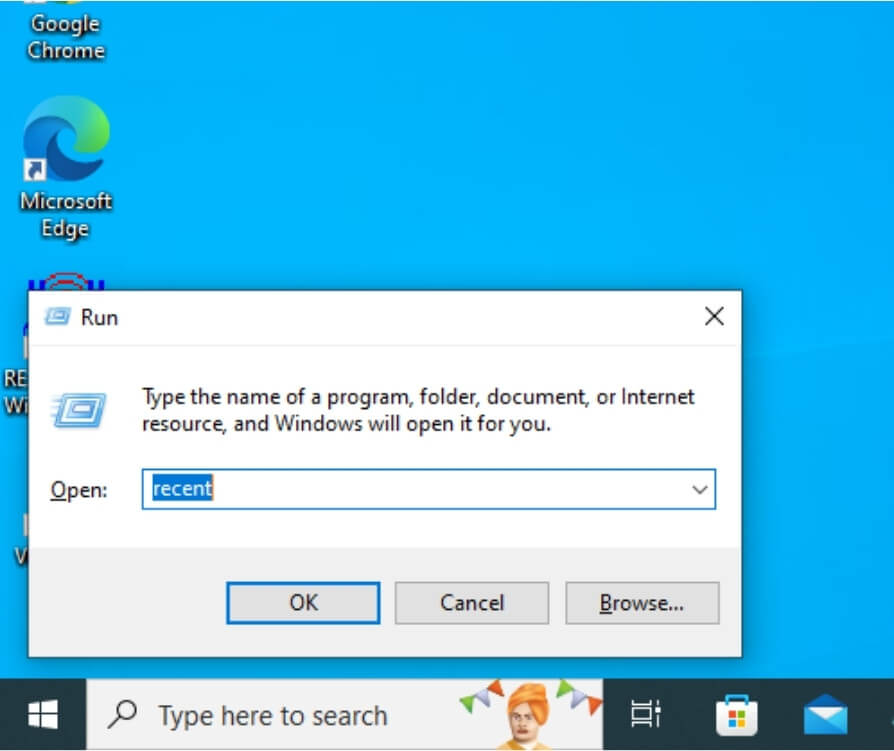
Step 2: Run box will appear. Type recent and click on OK.
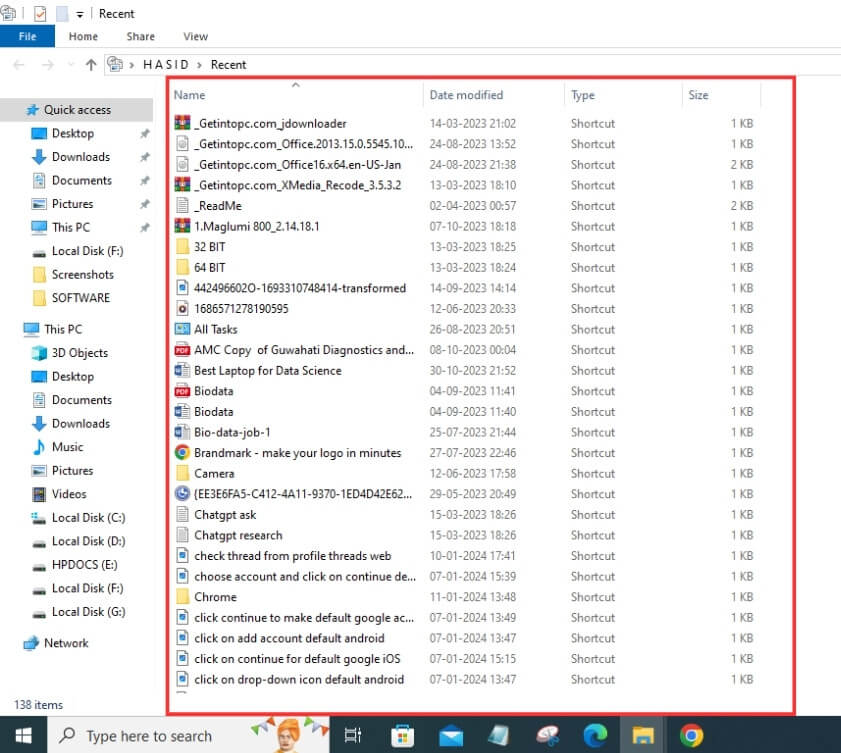
Step 3: Your recent files on your File Explorer will open. You can check the files according to the date modified.
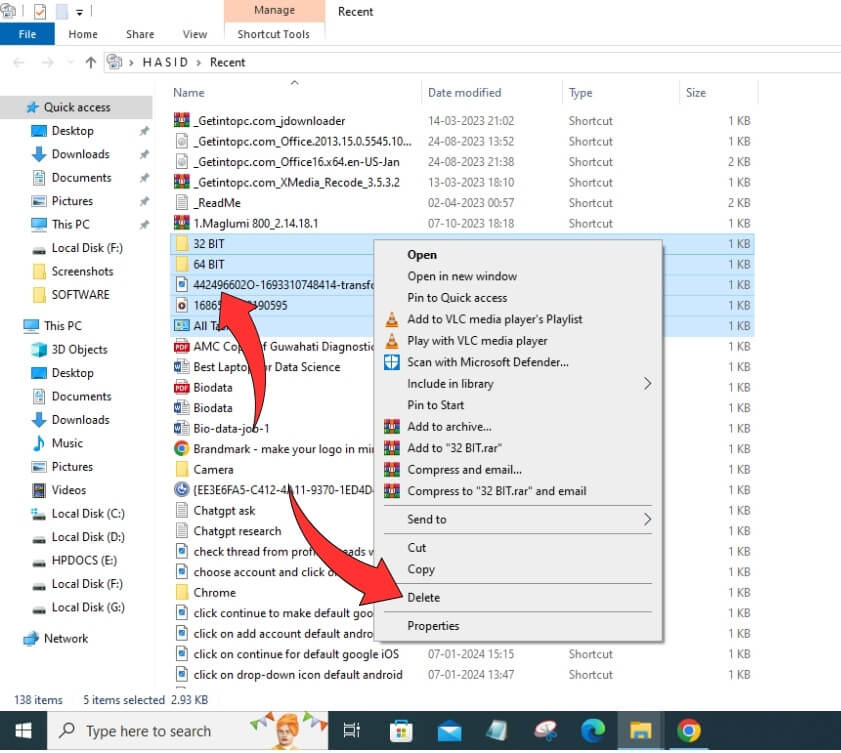
Step 4: To delete files, select the files you want to delete and then right-click on the selected files. Choose Delete from the list of options to delete the files from your recent file folder.
How to Check the Login History on My Computer?
1. Using Event Viewer
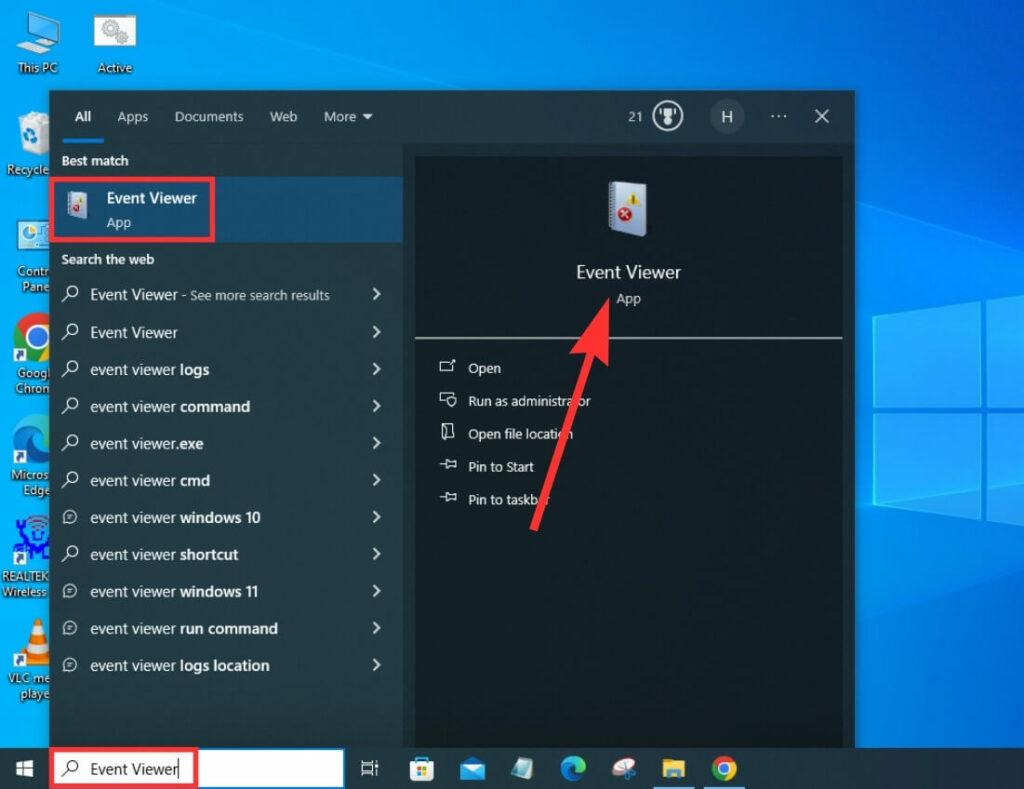
Step 1: Press the Windows key on your keyboard. Type Event Viewer into the search box and press Enter.
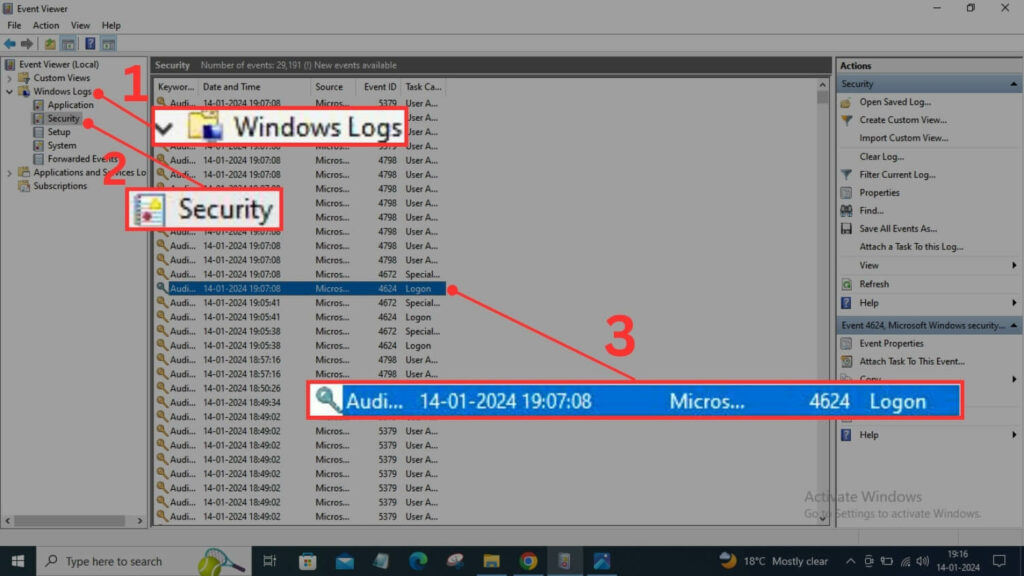
Step 2: A window will open. Go to Windows Logs > Security and look for events with Event ID 4624. It is an event for successful logons.
Step 3: Double-tap on an event whose ID is 4624 to get more information, including the account name, login time, and many more.
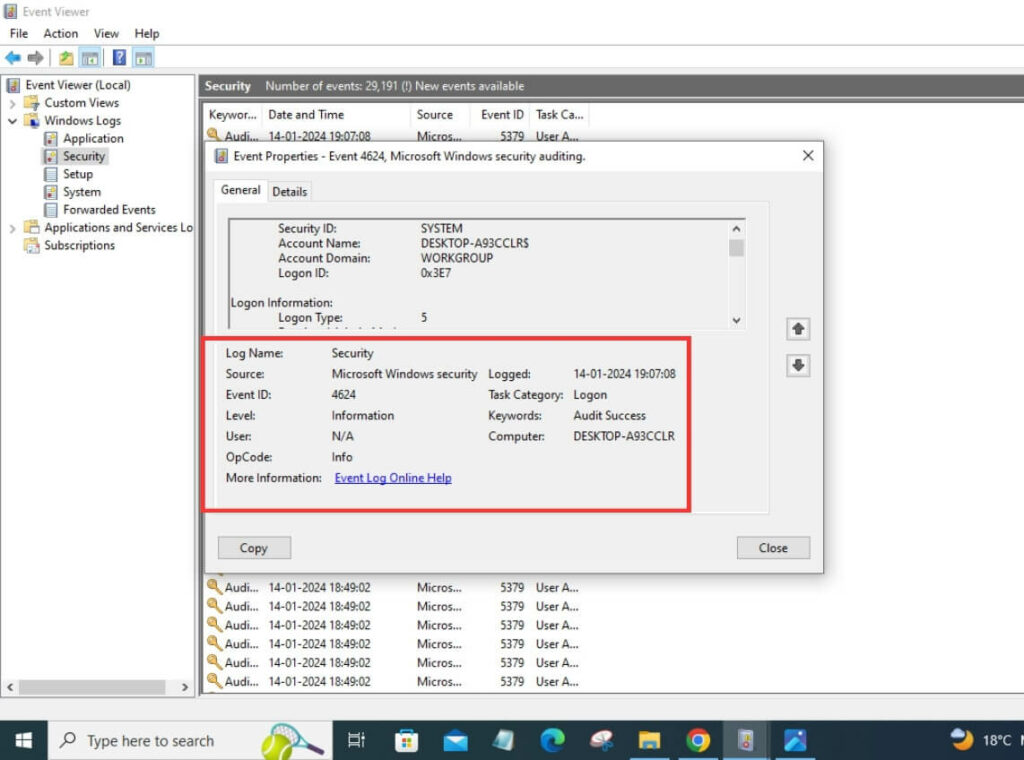
In this way, you can check all the logon events and get information.
2. Using Local Group Policy Editor
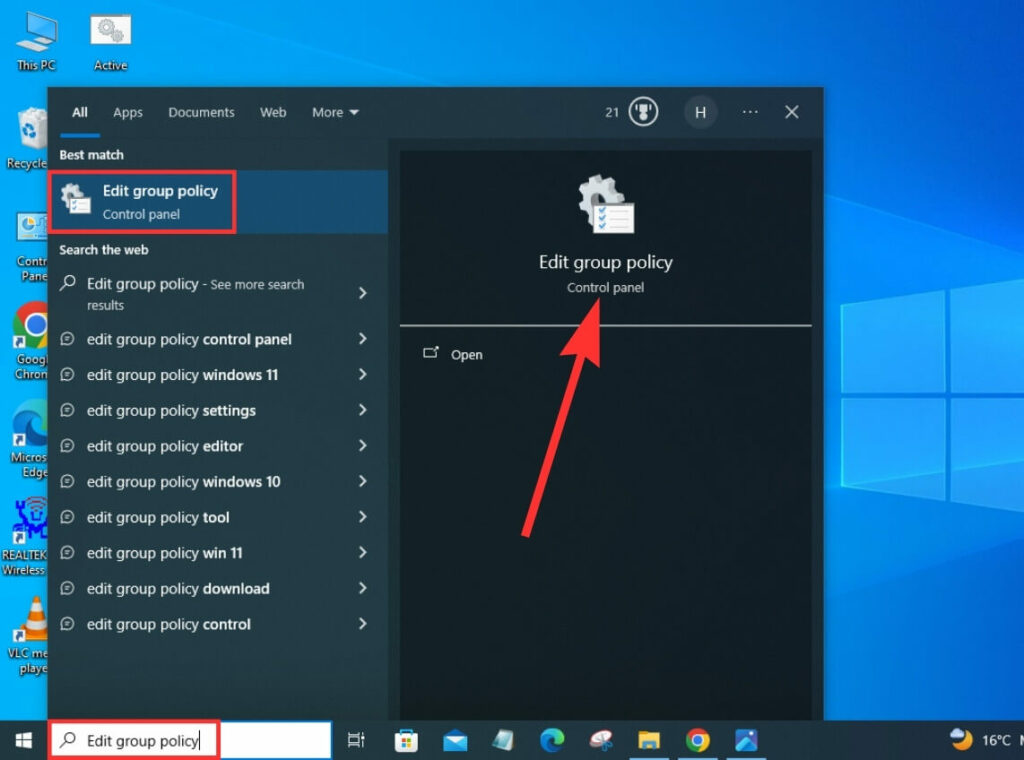
Step 1: Press the Windows key on your keyboard. Type Edit group policy and press Enter.
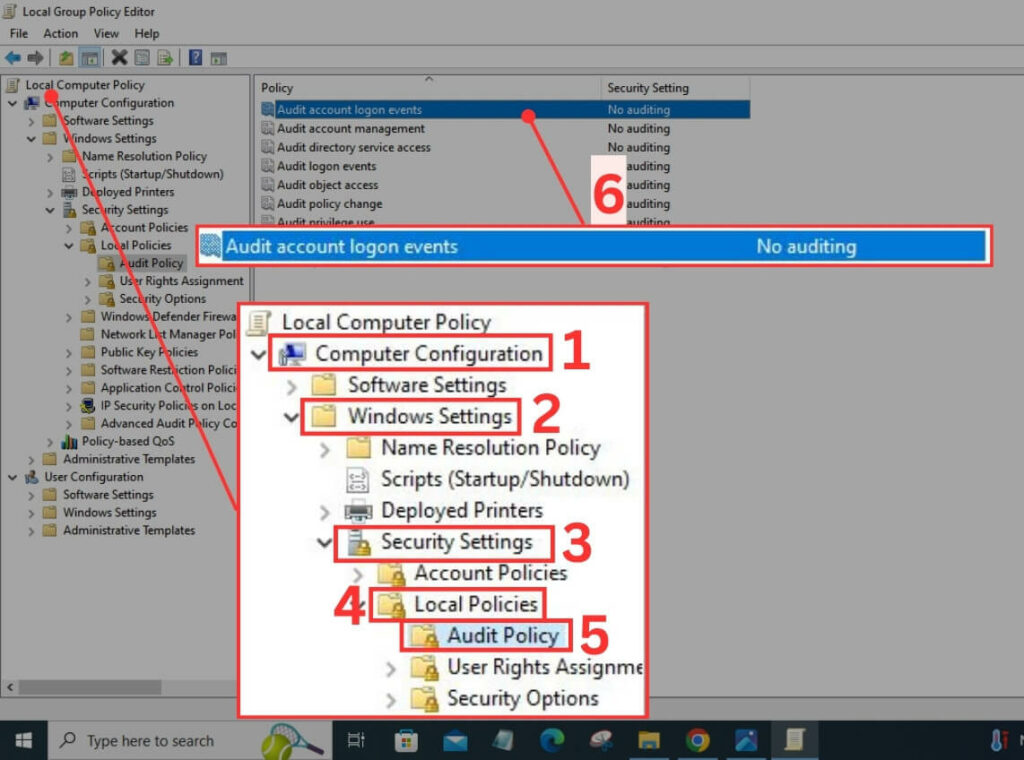
Step 2: The Local Group Policy Editor window will open. Then, go to Computer Configuration > Windows Settings > Security Settings > Local Policies > Audit Policy and double-tap on Audit account logon events.
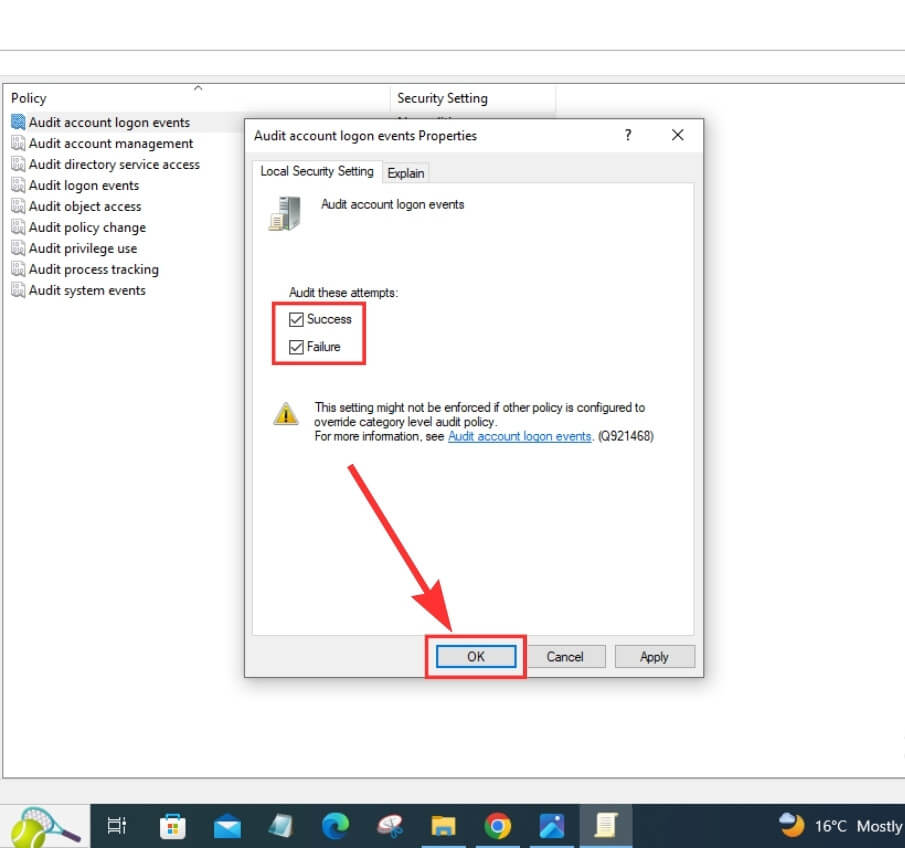
Step 3: A pop-up window will appear. Click the checkbox for Success and Failure to enable logging of all the logon events, and then click OK. Next, you can follow the Event Viewer method, as mentioned above, to see the logon events.
You Might Also Like
- How to Protect a Zip File: Step-by-Step Guide
- What is Bloatware? Everything you need to know
- What is Firewall: Everything You Need to Know
FAQs
No, Generally, incognito mode does not save any browsing history on your device. Private or incognito browsing is a mode that prevents your device from saving your browsing history, cookies, site data, or information entered in forms. However, this does not mean that your online activity is completely hidden or anonymous.
Your Internet Service Provider (ISP), the websites you visit, and some government authorities may still be able to track and record your browsing history.
Therefore, you should always be careful and responsible when browsing online, especially if you are accessing sensitive or confidential information.
Once you clear your browsing history, you can’t get it back. You clear your browsing history to hide the websites and searches you have made. Most browsers let you do this, but you usually can’t undo it.
Using third-party tools to check computer history can have some benefits, such as more features, options, and convenience. However, it may also come with some risks, such as malware infection, data theft, or system damage. Therefore, you should be careful while choosing and using third-party tools to check your computer history.
Get them only from trusted places like official websites. Don’t click on strange links or pop-ups. Scan the download with antivirus software, and read the terms and reviews. Back up your items before using the tool and use them only when needed. Don’t overdo it or use too many different tools.
Final Words
Checking your computer’s history can help you for many reasons, such as keeping your laptop safe or fixing problems. You can learn more about the history of your computer by looking at its different parts. You can see what you did online and how to use your computer better. But be careful and respectful when you check your computer’s history. Follow the rules and steps for your computer type.
In the end, we advise you not to store any personal or sensitive data on any device without proper protection. Unauthorized users can exploit your data if they have access to your device.


