The keyboard is not working on a Lenovo laptop. It seems to depend on which model. Some models have the same problem, and some have a different one.
Many familiar computer brands manufacture laptops for great productivity and suit every type of user, like a gamer, writer, or casual user.
No matter which category you fall under, the keyboard is one of the most basic devices to perform almost every task. But if you find that the keyboard installed on your laptop has become non-responsive, it may cause you real trouble and inconvenience.
Sometimes, the same scenario happens in the case of Lenovo laptops, as quite a few users report the issue. Sometimes, the problem is with the specific keys that don’t work when pressed or something goes wrong with the entire keyboard.
If you face the same issue, it is not entirely your fault, as this is common among Lenovo laptop users.
If you face any trouble regarding your laptop’s keyboard, below is the guide to getting back an effective working keyboard.
What causes the malfunctioning of your laptop’s keyboard?
The basic and the most effective way to get rid of this trouble is to check out the problem that causes the keyboard’s malfunctioning first, i.e., whether the problem is with the laptop’s software or the hardware, and then decide according to the nature of the issue.
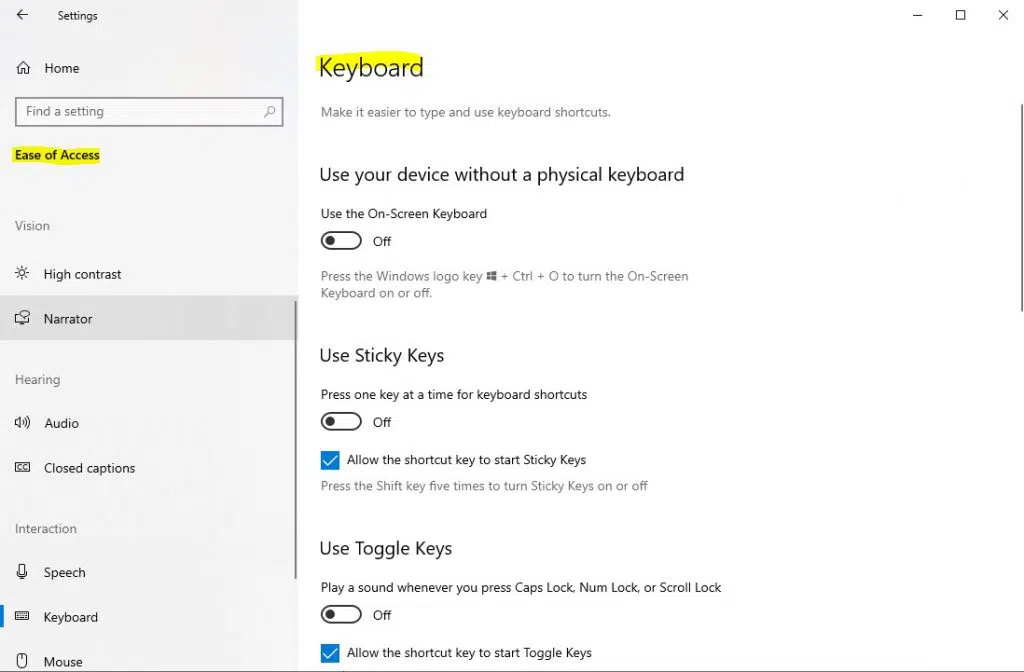
Go to settings and open “Ease of access.” Move to the keyboard section and enable the on-screen keyboard.
Use the laptop’s keyboard and check out all the keys by pressing them physically. Look out for the keys that are not responding.
Now, open the command prompt as administrator and test for the failed keys:
If the failed keys (checked on the virtual keyboard) work, the issue is caused by software and not the keyboard itself. But if the non-responsive keys do not work, the problem is with the hardware, i.e., the keyboard itself.
The main reasons that cause the malfunction of your computer’s keyboard?
Sometimes, the keys are damaged physically, and the wire connections between the keyboard and the motherboard are lost.
There may be dust or foreign objects lodged between the keys. Try cleaning the keyboard.
Outdated, faulty, or missing drivers can be the root cause of this problem. Driver updates make the system and its input-output devices work properly.
The keyboard rarely stops working on the Windows login screen. This might be a filter key error.
The power management settings in your operating system (Windows 10, macOS, Chrome) may cause the keyboard to turn off if it is kept inactive for some time.
Different methods to sort out Lenovo keyboard issue
Various troubleshooting methods can solve this issue if you’re having trouble with your Lenovo ideapad or Thinkpad keyboard.
1. Run keyboard troubleshooting program
Windows built-in troubleshooting feature can find out and sort some possible problems most of the time. So run the keyboard troubleshooting by applying the following steps:
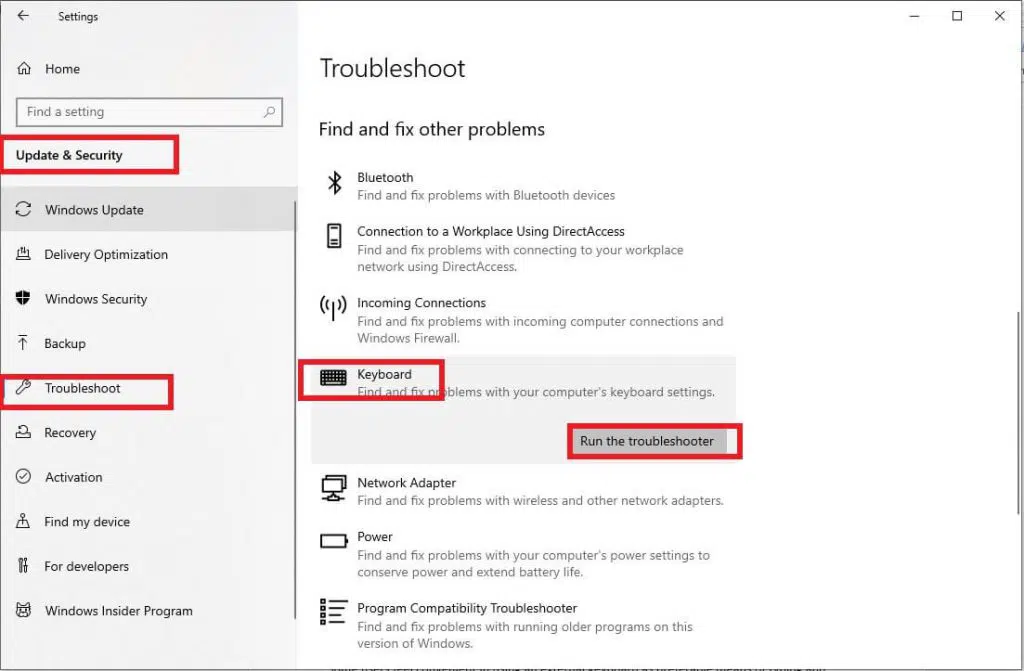
Step 1: Open Settings on your laptop and click on the “Updates and Security” option.
Step 2: From the left menu, select troubleshoot, and under this tab, look for “keyboard.”
Step 3: “Run the troubleshooting” option in the keyboard section and let Windows check out and resolve the possible errors with your laptop’s keyboard.
2. Disable certain keyboard features
Sometimes, disabling certain keyboard features makes it work easily and may help sort out this problem. To disable these keyboard enhancements, follow the process:
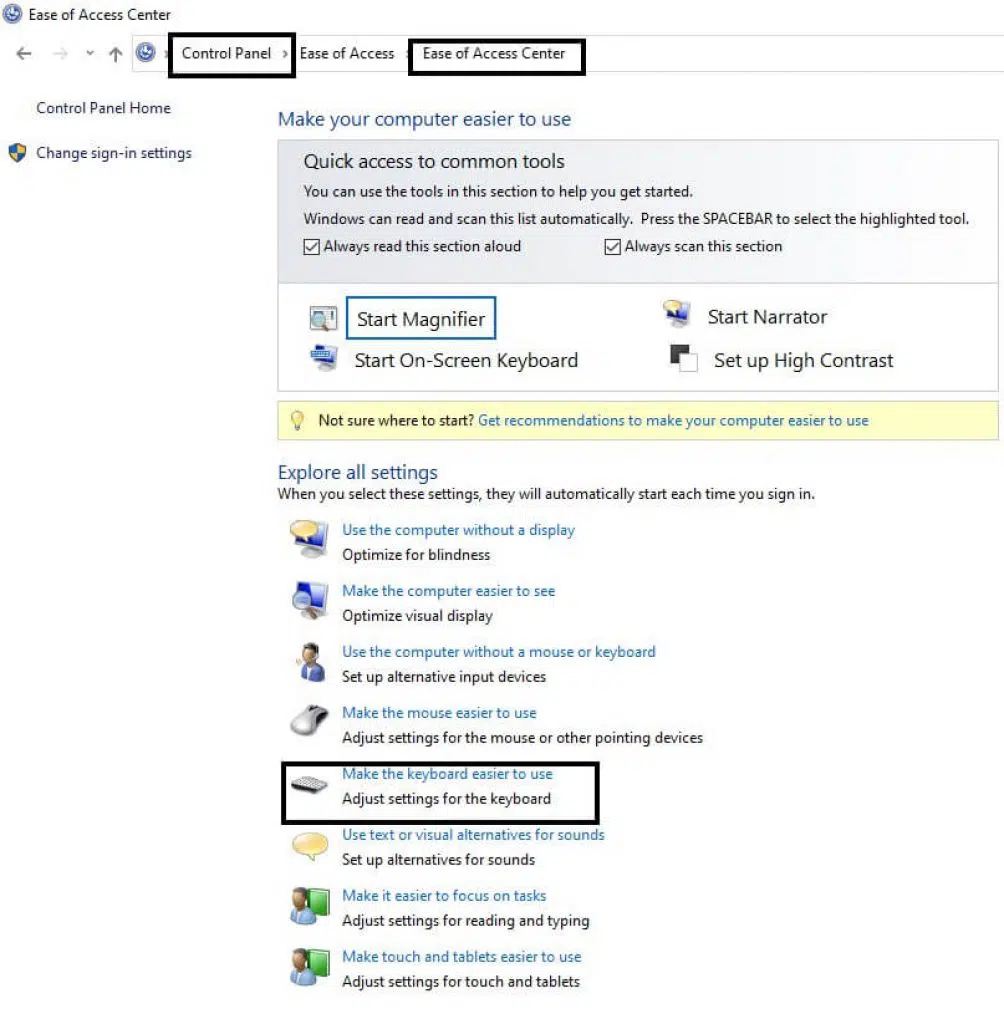
Step 1: Open the control panel window from the desktop.
Step 2: Go to the “ease of access” feature and click the “ease of access center.”
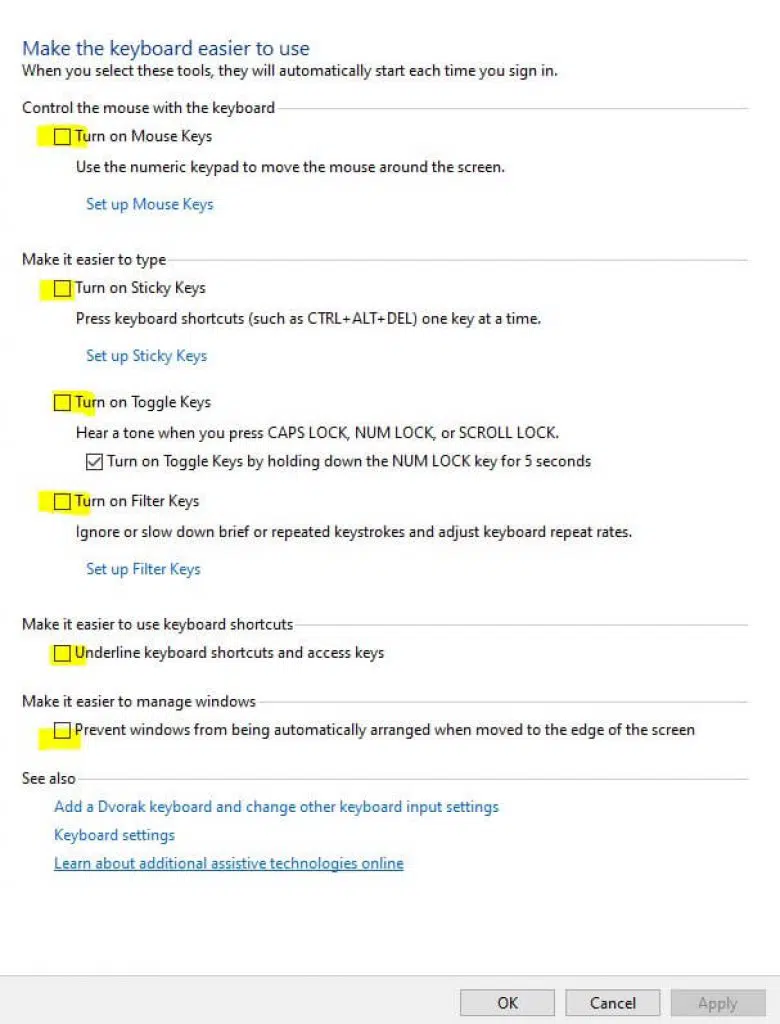
Step 3:Click on “ make the keyboard easier to use,” and a new window will prompt open.
Step 4: Uncheck all the options, including filter keys and after applying the settings you’ve made, restart your laptop.
3. Remove and uninstall the external keyboard from your laptop
Some users feel convenient to use an external keyboard as a preferable means of typing, and using an external keyboard can sometimes lead to traffic clashes between the two devices. Try uninstalling the external keyboard from your laptop. It might help in sorting out the problem:
Steps to unlink the external keyboard:
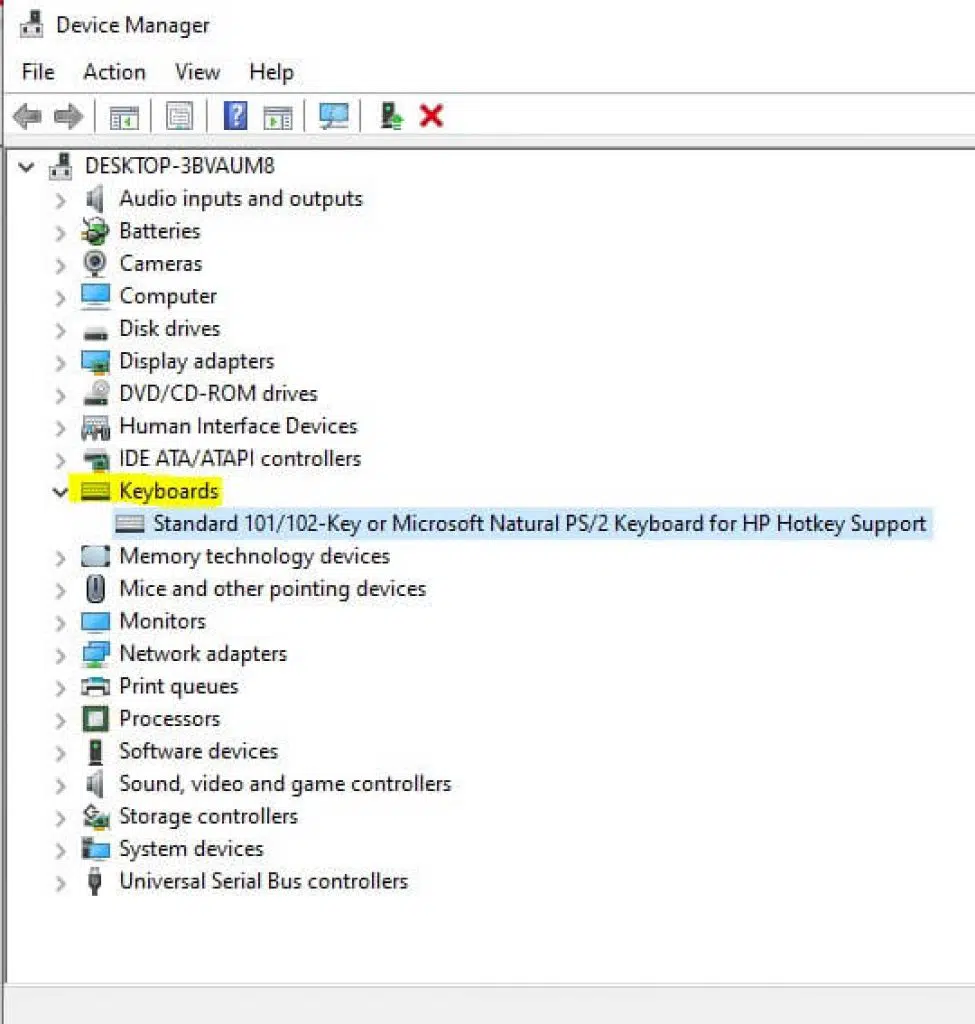
Step 1: Search the device manager in the taskbar and open it.
Step 2: Expand “keyboards” in the list of devices and right-click on the keyboard to be uninstalled.
If your laptop’s keyboard gets perfect in working perfectly now, surely the keyboard connected externally was causing the trouble.
4. Check and reinstall the drivers
Outdated, corrupt, and malfunctioning drivers can be a major factor in getting the input and output devices. If you are having trouble with the laptop’s keyboard, updating drivers might solve your problem.
Steps to update drivers:
Step 1: Open the device manager and Expand “keyboard.”
Step 2: Now click on “uninstall the device.”
Step 3: Restart the laptop and let Windows install the drivers again.
If this method is not working, try manually updating your drivers.
Step 1: Go to the official Lenovo website.
Step 2: Click “detect your product,” And then select Drivers accordingly.
Step 3: Click “Start scan” under the “automatic driver update” tab or check out manually for the keyboard updates.
5. Check your region, language, and time settings.
These settings can affect how your keyboard works. If they are wrong, your keyboard might produce different results than what you expect. To fix this, make sure your region, language, date, and time settings match your location and preferences.
6. Perform a system restore on the laptop
At times, the changes made in the system’s settings, intentionally or mistakenly, make the system unstable and affect the input-output devices. These changes can be reverted by performing a system restore on your laptop.
Steps to restore the keyboard settings of a laptop:
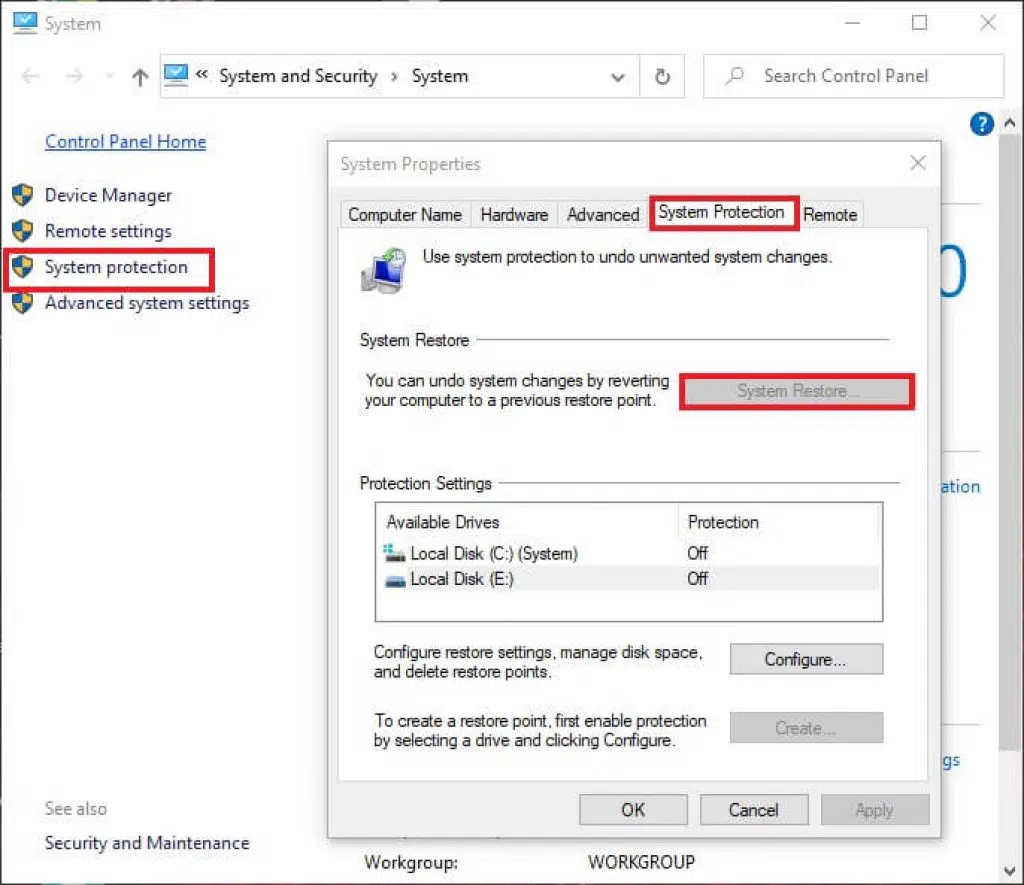
Step 1: Open System Properties either from the Control Panel or the desktop My Computer shortcut.
Step 2: Click on “System protection” from the left menu and click “System Restore.”
Step 3: Click “Next” to proceed and select the restore point.
Step 4: Finally, click “Finish” to complete the process, and if the confirmation box pops up, click YES.
Step 5: Now restart your laptop, and the system will reverse its settings, making the keyboard work properly.
You Might Also Like
- How to Cool Down Your Laptop while Gaming, Working?
- How to Factory Reset a Lenovo Laptop?
- How to Fix Lenovo Laptop Won’t Connect to Wi-Fi?
Final Word
Most of the time, the keys stick and stop working for a while. Pressing them repeatedly makes them work normally again. If the problem is complicated and unresolved, you can easily and quickly fix it by following one of the above methods.
You probably have a problem with your keyboard. Most of the time, problems are caused by dirt or other materials trapped in the keyboard.
Laptop keyboards have little space for air to pass through, which can even cause something as simple as a hairball to get stuck and make your laptop stop working.
If you have a computer with a keyboard, it’s important to check it as soon as possible. Use the methods and tips to ensure the keyboard is working properly.
If your laptop problem still needs to be fixed even after applying all these methods, let us know in the comment box.


![How to Factory Reset Acer Laptops? [Step-by-Step Guide]](https://pcvenus.com/wp-content/uploads/2024/04/How-to-Factory-Reset-Acer-Laptops-324x160.webp)

