Do you want to transfer files like photos, videos, and audio from one laptop to another, whether between Dell laptops or other models? If so, this guide will help.
This post provides a step-by-step method for transferring files wirelessly, using a USB flash drive or hard drive, or using a data transfer cable. These methods can share personal photos, videos, documents, and other files.
These methods are the best and simplest ways to transfer files from one laptop to another.
Things to Know Before Transferring Files:
- Check destination laptop storage.
- Back up essential files for safety.
- Close apps for a smooth transfer.
- Good internet speeds help for wireless transfers; use wired connections for big files.
- Keep laptops updated with the latest OS and antivirus.
- Safely remove external devices to avoid data issues.
Ways to Transfer Files from Laptop to Laptop
Method 1: Use a USB Flash Drive or External Hard Drive
Step 1: Connect your USB flash drive or external hard drive to your source computer.
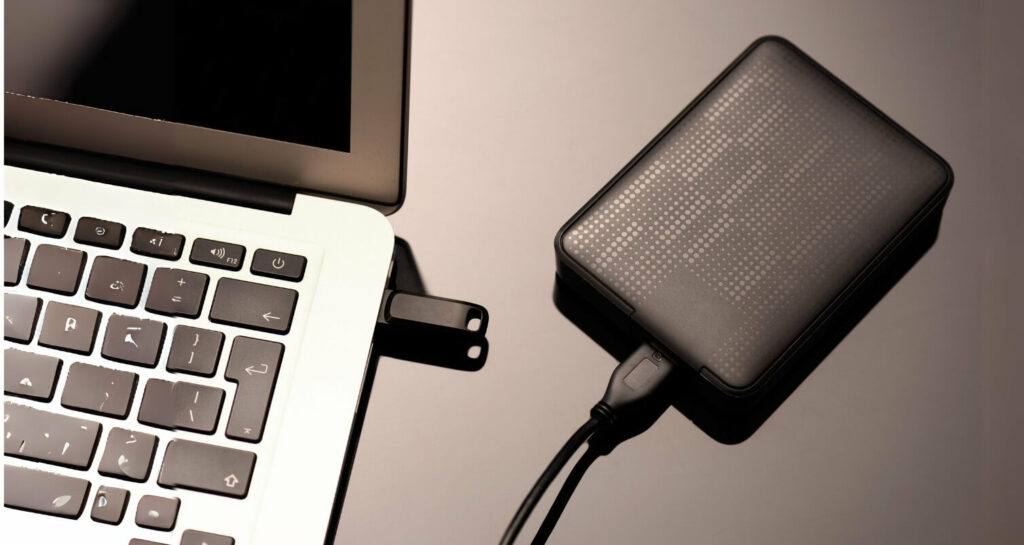
Step 2: Go to the folder on your source computer where the files you want to transfer to the destination computer are located.
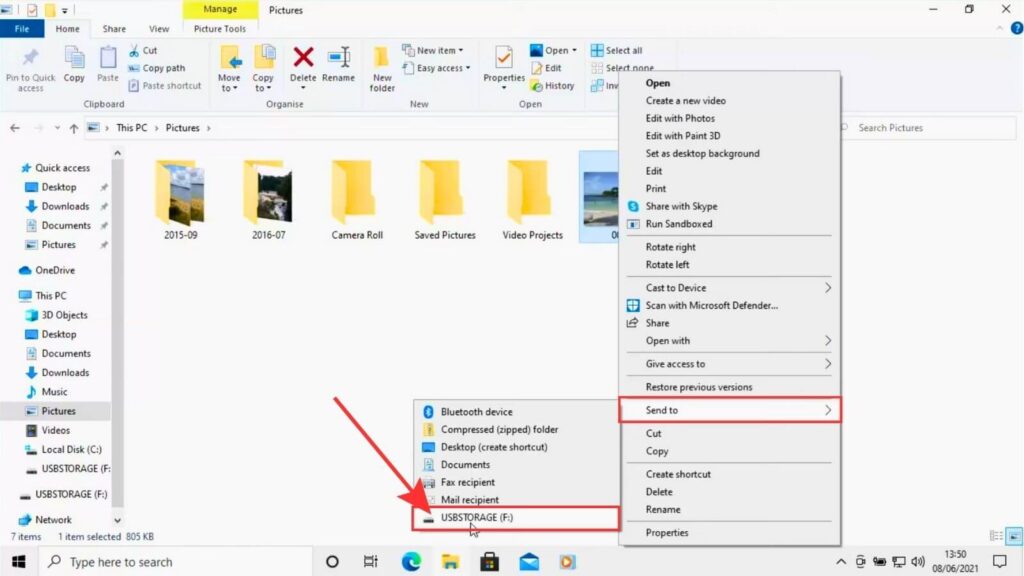
Step 3: Select the file you want to transfer and right-click on it. Click on Send to option and select your USB drive. The file will be transferred to your USB drive.
Step 4: Connect your USB flash drive or external hard drive to the destination computer.
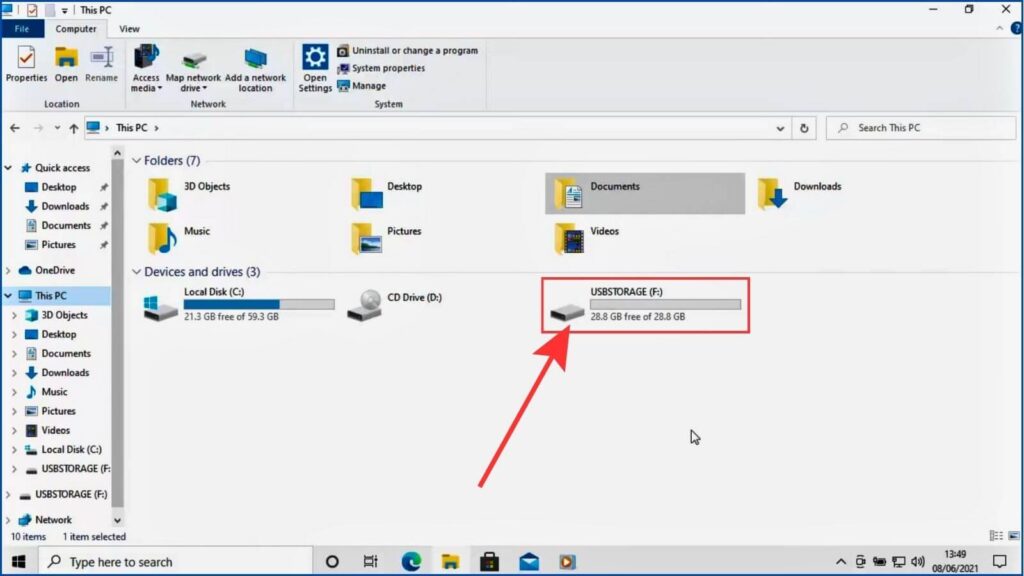
Step 5: Go to This PC and open the USB drive. Now, select the file that you want to transfer to your destination folder and right-click on it. Next, click the Copy or Cut option to move the file to the destination folder.
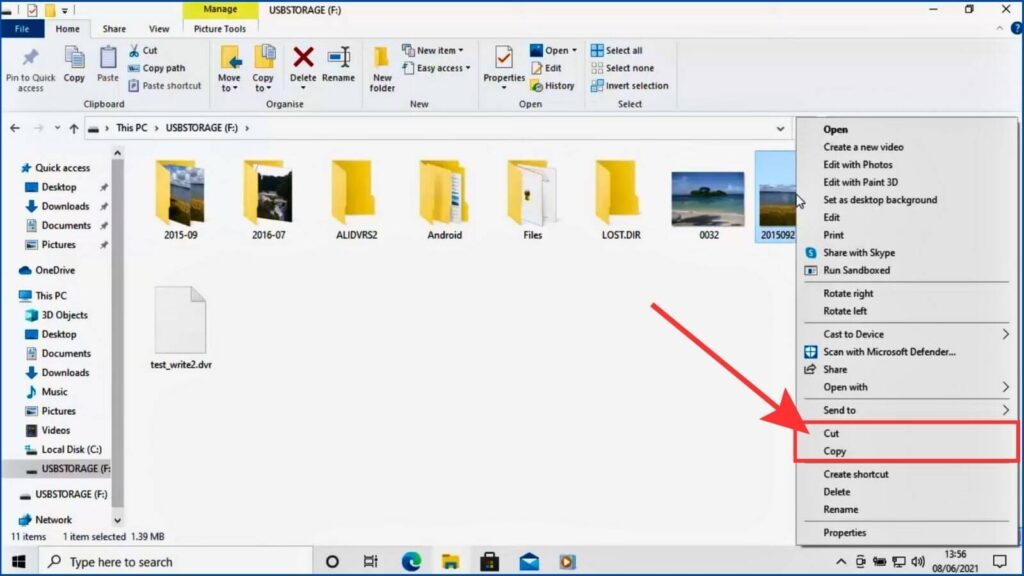
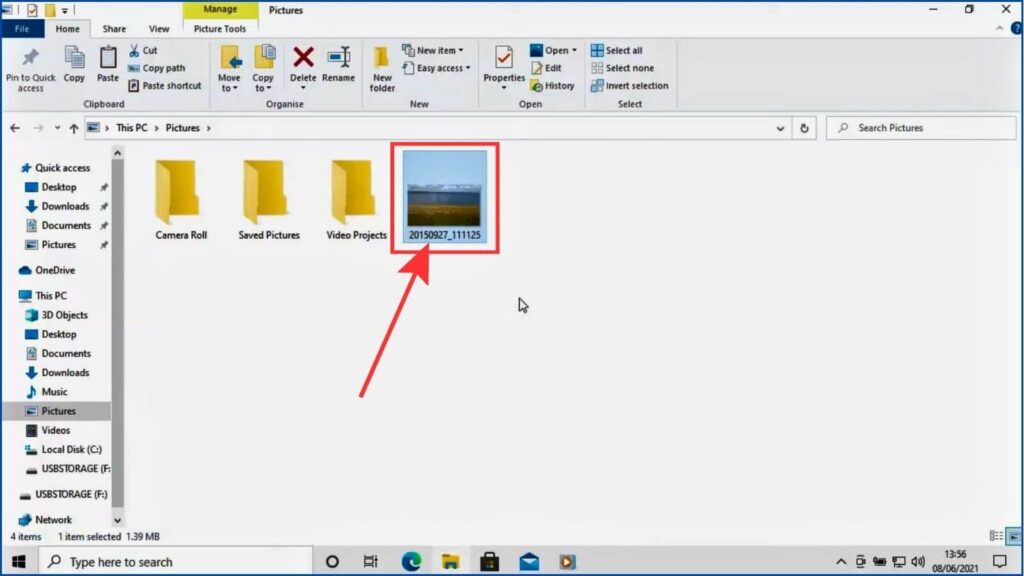
Step 6: Go to the destination folder. Right-click on the empty area and select the Paste option.
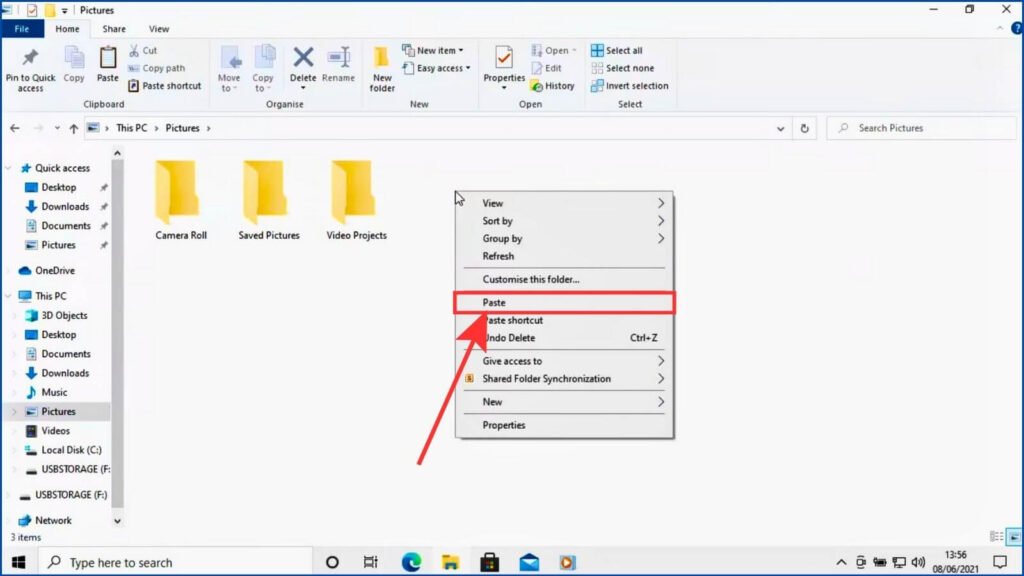
In this way, the file has been transferred to the destination folder. You can follow the same steps to send multiple files. You need to select multiple files before sending or copying.
Method 2: Using Google Drive
Step 1: Go to Google Drive on your source computer and sign in using your Google account.
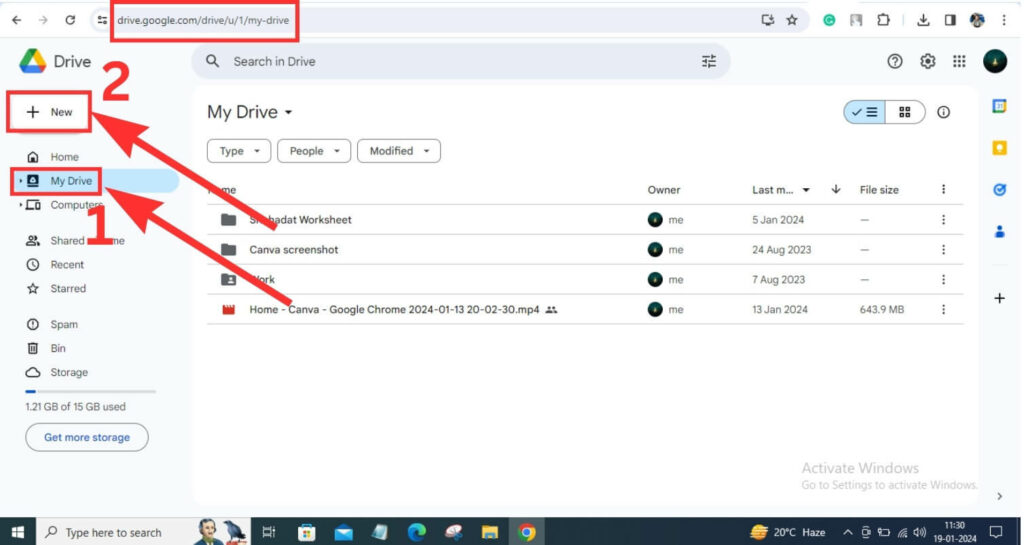
Step 2: From the left sidebar, click on My Drive and then click on the + New button to upload files.
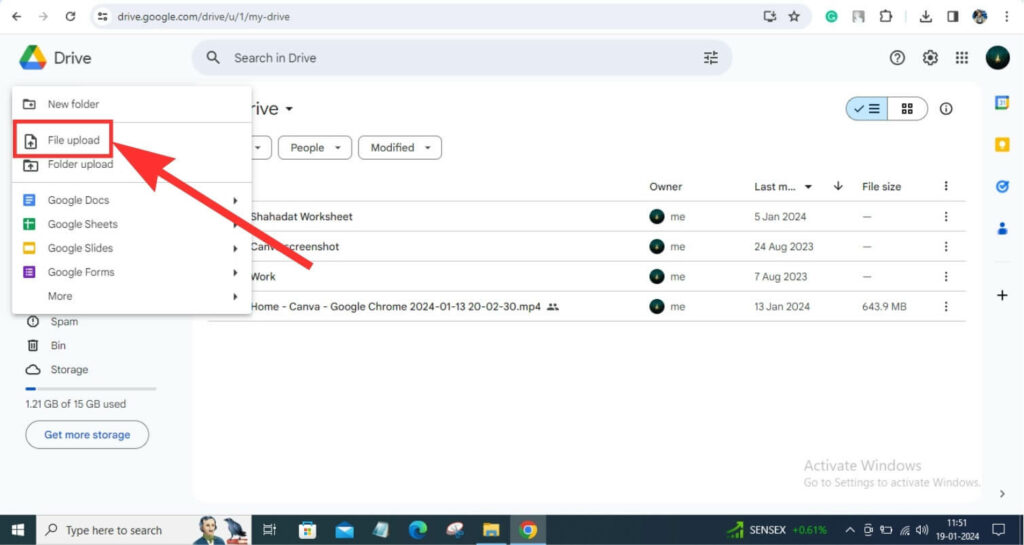
Step 3: Select File Upload from the options list.
Step 4: A pop-up window will appear. Go to the folder where your file is located. Select the file and click on Open. Depending on your internet speed, your file will be uploaded.
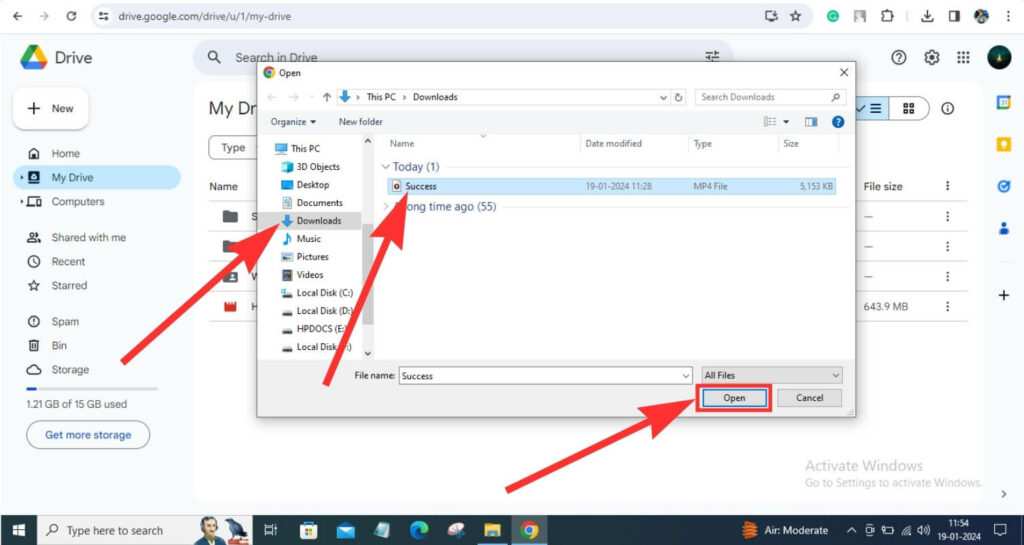
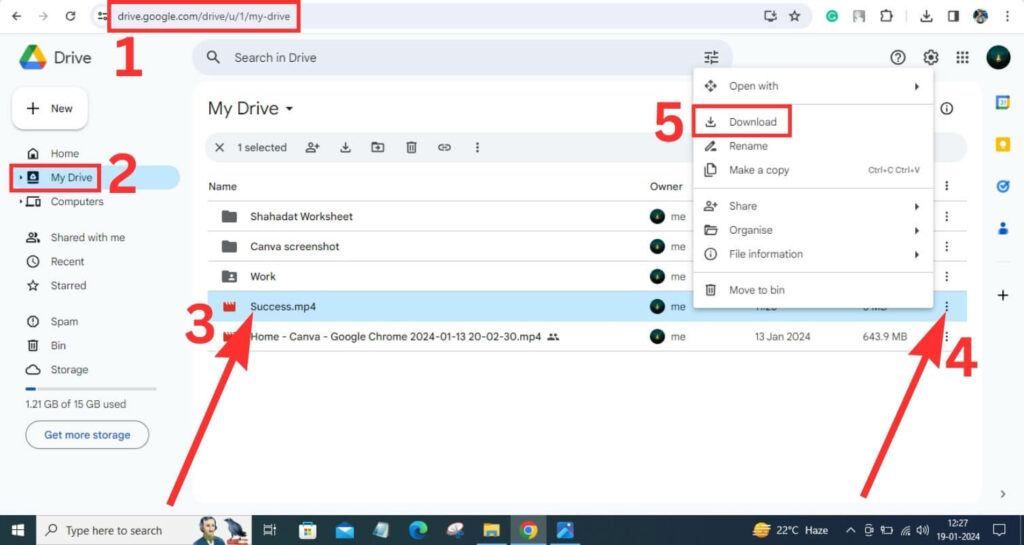
Step 5: Go to Google Drive on your destination computer and sign in using the same account you used to upload your file. Click on My Drive, and you will see the uploaded file there. Select the file and click on the three dots on the right side of the selected file. Next, click on Download to save the file to your destination computer.
Method 3: Using Network Sharing
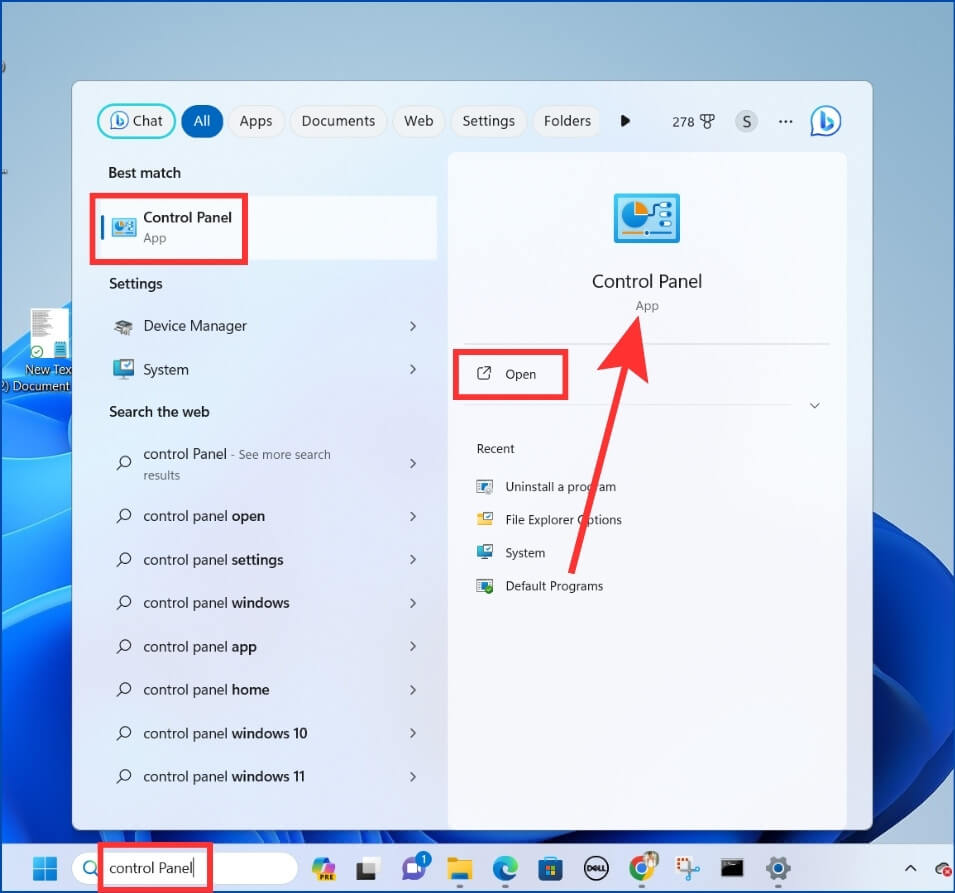
Step 1: Press the Windows key on your keyboard. Type Control Panel into the search box and press Enter.
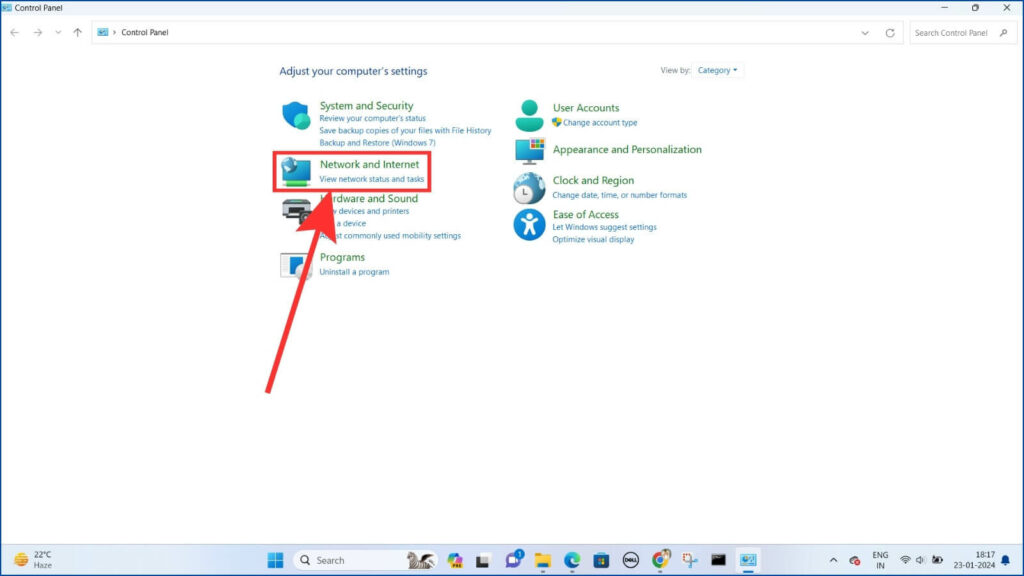
Step 2: Click on Network & internet.
Step 3: Now, click on Network and Sharing Centre and open it.
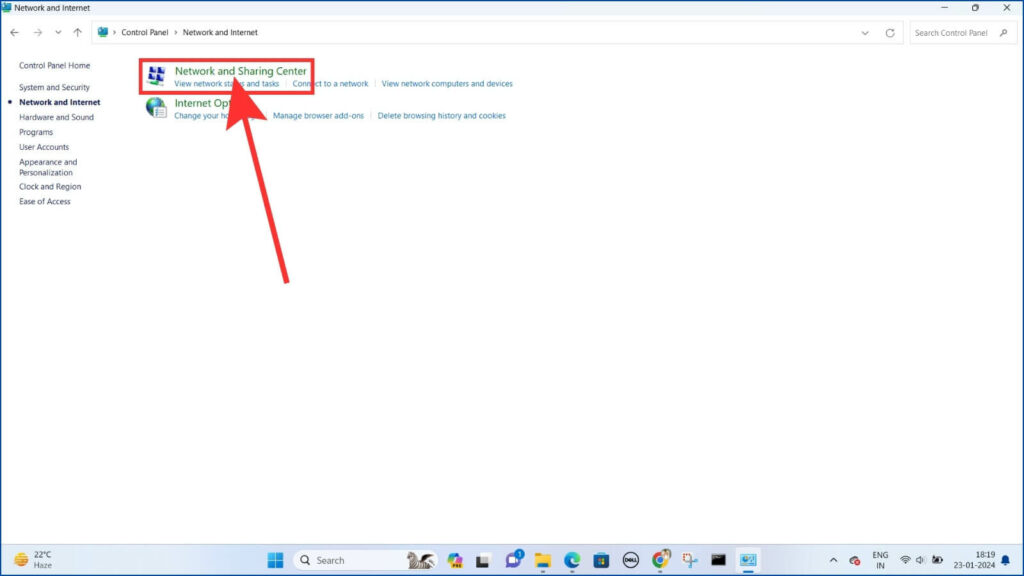
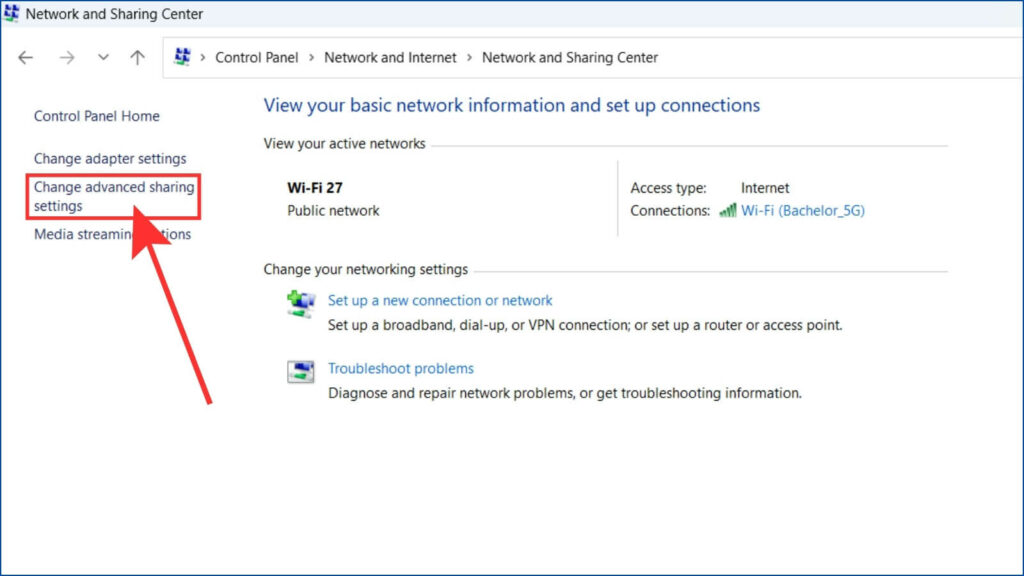
Step 4: Next, click on ‘Change advanced sharing settings.’
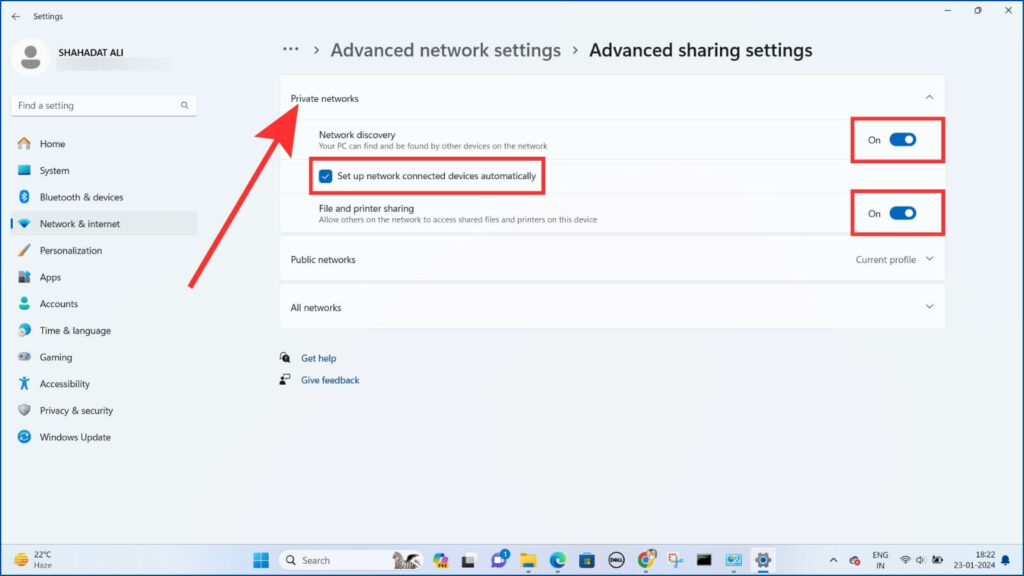
Step 5: In the Private networks, turn on the toggle for ‘Network discovery‘ and check the box for ‘Set up network connected devices automatically.’ Then, turn on the toggle for ‘File and printer sharing.’
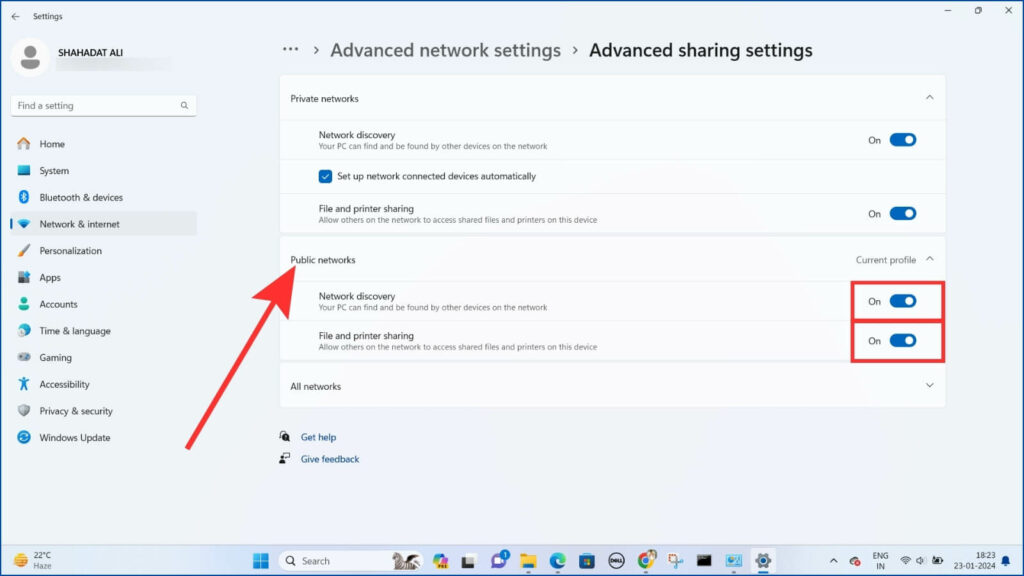
Now, navigate to Public networks. In this section, turn on the toggle for ‘Network discovery‘ and ‘File and printer sharing.’
Proceed to ‘All networks.’ Turn on the toggle for Public folder sharing. In the File sharing connections, select the ‘128-bit encryption‘ option. Finally, for Password-protected sharing, turn off the toggle.
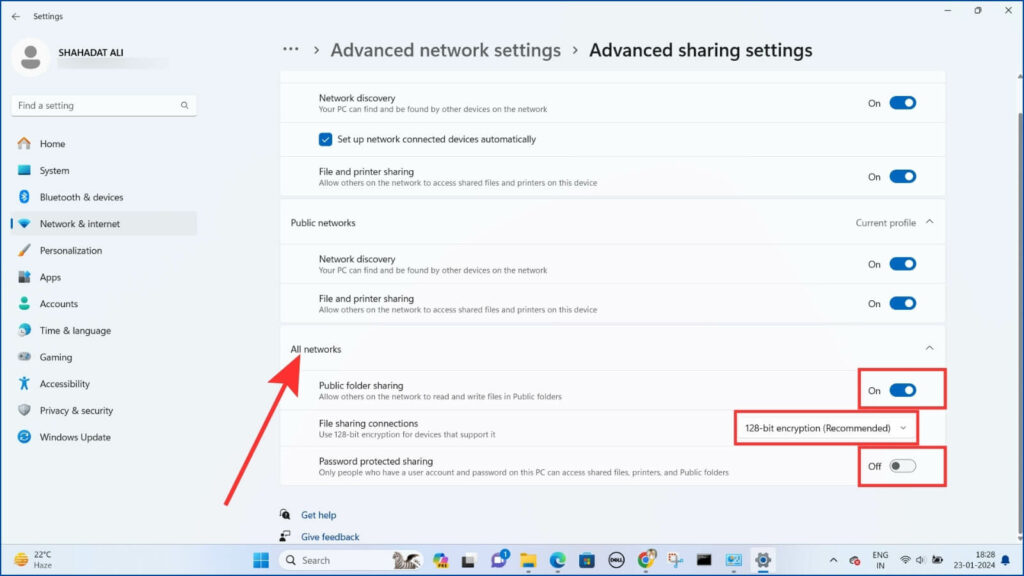
Note: To make this method work, you must configure both laptops’ settings. Simply follow Steps 1 to 4 for settings configuration on both laptops.
Step 6: Connect both laptops to the same wifi network. If you don’t have wifi then you can use a hotspot connection.
Step 7: Create a folder on your source laptop and copy the files to this folder, as you have to make this a sharing folder. You can also copy your files to this folder after making it a sharing folder.
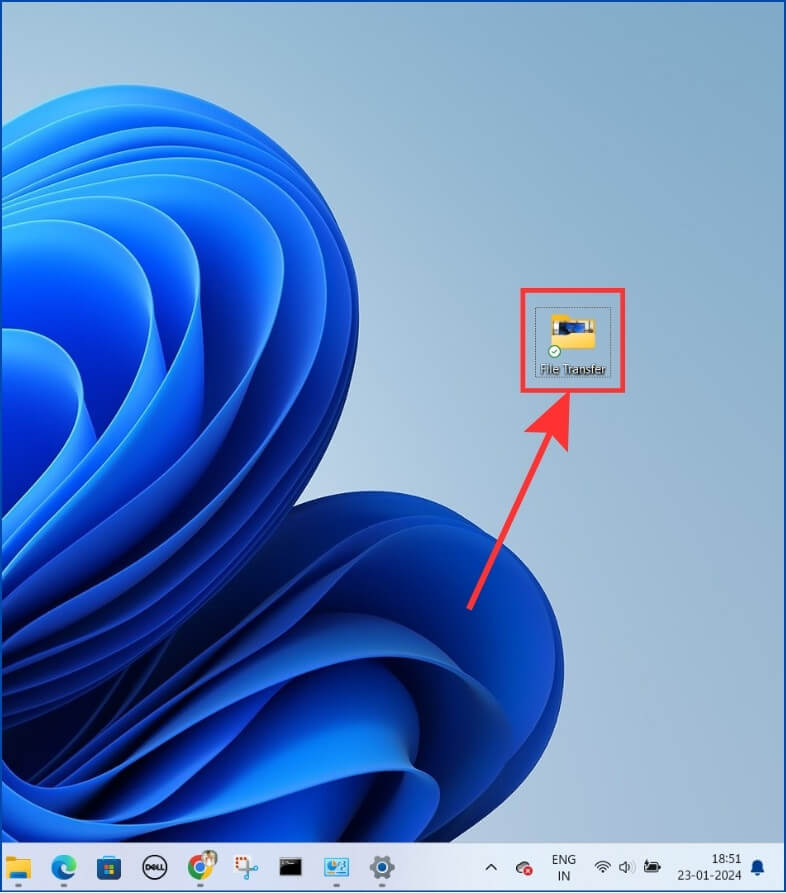
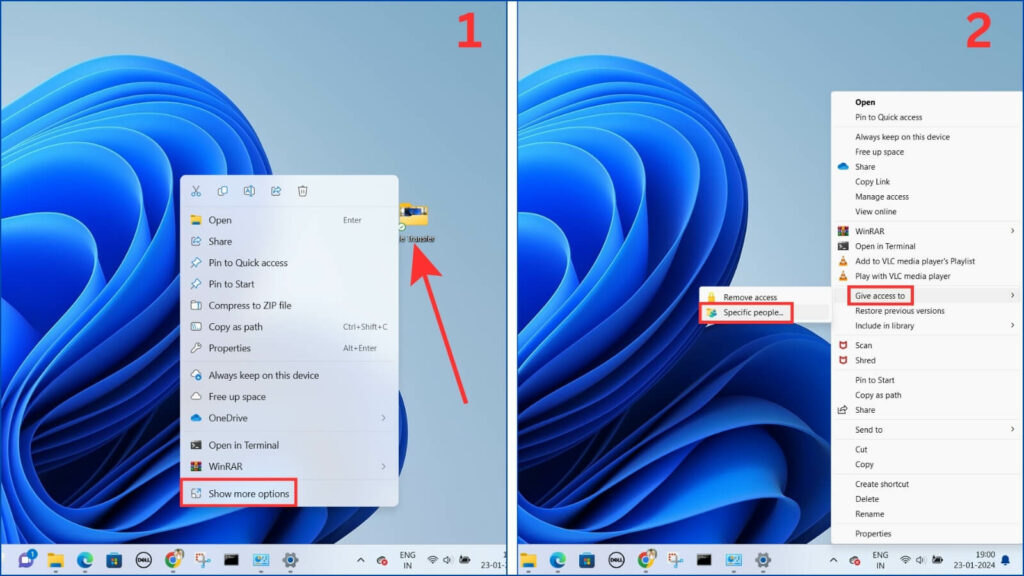
Step 8: To make a sharing folder, right-click on it and click ‘Show more options‘ if you can’t find the ‘Give access to‘ option. Select the option Give access to and choose Specific people.
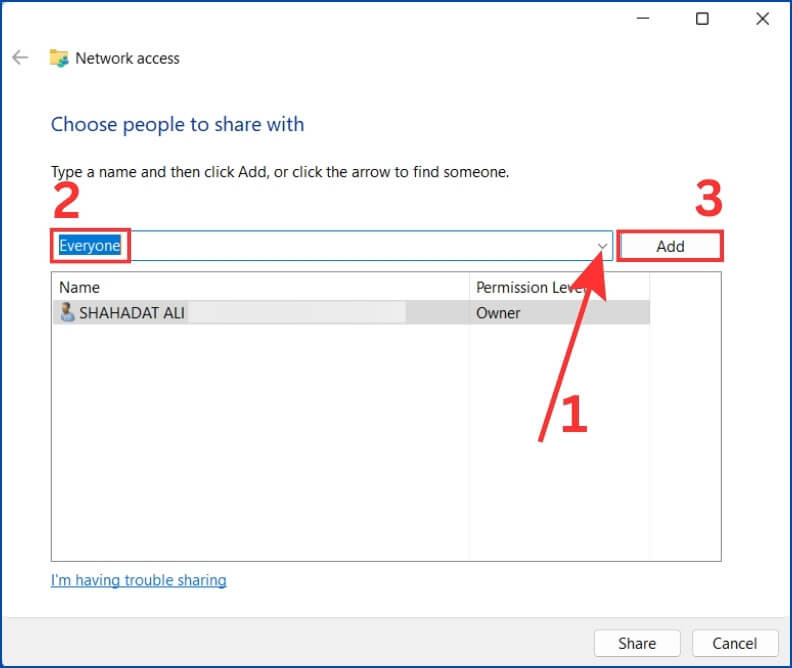
Step 9: A new window will open. Select Everyone from the list of options after clicking the down arrow and then click Add.
Step 10: Once added, right next to it, you can see Permission Level as Read. Click on it and select Read/Write to transfer the files. Lastly, click on Share.
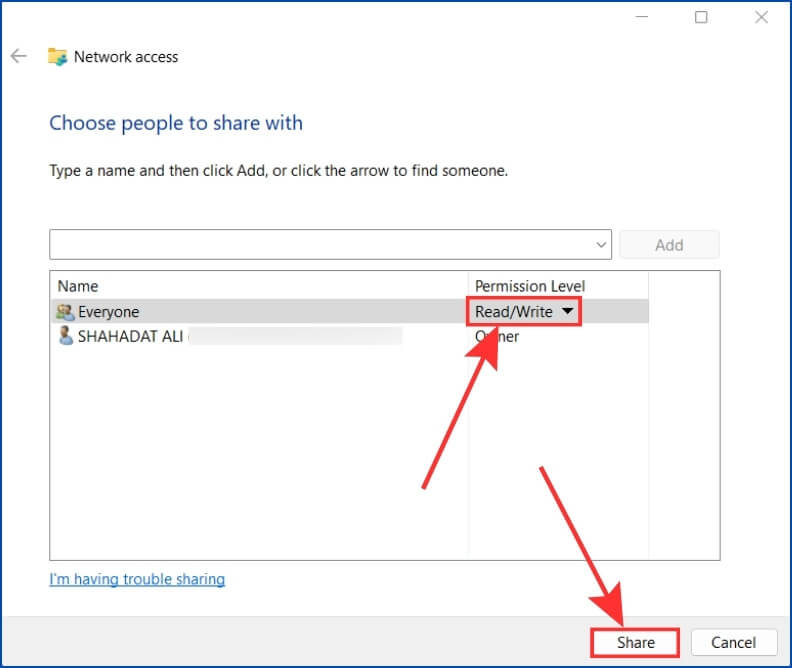
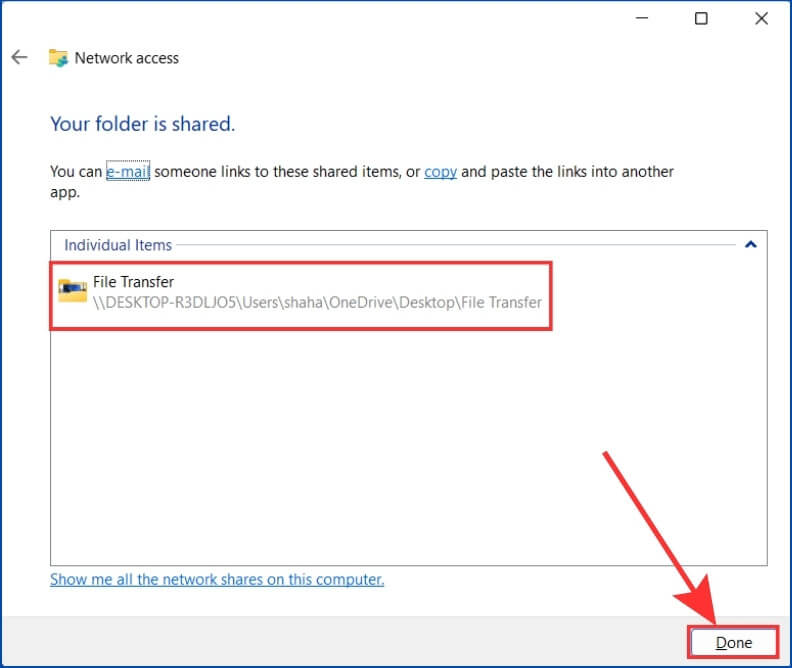
Step 11: After processing, your folder will become a sharing folder, and then click on Done.
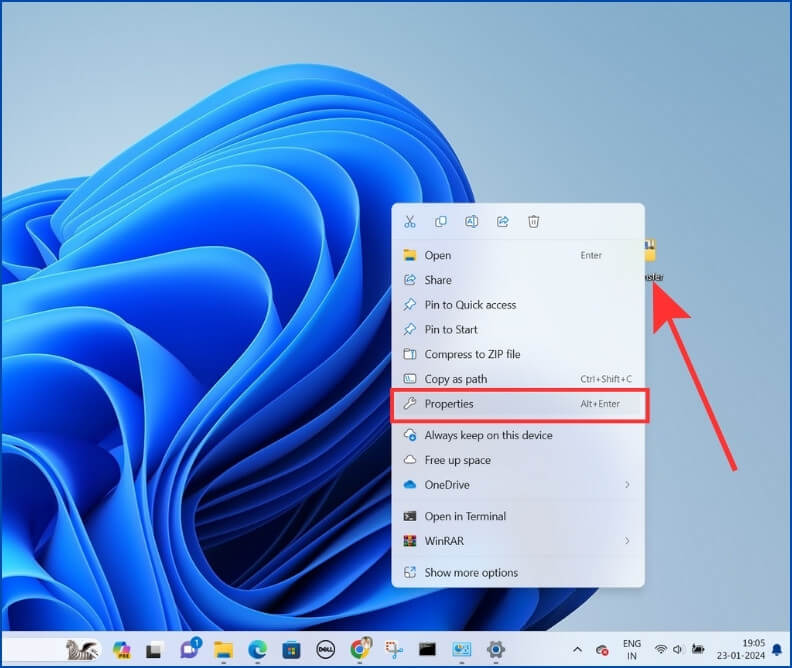
Step 12: Right-click on the sharing folder and select the Properties option.
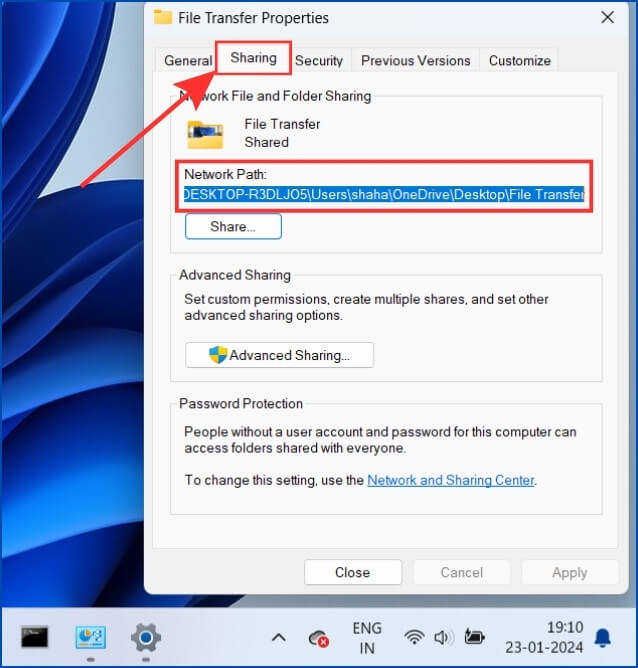
Step 13: A new window will open; you must click on sharing. Here, you will get the Network Path. Note the network path, and we will transfer the file using this.
Step 14: Go to the destination laptop and check whether both laptops are connected to the same network; if not, connect to the same network. Press Windows + R on your keyboard. A Run command window will open. Enter the same network path into the box you noted earlier and click OK.
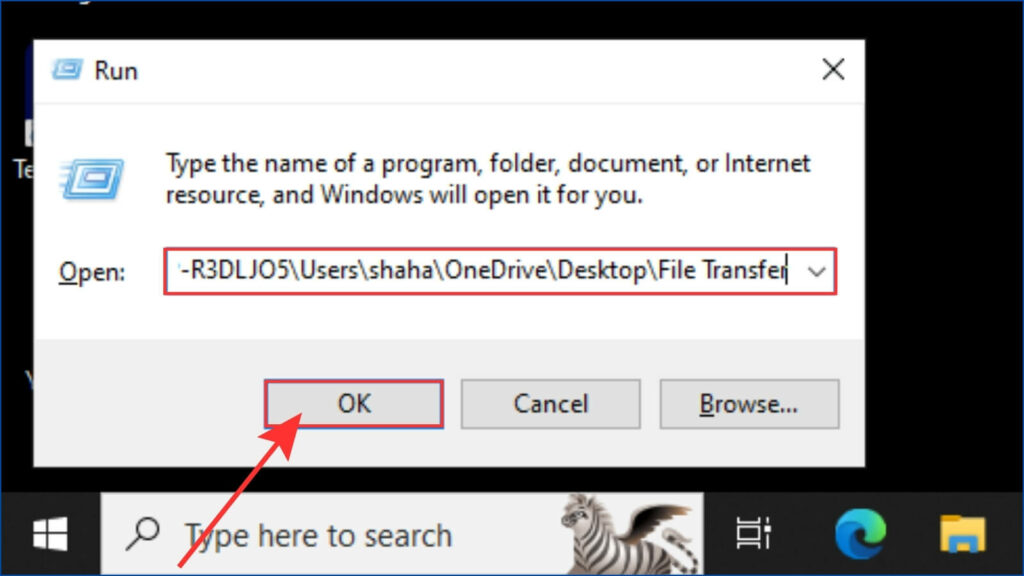
Note: If you do it for the first time, you might need to enter your wifi password for security reasons.
Step 15: All the files on the sharing folder you created on the source laptop will be visible here. Select all the files, then right-click on them and click on Copy.
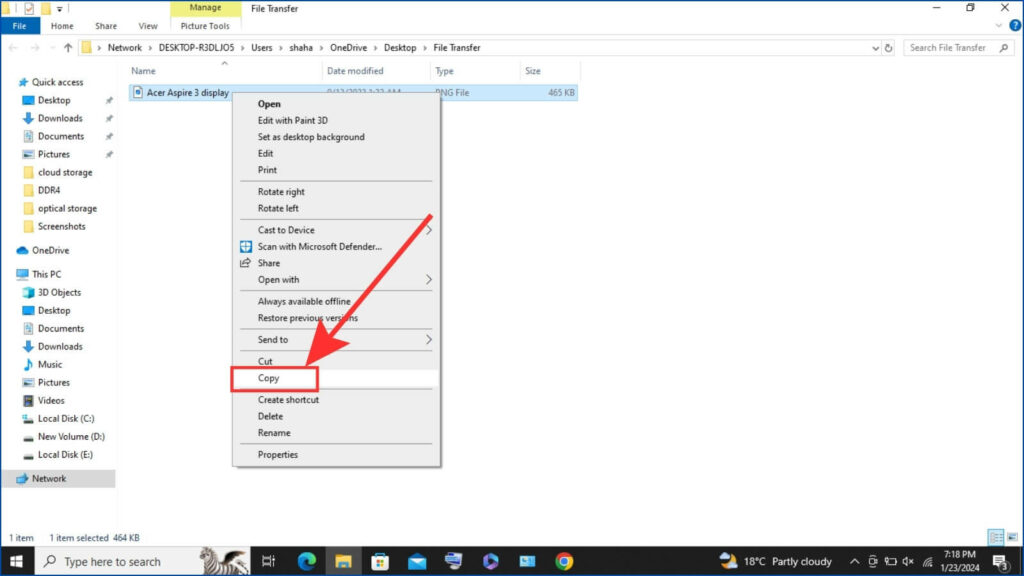
Step 16: Now, paste the files to your destination folder.
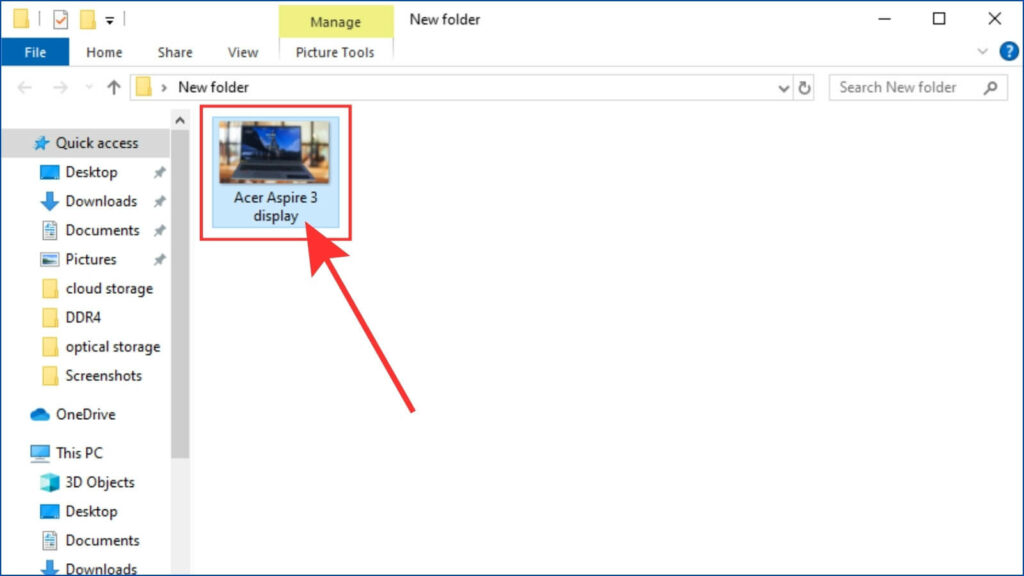
This way, you can transfer files from one laptop to another without using any data cable.
Method 4: Nearby Sharing (Windows 10 or later)
Step 1: Turn on Bluetooth and Wi-Fi on both the laptops. You will get this option after clicking on the Wi-Fi icon at the bottom right corner of your screen.
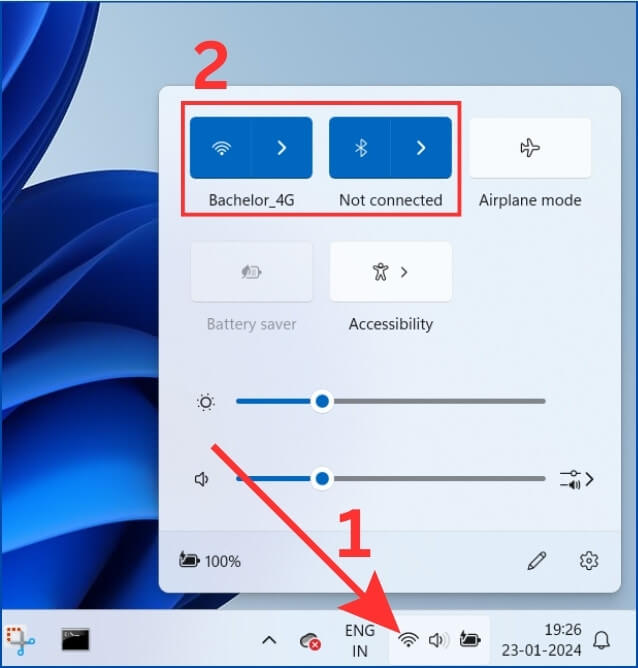
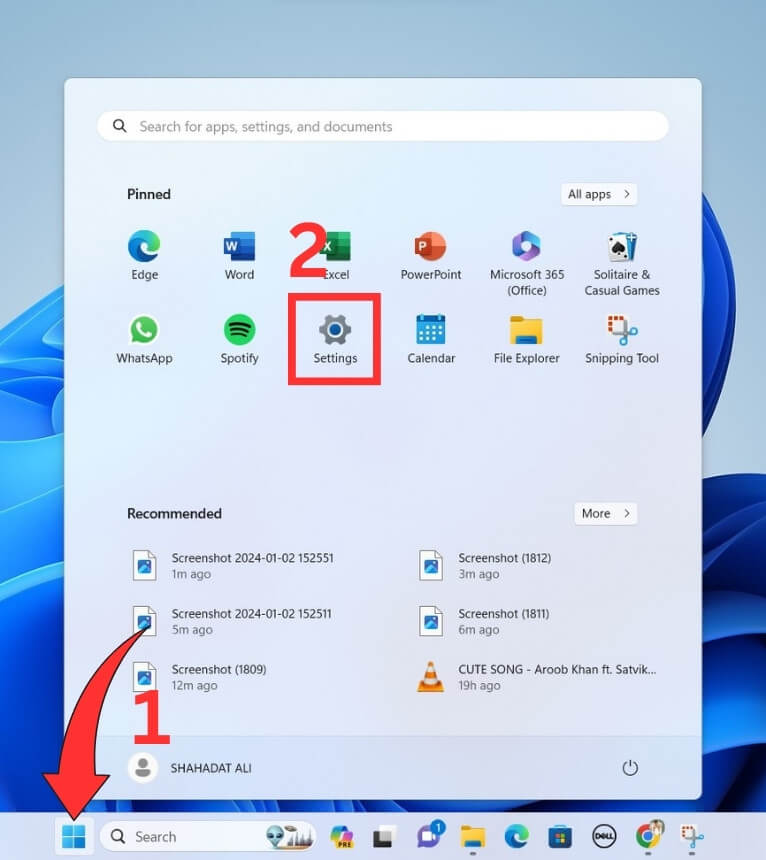
Step 2: Next, to enable the Nearby Sharing option, click on the Start button and then click on Settings.
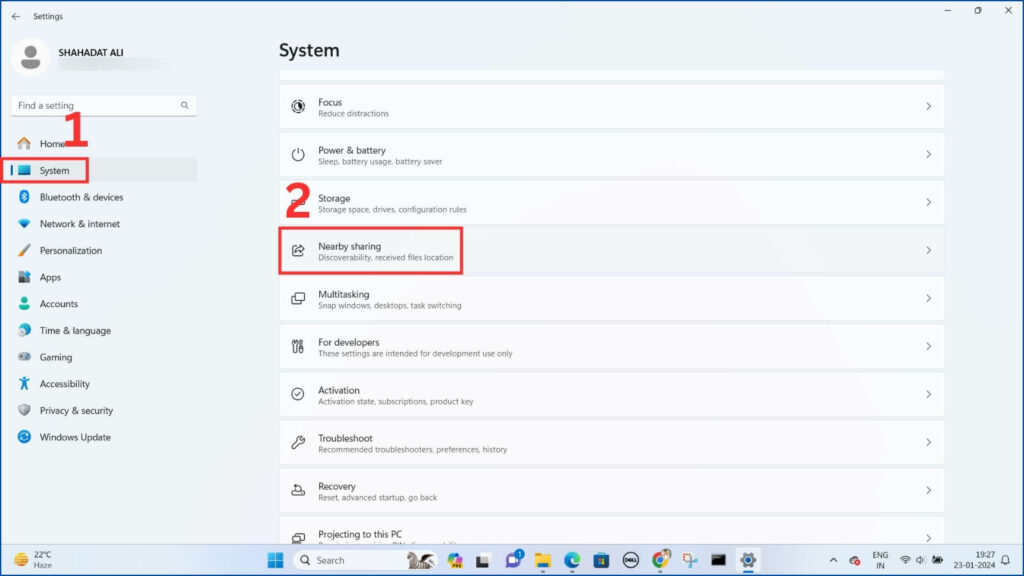
Step 3: Click on System from the left sidebar and then scroll down and select the Nearby Sharing option.
Step 4: After that, click on the Everyone Nearby option. Now, your laptop is visible to nearby devices.
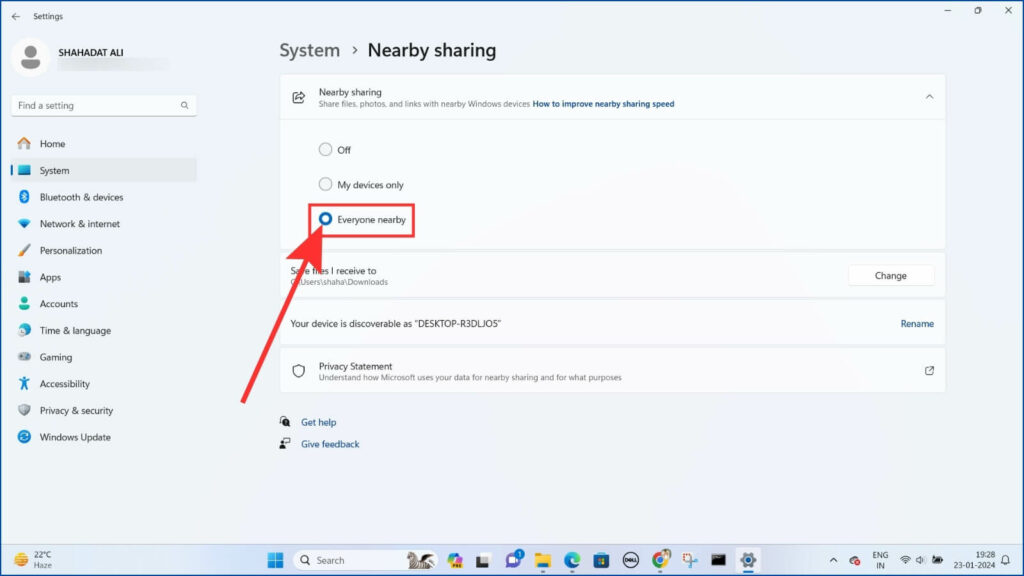
Note: You must enable these settings on both laptops for file transferring.
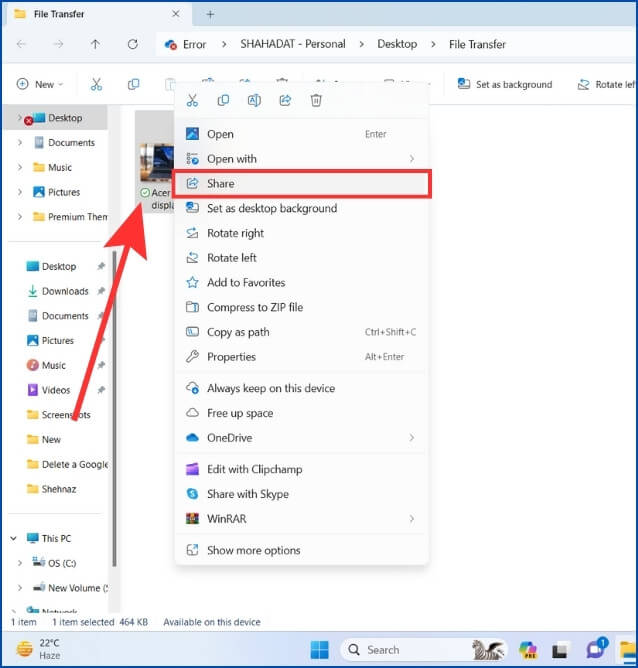
Step 5: Select the file you want to send to the destination laptop on your source laptop. Right-click on it and then click the share icon from the context menu.
Step 6: You will see all the nearby devices on your next screen. Click on the target laptop.
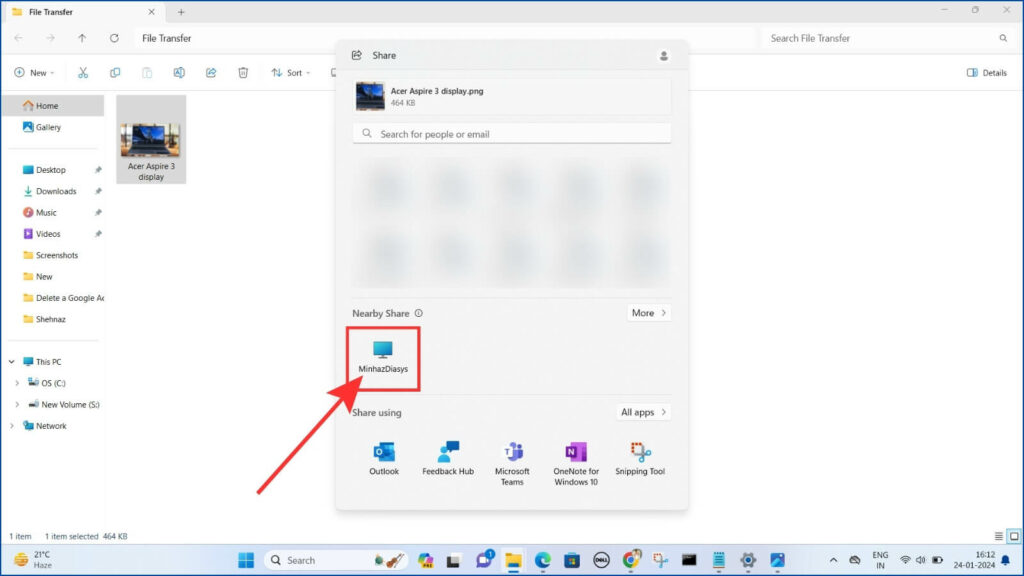
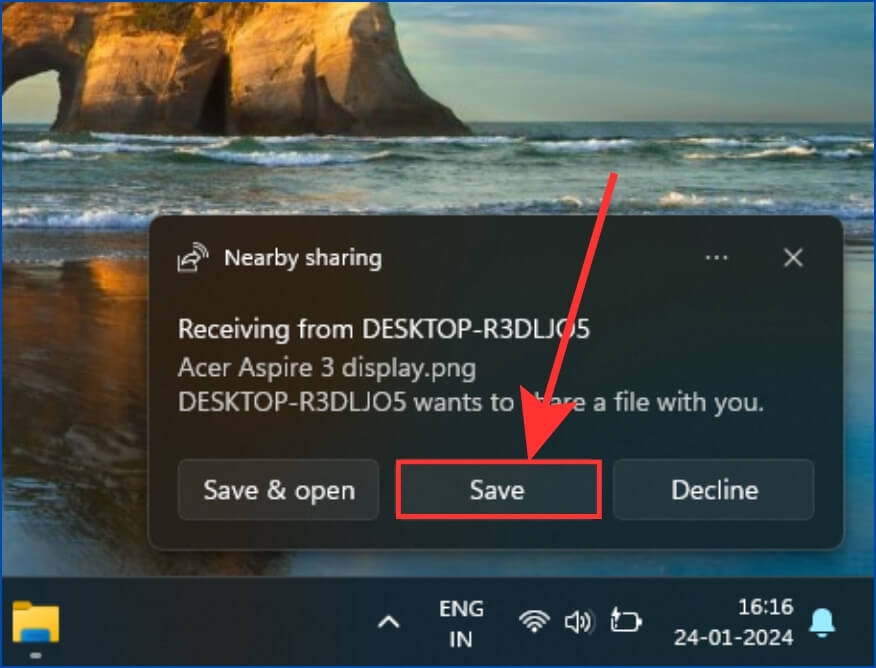
Step 7: Go to the destination laptop. You will see a pop-up notification to accept file requests from your source laptop at the bottom right. Click the Save button to save the file in the download folder.
Method 5: Using Data Transfer Cables
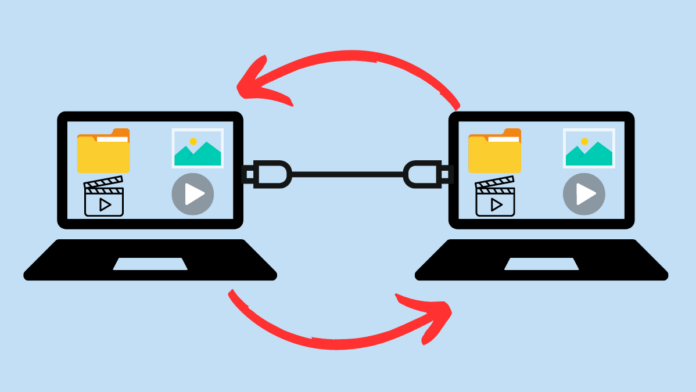
Data Transfer Cables offer a convenient solution for transferring files between two computers in close range. Similar to standard HDMI and USB cables, a specific USB-to-USB cable is designed for connecting two computers. You can use a USB-to-USB transfer cable or a USB-to-USB adapter to establish the connection based on your requirements and compatibility.
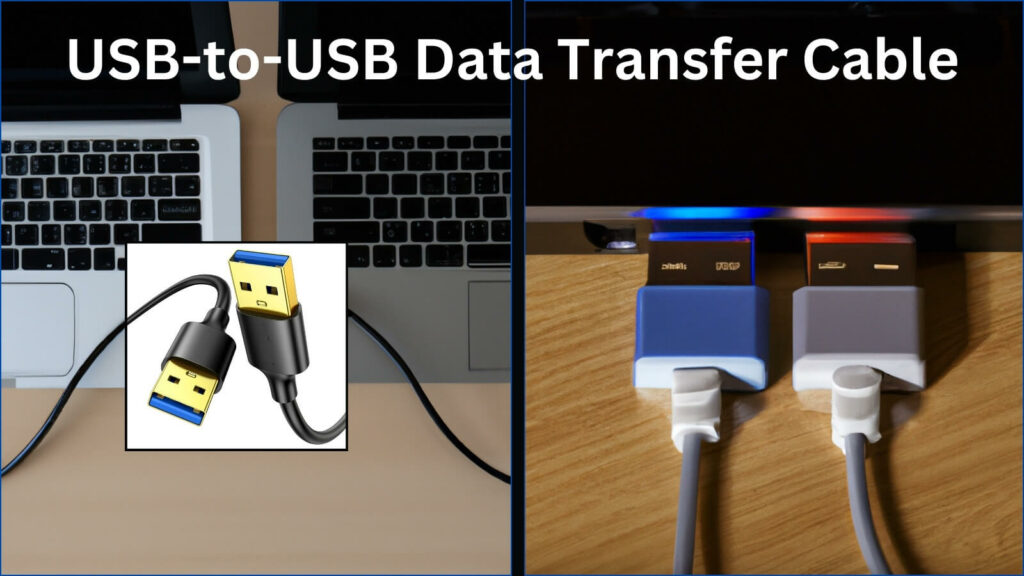
Additionally, USB adapter software must be installed on both your computers before you go for file transfer. This method does not require external devices such as external hard drives, USB flash drives, etc, and can transfer files quickly.
To transfer files via data cable, both your laptops must be close to each other and both laptops must be powered on. Follow the steps below to transfer files –
Step 1: Connect your computers with a USB-to-USB data transfer cable.
Step 2: The next step is to install transferable software on both computers. Generally, a disk is provided with your transfer cable which contains transfer software. Install that transfer software on both laptops. If you are not given a disk, install the “driver” software from the official website. Go to the official website of the Data cable and download the driver software on both your computers.
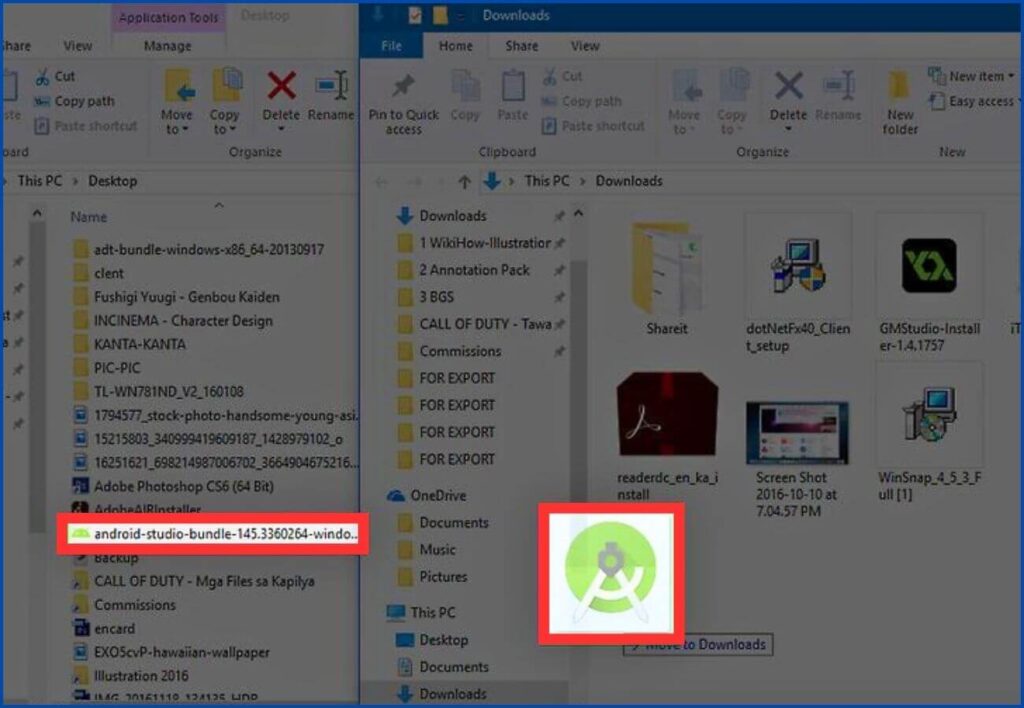
Step 3: After installation, open the software on both computers. You will get a side-by-side view of both computers.
Step 4: Now, you can access both computers for file transfer. Copy any file you want to transfer from your source laptop and paste it into any folder to your destination computer.
Also Read:
Final Words
Transferring files between laptops is a simple process that can be done in various ways. You can share any type of file using external storage devices, wired connections, and other methods, including photos, videos, and documents. By following our step-by-step instructions, you can transfer your files quickly.
You can try a few things if you’re having trouble transferring files. First, ensure you’re not applying any restrictions or settings that might prevent the transfer. If you’re still having trouble, you can try taking your laptop to a service station to have your external storage device replaced or repaired.
Reference
![How to Factory Reset Acer Laptops? [Step-by-Step Guide]](https://pcvenus.com/wp-content/uploads/2024/04/How-to-Factory-Reset-Acer-Laptops-324x160.webp)

